warning Important: Third-Party Services Disclaimer
- Firebase Realtime Database: Required for real-time chat functionality (free tier available)
- SMTP Service: Gmail or other SMTP provider required for email OTP verification and notifications
- Cloud Hosting & Storage: AWS, Google Cloud, or similar for image storage (free tier available)
These services are not included with the purchase and must be configured by the buyer.
inventory_2 What Comes With CarFindo
web
Unified Application
Admin Panel + Customer Website
Built with Laravel 12.x + React 19.2.8 (Inertia.js)
- Complete Admin Management Dashboard
- Customer-facing website with all features
- Single codebase serving both admin and website
- Shared database and backend logic
phone_android
Customer Application
React Native Mobile App
Built with React Native 0.86.2
- Complete mobile experience for customers
- Browse, search, and buy cars on the go
- Sell cars directly from mobile
- Real-time chat with sellers
info Note:The Unified Application contains both the Admin Panel and Customer Website in one codebase. The Customer Application is a separate React Native mobile app.
Introduction
Welcome to CarFindo, a modern used-car marketplace platform designed for automotive Sellers, car resellers, and mobility businesses. It brings the entire car-buying and selling journey into one platform — from discovery and inspection to negotiation, purchase, and post-sale reputation.
apps Two Applications, One Platform
web
Unified Application
Laravel + React (Admin Panel + Customer Website)
phone_android
Customer Application
React Native (Mobile App - Separate)
Core Features
- Auth & Onboarding — Email + phone registration with OTP verification, login, and forgot/reset password
- Buy / Browse — Categories, subcategories, filters/search with live suggestions, trending and recent searches, listing details with inspection report and vehicle history
- Sell / Create Listing — Multi-step wizard with auto-save draft, VIN/RC validation, normalization, and masking
- Buyer–Seller Chat — DB-persisted conversations mirrored to Firebase Realtime DB with live subscriptions, emoji picker, and photo attach
- Post-Sale Rating — Seller selects buyer, buyer confirms/denies purchase, seller rates buyer
- Seller Verification — Business/GST/license submission with admin review and verifiedSeller badges
- In-App Notifications — Notification feed, unread counts, and mark-all-read functionality
- Newsletter — Subscribe/unsubscribe with queued campaign delivery
- Complete Admin Management Dashboard — Manage customers, listings, brands, categories, inspections, vehicle history, blog, FAQ, legal pages, and more
- Content & SEO — About, Contact, FAQ, Privacy, Terms, Blog, and MapSearch
check_circle
White-Label Solution
This platform is distributed as a white-label solution, allowing complete customization of branding, configurations, and backend services to match your business requirements and scale your used-car operations efficiently.
Getting Started
extension Third-Party Plugins
- Firebase Realtime Database — Real-time chat and messaging
- SMTP (Gmail) — Email OTP verification and notifications
- RouteMappy — Location Search & Place Autocomplete
lightbulb
Prerequisite Knowledge
Basic understanding of React-based website development and backend setup (Laravel / API) is recommended before installation and customization.
hub Third Party Services
hub Third Party Services
CarFindo integrates with third-party services to provide real-time chat functionality, email communications, cloud storage, and location-based services. These services are not included with the purchase package and must be configured using your own accounts and credentials where applicable.
| Service | Purpose | Required |
|---|---|---|
| Firebase Realtime Database | Real-time Chat & Messaging Between Buyers & Sellers | Yes |
| SMTP Mail Service (Gmail) | Email OTP Verification, Password Reset & Notifications | Yes |
| RouteMappy | Location Search & Place Autocomplete | Yes |
database Firebase Realtime Database
CarFindo utilizes Firebase Realtime Database for real-time chat functionality between buyers and sellers. Firebase enables instant message delivery, read receipts, and live conversation updates without requiring page refresh.
To set up Firebase Realtime Database for CarFindo:
- Website: https://firebase.google.com/
- Free Tier: Includes 1GB storage and 10GB/month download with the Spark plan
- Setup Required: Create a Firebase project, enable Realtime Database, and configure security rules
email SMTP Mail Service (Gmail)
CarFindo uses SMTP mail services for email OTP verification, password reset emails, and system notifications. Gmail's SMTP service is recommended for its reliability and ease of configuration.
To configure SMTP for CarFindo:
- Gmail SMTP Settings: smtp.gmail.com, Port 587 (TLS) or 465 (SSL)
- Alternative Providers: SendGrid, Mailgun, Amazon SES, or any SMTP-compatible service
- Security: Use App Passwords for Gmail if 2FA is enabled
map RouteMappy
CarFindo utilizes RouteMappy for location search and place autocomplete functionality. RouteMappy provides location-based services for car listings, search, and place discovery.
To set up RouteMappy for CarFindo:
- Website: https://routemappy.com/
- Email: sales@menpanitech.com
- Setup Required: Create a RouteMappy account, obtain API key, and configure in Admin Panel → Map Settings
warning Important Notice
Firebase project setup, SMTP credentials, cloud storage accounts, RouteMappy API key, hosting services, domain registration, and SSL certificates are not included with the purchase package. Buyers are responsible for creating and maintaining their own third-party service accounts and subscriptions where applicable.
dns Environmental Setup
verified Version Requirements
Ensure the following software versions are installed before proceeding:
Unified Application (Admin + Website)
- PHP: 8.3 or later
- Laravel: 12.x
- MySQL: 8.0 or later
- Composer: 2.x or later
- Apache/Nginx: Latest stable version
- Node.js: 20.x or later
- npm: 10.x or later
- React: 19.2.8
- Vite: 8.x
- Tailwind CSS: 4.x
Customer App (React Native - Separate)
- Node.js: 20.x or later
- npm: 10.x or later
- React Native: 0.86.2
- React: 19.2.3
- Android Studio: 2024.1+ (for Android builds)
- Xcode: 16.x+ (for iOS builds - macOS only)
warning
Important:
Using older versions may cause compatibility issues. Always use the
recommended versions.
System Requirements
Operating System:
- Windows 10/11 (64-bit) — Pro or Enterprise recommended
- macOS Monterey (12.0) or later — Sonoma 14.5+ recommended
- Linux (Ubuntu 22.04 LTS, 24.04 LTS, or equivalent)
Minimum Hardware:
- Processor: Intel i5 10th Gen (or AMD Ryzen 5) or better
- RAM: 4 GB (minimum), 8 GB recommended for Android Studio
- Storage: 10 GB free disk space for dependencies, SDKs, and build files
- Internet: Broadband connection required for downloading dependencies
Software Requirements
| Tool/Software | Minimum Version | Recommended Version | Purpose |
|---|---|---|---|
| PHP | 8.3 | 8.3+ | Laravel backend |
| Laravel | 12.68.0 | 12.x | PHP Framework |
| React | 19.2.8 | 19.x | UI Library (Customer Website in Unified App) |
| React Native | 0.86.2 | 0.86.x | Mobile App Framework (Customer App - Separate) |
| Node.js | 18+ | 20+ | React & npm scripts |
| MySQL | 8.0 | 8.0+ | Database |
| Composer | 2.x | 2.x | PHP dependency manager |
| npm | 9+ | 10+ | Package management |
| Android Studio | 2024.1 | 2024.1+ | Android APK/AAB build (Customer App) |
| Java JDK | 17 | 17+ | Android compilation |
| Xcode (macOS only) | 16.0 | 16.x+ | iOS IPA build (Customer App) |
| Git | 2.30 | Latest | Version control (optional) |
| VS Code | 1.80 | Latest | Code editor (recommended) |
| Web Browser | Chrome 120, Firefox 120, Edge 120 | Latest version | Testing & debugging |
Laravel Dependencies (Unified Application)
{
    "require": {
        "php": "^8.3",
        "bezhansalleh/filament-shield": "^4.3",
        "filament/filament": "^5.0",
        "inertiajs/inertia-laravel": "^3.1",
        "laravel/framework": "^12.68.0",
        "laravel/sanctum": "^4.3",
        "laravel/tinker": "^3.0",
        "spatie/laravel-permission": "^8.3",
        "wireui/heroicons": "^2.10"
    },
    "require-dev": {
        "fakerphp/faker": "^1.23",
        "laravel/pail": "^1.2.5",
        "laravel/pao": "^1.0.6",
        "laravel/pint": "^1.27",
        "mockery/mockery": "^1.6",
        "nunomaduro/collision": "^8.6",
        "phpunit/phpunit": "^12.5.12"
    }
}
React Dependencies (Customer Website - Unified Application)
{
    "dependencies": {
        "@dnd-kit/core": "^6.3.1",
        "@dnd-kit/sortable": "^10.0.0",
        "@dnd-kit/utilities": "^3.2.2",
        "@inertiajs/react": "^3.6.1",
        "@vitejs/plugin-react": "^6.0.4",
        "lucide-react": "^1.26.0",
        "react": "^19.2.8",
        "react-dom": "^19.2.8",
        "react-easy-crop": "^6.2.3",
        "react-phone-number-input": "^3.4.17",
        "sonner": "^2.0.7",
        "swiper": "^14.0.6"
    }
}
Customer App React Native Dependencies (Separate Application)
{
    "dependencies": {
        "@react-native-async-storage/async-storage": "^3.1.1",
        "@react-native-community/geolocation": "^3.4.0",
        "@react-native/new-app-screen": "0.86.2",
        "@react-navigation/drawer": "^7.13.8",
        "@react-navigation/native": "^7.3.16",
        "@react-navigation/native-stack": "^7.18.8",
        "lucide-react-native": "^1.31.0",
        "react": "19.2.3",
        "react-native": "0.86.2",
        "react-native-gesture-handler": "^3.1.0",
        "react-native-linear-gradient": "^2.8.3",
        "react-native-reanimated": "^4.5.3",
        "react-native-safe-area-context": "^5.5.2",
        "react-native-screens": "^4.27.0",
        "react-native-svg": "^15.15.5"
    },
    "devDependencies": {
        "@babel/core": "^7.25.2",
        "@babel/preset-env": "^7.25.3",
        "@babel/runtime": "^7.25.0",
        "@react-native-community/cli": "20.1.0",
        "@react-native-community/cli-platform-android": "20.1.0",
        "@react-native-community/cli-platform-ios": "20.1.0",
        "@react-native/babel-preset": "0.86.2",
        "@react-native/eslint-config": "0.86.2",
        "@react-native/jest-preset": "0.86.2",
        "@react-native/metro-config": "0.86.2",
        "@react-native/typescript-config": "0.86.2",
        "@types/jest": "^29.5.13",
        "@types/react": "^19.2.0",
        "@types/react-test-renderer": "^19.1.0",
        "eslint": "^8.19.0",
        "jest": "^29.6.3",
        "prettier": "2.8.8",
        "react-test-renderer": "19.2.3",
        "typescript": "^5.8.3"
    }
}
XAMPP / Local Server Installation
- Download XAMPP from apachefriends.org (version 8.2+ recommended)
- Install XAMPP on your system with default settings
- After installation, start Apache and MySQL services from the XAMPP control panel
- Verify installation by visiting
http://localhostin your browser
info
Alternative Local Servers:
- Laragon (Windows) - Faster and lighter alternative
- MAMP (macOS/Windows) - Easy to use
- Docker (All platforms) - Containerized environment
- Valet (macOS) - Laravel native development
Composer Installation
- Download Composer from getcomposer.org
- Install Composer on your system
info
Composer Installation Guide:
Getting Started Requirements
lightbulb
Note: It's necessary to have a basic knowledge in both server side, website, and mobile app development.
- Basic knowledge of React-based website development
- Basic knowledge of React Native mobile application development
- Basic knowledge of Laravel backend setup and API integration
- Understanding of database management (MySQL)
terminal
Verify Your Installation
Run these commands in your terminal/command prompt to confirm all required tools are properly installed:
# Check Node.js version
node --version   # Should show v20.x or higher

# Check npm version
npm --version    # Should show v10.x or higher

# Check PHP version
php --version    # Should show 8.3 or higher

# Check Composer version
composer --version  # Should show 2.x or higher

# Check MySQL version
mysql --version  # Should show 8.0 or higher

# Check React Native version (Customer App)
npx react-native --version  # Should show 0.86.x
check_circle
Success Indicator:
If all commands show the correct versions (or higher), your environment is ready for installation.
error
Troubleshooting:
If any command returns "not found" or shows an older version, please install or update the corresponding software before proceeding.
memory Technology Stack
memory Complete Technology Stack
CarFindo is built using modern and scalable technologies to power the Unified Application (Admin Panel + Customer Website) and the Customer Application (React Native - Separate).
Core Technology Versions
Before installing and running the application, ensure the following technologies and tools are installed with the recommended versions.
| Tool/Software | Minimum Version | Recommended Version |
|---|---|---|
| PHP | 8.3 | 8.3+ |
| Laravel | 12.68.0 | 12.x |
| Filament | 5.0 | 5.x |
| React (Customer Website) | 19.2.8 | 19.x |
| Inertia.js | 3.6.1 | 3.x |
| React Native (Customer App) | 0.86.2 | 0.86.x |
| Node.js | 18+ | 20+ |
| MySQL | 8.0 | 8.0+ |
| Composer | 2.x | 2.x |
| npm | 9+ | 10+ |
| Vite | 8.0 | 8.x |
| Tailwind CSS | 4.0 | 4.x |
| Android Studio | 2024.1 | 2024.1+ |
| Java JDK | 17 | 17+ |
| Xcode | 16.0 | 16.x+ |
| Category | Technology | Version | Purpose |
|---|---|---|---|
| Unified Application (Admin Panel + Customer Website) | |||
| Backend Language | PHP | 8.3+ | Server-Side Programming |
| Backend Framework | Laravel | 12.x | PHP Framework (Serves both Admin & Website) |
| Admin Panel | Filament | 5.0 | Admin Dashboard (within Laravel app) |
| Admin Security | Filament Shield | 4.3 | Admin Panel Security & Permissions |
| Role & Permission | Spatie Laravel Permission | 8.3 | User Roles & Permissions Management |
| Database | MySQL / MariaDB | 8.0+ / 10.6+ | Relational Database |
| Dependency Manager | Composer | 2.x | PHP Package Management |
| Frontend Framework | React | 19.2.8 | UI Library (Customer Website) |
| Routing | Inertia.js | 3.6.1 | Server-side routing (Laravel + React) |
| Build Tool | Vite | 8.x | Build tool & development server |
| CSS Framework | Tailwind CSS | 4.x | Utility-first CSS framework |
| Customer Application (React Native - Separate App) | |||
| Framework | React Native | 0.86.2 | Cross-platform mobile framework |
| UI Library | React | 19.2.3 | Application User Interface |
| Navigation | React Navigation | 7.x | Screen navigation |
| Gesture Handler | React Native Gesture Handler | 3.1.0 | Gesture-based interactions |
| Animations | React Native Reanimated | 4.5.3 | Smooth animations |
| Storage | Async Storage | 3.1.1 | Local data persistence |
| Location | Geolocation | 3.4.0 | GPS location services |
| Icons | Lucide React Native | 1.31.0 | Icon library |
| Gradients | Linear Gradient | 2.8.3 | Linear gradient effects |
| SVG | React Native SVG | 15.15.5 | SVG rendering |
| Third-Party Integrations | |||
| Real-time Chat | Firebase Realtime Database | Latest | Real-time messaging |
| Email Service | SMTP (Gmail) | Latest | Email OTP & notifications |
Hosting & Production Server Requirements
- Apache 2.4+ or Nginx 1.18+
- PHP 8.3+
- MySQL 8.0+ / MariaDB 10.6+
- SSL Certificate (HTTPS) Recommended
- Cron Job Support
- Minimum 4 GB RAM (8 GB Recommended)
- Minimum 10 GB Available Storage
Important:
Shared hosting, VPS, cloud servers, and dedicated servers are supported as long as the above
requirements are met.
info Note on Third-Party Services
This platform integrates with Firebase Realtime Database and SMTP (Gmail) which require separate accounts and may incur additional costs. See full details in Overview →
info
Important Note
Install all required SDKs, development tools, and dependencies using the recommended versions before beginning the installation process. Version mismatches may result in build or runtime issues.
Pro Tip: Use Node Version Manager (NVM) for managing Node.js versions and Android Studio SDK Manager for maintaining Android SDK compatibility.
view_module Project Dependencies
Project Dependencies Overview
CarFindo consists of two main components:
web
Unified Application
Laravel + React (Admin Panel + Customer Website)
phone_android
Customer App
React Native mobile app (Separate)
info
Unified Application: Laravel 12.x with Filament 5.0 (Admin) + React 19.2.8 with Inertia.js 3.6.1 (Customer Website) — Same codebase
Customer App: React Native 0.86.2 with React 19.2.3, React Navigation 7.x — Separate application
web Unified Application Dependencies (Laravel + React)
The unified application includes both the Laravel backend (Admin Panel) and React frontend (Customer Website) in the same codebase:
Laravel Dependencies
The Laravel backend uses the following PHP dependencies:
| Package | Version | Purpose |
|---|---|---|
| Production Dependencies | ||
| php | ^8.3 | Server-side scripting language |
| laravel/framework | ^12.68.0 | Laravel PHP Framework |
| filament/filament | ^5.0 | Admin panel framework |
| bezhansalleh/filament-shield | ^4.3 | Filament security & permissions |
| spatie/laravel-permission | ^8.3 | User roles & permissions |
| inertiajs/inertia-laravel | ^3.1 | Inertia.js server-side adapter |
| laravel/sanctum | ^4.3 | API authentication |
| laravel/tinker | ^3.0 | Artisan REPL & interactive shell |
| wireui/heroicons | ^2.10 | Heroicons for Blade/Filament |
| Development Dependencies | ||
| fakerphp/faker | ^1.23 | Fake data generation |
| laravel/pail | ^1.2.5 | Log viewer |
| laravel/pao | ^1.0.6 | Package auto-discovery optimizer |
| laravel/pint | ^1.27 | PHP code style fixer |
| mockery/mockery | ^1.6 | Mocking framework for tests |
| nunomaduro/collision | ^8.6 | Error handling for console |
| phpunit/phpunit | ^12.5.12 | PHP testing framework |
React Dependencies
The React frontend (Customer Website) uses the following dependencies:
| Package | Version | Purpose |
|---|---|---|
| react | ^19.2.8 | UI Library |
| react-dom | ^19.2.8 | React DOM rendering |
| @inertiajs/react | ^3.6.1 | Inertia.js integration for server-side routing |
| @vitejs/plugin-react | ^6.0.4 | Vite plugin for React |
| @dnd-kit/core | ^6.3.1 | Drag & drop core functionality |
| @dnd-kit/sortable | ^10.0.0 | Sortable drag & drop lists |
| @dnd-kit/utilities | ^3.2.2 | Utilities for drag & drop |
| lucide-react | ^1.26.0 | Icon library |
| react-easy-crop | ^6.2.3 | Image cropping component |
| react-phone-number-input | ^3.4.17 | Phone number input with country codes |
| sonner | ^2.0.7 | Toast notifications |
| swiper | ^14.0.6 | Touch slider/carousel component |
phone_android Customer App Dependencies (React Native - Separate)
The customer app is a separate React Native application with its own dependencies:
| Package | Version | Purpose |
|---|---|---|
| Core Libraries | ||
| react | 19.2.3 | UI Library |
| react-native | 0.86.2 | Cross-platform mobile framework |
| react-native-gesture-handler | ^3.1.0 | Gesture-based interactions |
| react-native-reanimated | ^4.5.3 | Smooth animations |
| react-native-safe-area-context | ^5.5.2 | Safe area handling |
| react-native-screens | ^4.27.0 | Native screen optimization |
| react-native-svg | ^15.15.5 | SVG rendering |
| react-native-linear-gradient | ^2.8.3 | Linear gradient effects |
| lucide-react-native | ^1.31.0 | Icon library |
| Navigation | ||
| @react-navigation/native | ^7.3.16 | Core navigation library |
| @react-navigation/native-stack | ^7.18.8 | Stack navigation |
| @react-navigation/drawer | ^7.13.8 | Drawer/side menu navigation |
| Storage & Location | ||
| @react-native-async-storage/async-storage | ^3.1.1 | Local data persistence |
| @react-native-community/geolocation | ^3.4.0 | GPS location services |
Dependency Summary
web
Unified Application:
- PHP Version: 8.3+
- Laravel: 12.68.0
- Filament: 5.0 (Admin Panel)
- React: 19.2.8 (Customer Website)
- Inertia.js: 3.6.1
- Total Dependencies: 12 frontend packages + Laravel dependencies
- UI Features: Image Cropping, Phone Input, Toast, Swiper, Drag & Drop
phone_android
Customer App (Separate):
- Total Dependencies: 15 packages
- React Native: 0.86.2
- React Version: 19.2.3
- Navigation: React Navigation 7.x
- Storage: Async Storage
check_circle
Shared Libraries
web
Unified Application
phone_android
Customer App (Separate)
language Customer Website Guide
How Customers Use the Website
1
Registration & Login
- Register (new user): Go to /register/email → Enter email → Click "Send verification code" → Check inbox and enter OTP → Fill registration form (name, phone, email, password) → Account created and auto-logged in
- Login (returning user): Go to /login → Enter email + password → Click Login → Redirected to home/dashboard
- Logout: Click Logout in header to end session
- Forgot Password: On login page click "Forgot password" → Enter email → Receive OTP → Enter OTP → Set new password → Login with it
2
Browse Cars
- Browse Listings: Click "Buy Car" / "Browse Cars" in header → /listings → Browse car cards (photo, name, price, key specs)
- Listing Detail: Click a car card → /listings/{id} → Photo gallery + basic specs → Car Attributes (body type, fuel, transmission, etc.) → 200-Point Inspection Report → Vehicle History → Price, location, seller contact
- Wishlist: Click Heart icon on any card to save to Wishlist
3
Search & Filter
- Search: Type in Search bar (header) → Live suggestions appear (brands, models, listings, categories) → Recent searches / trending searches shown before typing
- Search Results: Press Enter → /search?q=... results page
- Filters: Use filters: price range, brand, model, fuel, year, km, body type, transmission → Sort / page through results
- Shortlist: Click "Shortlist" on results to save cars
4
Wishlist
- Add to Wishlist: Click heart icon on any car card or detail page
- View Wishlist: Open Wishlist from header (heart icon) → /wishlist → See all saved cars → Click to view, or remove from list
5
Contact Seller / Chat
- Start Chat: On listing detail page, click "Contact Seller" or "Start Chat" → Opens /messages/{conversation}
- Chat Features: Type message → Press Send → Delivered instantly (Firebase real-time) → Emoji picker, attach photo, read receipts
- Unread Count: Header shows unread chat count → Click to open conversations list /messages
6
Sell a Car (Create Listing)
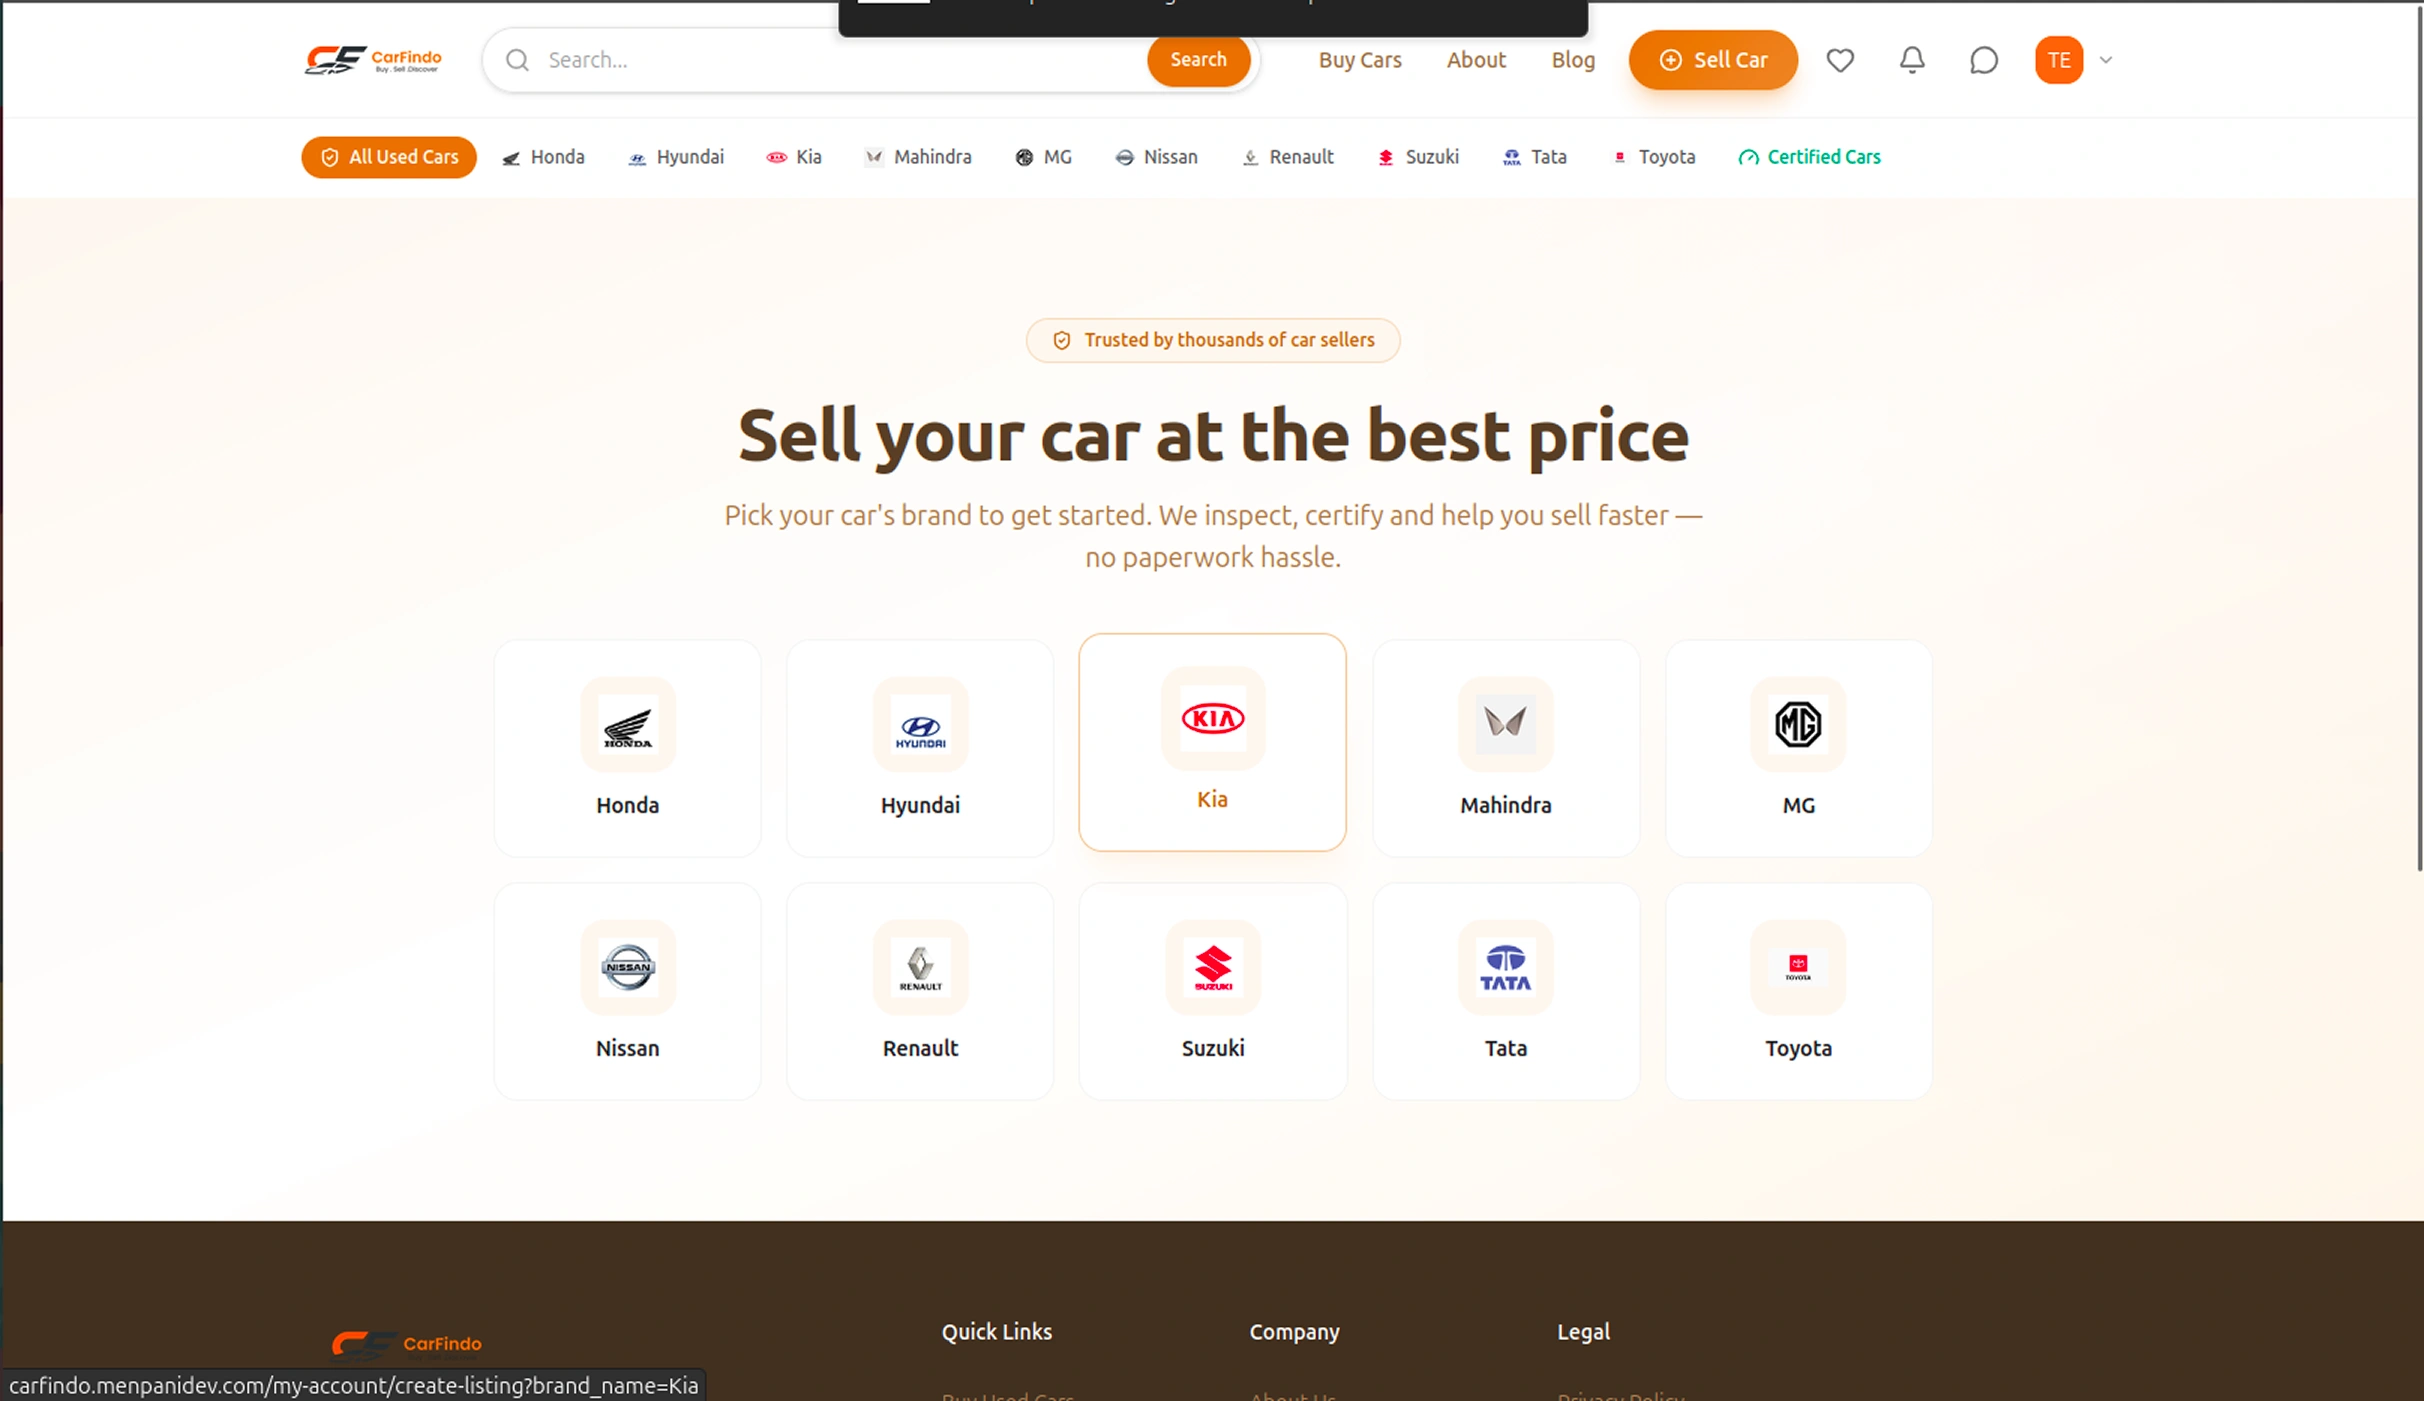
- Start Selling: Click "Sell Car" in header → /sell-car → Choose car's brand from the grid → Goes to /my-account/create-listing?brand_name=...
- Add Listing Form: Basic: title, description, condition → Brand + Model (pre-selected from brand you clicked) → Car Specific Details (custom fields) → Car Attributes (Body Type sets subcategory correctly) → Price (₹, negotiable toggle) → Location (searchable location picker) → Contact Details (name, phone, email) → Images (upload car photos)
- Auto-Save: Work auto-saves as a draft along the way
- Publish: Submit → Listing goes live → Appears in Browse/Search
- Manage Listings: From "My Account" → Listings: edit, pause/resume, clone, relist, mark sold, delete
7
My Account
- Access: Open "My Account" from header (profile icon) → /my-account
- Dashboard: Overview, stats, quick links
- Edit Profile: Name, phone, email, photo, bio
- My Listings: Manage your cars (edit, pause, sold, etc.)
- Wishlist: Your saved cars
- Messages: Chat inbox with unread counts
8
After a Sale
- Mark Sold: Mark a listing "Sold" → Select the buyer
- Confirmation: Buyer confirms/denies the purchase
- Rate Buyer: Confirm → Rate the buyer (stars + review) → Rating saved to their profile
9
Notifications
- Notification Bell: Header shows a bell icon with unread count
- View Feed: Click → /notifications feed (listing activity, messages, account events)
- Actions: Click a notification to navigate / mark all read
10
Newsletter & Content
- Subscribe: Scroll to Footer → Enter email in Subscribe box → Receive newsletter emails (queued campaigns)
- Unsubscribe: Use Unsubscribe link in any email to stop
- Pages: Browse About, Contact, FAQ, Blog, Privacy, Terms pages from the footer
lightbulb
Pro Tip: Save your favorite cars to Wishlist for quick access.
Enable notifications to receive real-time updates on listing activity and messages!
phone_android Customer Application Guide
Mobile App Workflow
1
Registration & Login
- Register (new user): Open app → Enter email → Click "Send verification code" → Check inbox and enter OTP → Fill registration form (name, phone, email, password) → Account created and auto-logged in
- Login (returning user): Enter email + password → Click Login → Redirected to home/dashboard
- Logout: Click Logout from profile/settings to end session
- Forgot Password: On login page click "Forgot password" → Enter email → Receive OTP → Enter OTP → Set new password → Login with it
2
Browse Cars
- Browse Listings: Tap "Buy Car" / "Browse Cars" → Browse car cards (photo, name, price, key specs)
- Listing Detail: Tap a car card → Photo gallery + basic specs → Car Attributes (body type, fuel, transmission, etc.) → 200-Point Inspection Report → Vehicle History → Price, location, seller contact
- Wishlist: Tap Heart icon on any card to save to Wishlist
3
Search & Filter
- Search: Type in Search bar → Live suggestions appear (brands, models, listings, categories) → Recent searches / trending searches shown before typing
- Search Results: Press Enter → Search results page
- Filters: Use filters: price range, brand, model, fuel, year, km, body type, transmission → Sort / page through results
- Shortlist: Tap "Shortlist" on results to save cars
4
Wishlist
- Add to Wishlist: Tap heart icon on any car card or detail page
- View Wishlist: Open Wishlist from bottom navigation → See all saved cars → Tap to view, or remove from list
5
Contact Seller / Chat
- Start Chat: On listing detail page, tap "Contact Seller" or "Start Chat" → Opens chat screen
- Chat Features: Type message → Tap Send → Delivered instantly (Firebase real-time) → Emoji picker, attach photo, read receipts
- Unread Count: Bottom navigation shows unread chat count → Tap to open conversations list
6
Sell a Car (Create Listing)
- Start Selling: Tap "Sell Car" → Choose car's brand from the grid
- Add Listing Form: Basic: title, description, condition → Brand + Model (pre-selected from brand you clicked) → Car Specific Details (custom fields) → Car Attributes (Body Type sets subcategory correctly) → Price (₹, negotiable toggle) → Location (searchable location picker) → Contact Details (name, phone, email) → Images (upload car photos)
- Auto-Save: Work auto-saves as a draft along the way
- Publish: Submit → Listing goes live → Appears in Browse/Search
- Manage Listings: From "My Account" → Listings: edit, pause/resume, clone, relist, mark sold, delete
7
My Account
- Access: Tap profile icon from bottom navigation → /my-account
- Dashboard: Overview, stats, quick links
- Edit Profile: Name, phone, email, photo, bio
- My Listings: Manage your cars (edit, pause, sold, etc.)
- Wishlist: Your saved cars
- Messages: Chat inbox with unread counts
8
After a Sale
- Mark Sold: Mark a listing "Sold" → Select the buyer
- Confirmation: Buyer confirms/denies the purchase
- Rate Buyer: Confirm → Rate the buyer (stars + review) → Rating saved to their profile
9
Notifications
- Notification Bell: Header/Bottom nav shows a bell icon with unread count
- View Feed: Tap → Notifications feed (listing activity, messages, account events)
- Actions: Tap a notification to navigate / mark all read
lightbulb
Pro Tip: Enable push notifications to receive real-time updates
on listing activity, messages, and account events. Save your favorite cars to Wishlist for quick
access!
admin_panel_settings Admin Panel Guide
Admin Panel Overview
The CarFindo Admin Panel provides complete control over the platform. Below is the detailed menu structure and functionality.
| Menu Section | Sub-Menu Items | Fields / Functionality | |
|---|---|---|---|
| Dashboard | |||
| Dashboard | - | Landing page after login. Summary stats (customers, listings, leads, blog posts, subscribers, cities, categories) as cards/widgets. Click any stat to jump to that section. | |
| Settings | |||
| App Settings | - |
Basic App Information: App Name*, App Version*, Default Country,
Phone Code, About Us* Currency Information: Default Currency*, Currency Symbol*, Currency Short Code* Application Logo & Theme: App Logo, Favicon (32x32 or 64x64px), Theme Color (Hex), Hero Section Image |
|
| User Management | |||
| Customers | - |
Customer Information: First Name*, Last Name, Display Name,
Gender*, Date of Birth* Contact Information: Email*, Country Code, Phone Number*, Password, Profile Photo Additional Information: Address, City*, State*, Country*, Status*, Notes |
|
| Users | - | Admin staff accounts. Fields: Name, Email, Role | |
| Marketplace | |||
| Categories | - | Fields: Category Name*, Status*, Show Brand Field, Show Model Field, Category Icon* | |
| Listings | - |
Listing Information: Title*, Description (HTML), Price (INR), Price
Negotiable, Certified Pre-Owned, Condition, Tags Vehicle Details: Body Type, VIN/Chassis Number*, RC Number*, Registration Year, Variant/Trim, Fuel Efficiency (kmpl), Exterior Color, Interior Color, Insurance Expiry, Guarantee (days), Warranty Type Category & Location: Category*, Location, City Seller Contact: Contact Name, Contact Phone, Contact Email Moderation & Visibility: Status*, Auto Renew, Expires At |
|
| Cities | - | Fields: City Name*, Slug*, State, Status* | |
| Subcategories | - | Fields: Parent Category*, Subcategory Name*, Slug, Status*, Subcategory Icon* | |
| Attributes | - |
Attribute Information: Attribute Name*, Slug*, Display Label*,
Field Type*, Placeholder, Help Text Settings: Required, Filterable, Searchable, Active, Sort Order Applicable Subcategories: Subcategories* |
|
| Brands | - | Fields: Brand Name*, Slug*, Brand Icon (small square icon shown on home page brand tiles), Applicable Subcategories* | |
| Content | |||
| Blog Posts | - |
Post Content: Title*, Slug*, Short Description, Content* Status & Publishing: Status, Publish Date, Category, Featured Image, Author Image |
|
| About Pages | - |
About Us: Title*, Short Description, About Content Mission & Vision: Mission, Vision Banner Image: Banner/Story Image (800x600px recommended) Settings: Active Statistics: Value*, Label* Core Values: Icon (Lucide), Title*, Description |
|
| Communication | |||
| Contact Page | - |
Company & Contact Information: Company Name, Email, Contact Number,
WhatsApp Number, Form Submissions Email Address & Working Hours: Office Address, Working Hours, Opening Time, Closing Time Settings: Active Social Media Links: Facebook URL, Instagram URL, Twitter (X) URL, LinkedIn URL, YouTube URL |
|
| Contact Messages | - | Fields: Name, Email, Subject, Phone, Status (Read/Unread/Replied), Received | |
| Marketing | |||
| Newsletter Subscribers | - | Fields: Email, Status (Active/Unsubscribed), Subscribed At | |
| Newsletter Campaigns | - |
Fields: Subject*, Email Title*, Message*, Send To* (All Subscribers
or Selected) Workflow: Create → Draft → Send Now → Sending → Sent (queued job) |
|
| Legal | |||
| Privacy Policies | - | Fields: Title*, Status*, Description* | |
| Terms Conditions | - | Fields: Title*, Status*, Description* | |
| FAQs | - | Fields: Question*, Status*, Answer* | |
| Trust & Certification | |||
| Inspection Reports | - |
Report: Vehicle Listing*, Status (auto derives Passed/Failed/In
Progress), Inspector, Report ID, Inspected At Summary: Score (computed automatically) Categories: Exterior (6 pts), Interior (5 pts), Engine & Mechanical (3 pts), Transmission (2 pts), Suspension & Steering (2 pts), Brakes (2 pts), Tyres & Wheels (3 pts), Electrical & Electronics (2 pts), Documents & Legal (4 pts), Test Drive (2 pts) |
|
| Verification Requests | - | Fields:Seller, Document, Status (Pending/Approved/Rejected), Business, Reviewed, Submitted | |
| Inspection Points | - | Fields: Point Name*, Category*, Description, Sort Order, Required for Pass (all required points must be checked for the report to pass), Active (inactive points excluded from new inspection forms) | |
| Vehicle History Reports | - |
Report: Vehicle Listing*, VIN (optional — falls back to listing
VIN), Status (Verified by team), Checked At Summary: Summary, Accidents, Service Records, Ownership History |
|
| Filament Shield | |||
| Roles | - |
Fields: Name*, Guard Name, Select All (Enables/Disables all
Permissions for this role) Default Roles: Super Admin, Admin, Moderator, Content Manager |
|
admin_panel_settings
Access URL:
http://yourdomain.com/admin
android Android Configuration
settings Android Configuration
The Android build configuration defines the SDK versions, build tools, and other essential parameters required for compiling the application.
Build Configuration
File Location: android/build.gradle
| Configuration | Value |
|---|---|
| Build Tools Version | 36.0.0 |
| Minimum SDK Version | 24 |
| Compile SDK Version | 36 |
| Target SDK Version | 36 |
| Android NDK Version | 27.1.12297006 |
| Kotlin Version | 2.1.20 |
Example Configuration
code
Build Configuration (build.gradle)
buildToolsVersion = "36.0.0"

        minSdkVersion = 24

        compileSdkVersion = 36

        targetSdkVersion = 36

        ndkVersion = "27.1.12297006"

        kotlinVersion = "2.1.20"
Gradle Properties
Gradle properties control the build performance, memory allocation, and Android compatibility settings.
File Location: android/gradle.properties
settings
Gradle Properties
org.gradle.jvmargs=-Xmx8g -XX:MaxMetaspaceSize=3g -Dfile.encoding=UTF-8

        org.gradle.daemon=true

        org.gradle.parallel=true

        org.gradle.caching=true

        android.useAndroidX=true

        reactNativeArchitectures=arm64-v8a

        newArchEnabled=true

        hermesEnabled=true

        edgeToEdgeEnabled=false
| Property | Value | Description |
|---|---|---|
| org.gradle.jvmargs | -Xmx8g -XX:MaxMetaspaceSize=3g -Dfile.encoding=UTF-8 | JVM memory allocation for Gradle builds |
| org.gradle.daemon | true | Enables Gradle daemon for faster builds |
| org.gradle.parallel | true | Enables parallel execution of tasks |
| org.gradle.caching | true | Enables build caching for faster builds |
| android.useAndroidX | true | Enables AndroidX support libraries |
| reactNativeArchitectures | arm64-v8a | Target architecture for React Native |
| newArchEnabled | true | Enables React Native New Architecture |
| hermesEnabled | true | Enables Hermes JavaScript engine |
| edgeToEdgeEnabled | false | Disables edge-to-edge display mode |
Gradle Plugin Configuration
File Location: android/build.gradle
extension
Gradle Plugins
classpath("com.android.tools.build:gradle:8.7.2")

        classpath("com.facebook.react:react-native-gradle-plugin")

        classpath("org.jetbrains.kotlin:kotlin-gradle-plugin")

        classpath("com.google.gms:google-services:4.4.2")
info
Important Notes
- SDK Versions: Ensure all SDK versions are consistent across the build configuration
- Gradle Version: Compatible with Gradle 9 or later
- New Architecture: React Native New Architecture is enabled by default
(
newArchEnabled=true) - Hermes: Hermes JavaScript engine is enabled for improved performance
- Google Services: Firebase integration requires the Google Services plugin
info Single Unified Application
The Admin Panel and Customer Website are part of the same Laravel application. They share the same codebase, database, and backend. The Customer Website is built with React + Inertia.js and is served directly from the Laravel application.
web Unified Application: Admin Panel & Customer Website
info
PHP Version Requirement
This admin panel requires PHP 8.3. Please ensure you have the correct version installed before proceeding.
php --version # Should show PHP 8.3.x
folder
Project Structure
The React website is located inside the admin project folder:
carfindo_admin_customer_website/
├── app/
│   ├── Console/Commands/
│   ├── Filament/
│   │   ├── Pages/
│   │   ├── Resources/          # 50+ Filament resources
│   │   └── Shield/
│   ├── Http/
│   │   ├── Controllers/        # API + Web controllers
│   │   ├── Middleware/
│   │   ├── Requests/           # Form requests
│   │   └── Resources/          # API resources
│   ├── Jobs/
│   ├── Mail/
│   ├── Models/                 # 40+ Eloquent models
│   ├── Notifications/
│   ├── Policies/
│   ├── Providers/Filament/
│   ├── Rules/
│   ├── Services/
│   └── Support/
├── bootstrap/
│   └── cache/
├── config/                     # 16 config files
├── database/
│   ├── factories/
│   ├── migrations/             # 80+ migrations
│   └── seeders/                # 5 seeders
├── public/
│   ├── build/                  # Vite assets (manifest.json + js/css)
│   ├── css/                    # Filament CSS + custom
│   ├── fonts/
│   └── images/
├── resources/
│   ├── css/
│   ├── js/
│   │   ├── Components/
│   │   ├── Pages/              # 40+ React pages
│   │   ├── Layouts/
│   │   ├── stores/             # Zustand stores
│   │   └── utils/
│   └── views/
│       ├── emails/
│       └── filament/
├── routes/
│   ├── api.php
│   ├── console.php
│   └── web.php
├── storage/
│   ├── app/public/
│   └── framework/              # cache, sessions, views (with .gitkeep)
├── .env                        # App key, DB placeholders, Firebase disabled
├── composer.json / composer.lock
├── package.json / package-lock.json
├── vite.config.js
├── phpunit.xml
└── artisan
Installation Steps
admin_panel_settings Part 1: Admin Panel (Laravel Filament)
Set up the Laravel backend and Filament admin panel
-
1
Unzip the Source Folder
Extract the downloaded source files to your working directory.
-
2
Copy to XAMPP
Copy the admin folder and paste it inside
XAMPP → htdocs. Rename your project folder (e.g., carfindo_admin_customer_website).infoVerify XAMPP & Composer: Ensure XAMPP and Composer are already installed. If not, download them from apachefriends.org and getcomposer.org. -
3
Open Command Prompt
Navigate to your project folder:
cd C:\xampp\htdocs\carfindo_admin_customer_website -
4
Configure Environment
Copy the example environment file and configure your database credentials:
cp .env.example .envUpdate your
.envfile with your database credentials:APP_NAME=your_application_name APP_ENV=local APP_DEBUG=true APP_URL=http://your-domain.com DB_CONNECTION=mysql DB_HOST=your_database_host DB_PORT=3306 DB_DATABASE=your_database_name DB_USERNAME=your_database_username DB_PASSWORD=your_database_password DB_SOCKET= SESSION_DRIVER=database QUEUE_CONNECTION=database CACHE_STORE=database -
5
Install PHP Dependencies
Run the following command to install all PHP dependencies:
composer installWhen finished, verify the
vendorfolder has been created in your project. -
6
Create Database
Follow these steps in phpMyAdmin:
- Open
http://localhost/phpmyadminin your browser - Click "New"
- Enter your database name (e.g.,
carfindo) - Click "Create"
- Open
-
7
Import Database
Import the SQL file located at
database/carfindo.sqlusing phpMyAdmin:- In phpMyAdmin, select your newly created database
- Click the "Import" tab
- Choose the
carfindo.sqlfile from your project - Click "Go"
-
8
Generate Application Key
Run the following command to generate a unique application key:
php artisan key:generateinfoKey Generate: This command generates a unique application key that is used for encryption and security purposes. -
9
Configure .env File
If
.envfile is not visible, enable "show hidden files" in your system settings. Update the.envfile in your project root with the following settings:Application Settings
APP_URL=http://localhost:8000 APP_ASSET_URL=http://localhost:8000/storage APP_ENV=local APP_DEBUG=trueDatabase Configuration
DB_CONNECTION=mysql DB_HOST=127.0.0.1 DB_PORT=3306 DB_DATABASE=carfindo DB_USERNAME=root DB_PASSWORD= DB_SOCKET=Firebase Configuration
Firebase is required for push notifications, real-time database features, and other Firebase services. Before using the application, configure your own Firebase project.
Step 1: Download Firebase Service Account
- Open the Firebase Console.
- Select your Firebase Project.
- Go to Project Settings → Service Accounts.
- Click "Generate New Private Key".
- A JSON file will be downloaded (Example:
your-app-name-firebase-adminsdk.json).
Step 2: Upload the JSON File
Copy the downloaded Firebase JSON file into the following directory:
config/your-app-name.jsonStep 3: Update the .env File
FIREBASE_FILE=your-app-name.json FIREBASE_DB=https://your-project.firebaseio.com FCM_SERVER_KEY=your_fcm_server_key FCM_SENDER_ID=your_fcm_sender_idcheck_circleFirebase Connected
Once the JSON file is uploaded and the
.envvalues are updated, the application will automatically connect to your Firebase project.shieldSecurity Notice
Never share your Firebase Service Account JSON file or upload it to a public Git repository. This file contains sensitive credentials with administrative access to your Firebase project.
warningImportant: Replace all placeholder values with your actual credentials before running the application.
-
10
Run Migrations
Run the following command to create the database tables:
php artisan migrate -
11
Seed the Database
Run the following command to seed the database with default data:
php artisan db:seed --forceinfoThe--forceflag is used to run the seeder in production environments. For local development, you can omit it. -
12
Generate Shield Permissions
Run the following command to generate all Shield permissions:
php artisan shield:generate --all --option=permissions --panel=adminAfter generating permissions, run this command to assign the super admin role to your admin user:
php artisan tinker --execute=" $role = DB::table('roles')->where('name','super_admin')->first(); $perms = DB::table('permissions')->pluck('id')->toArray(); $rows = array_map(fn($id) => ['permission_id'=>$id,'role_id'=>$role->id], $perms); DB::table('role_has_permissions')->insertOrIgnore($rows); DB::table('model_has_roles')->insertOrIgnore(['role_id'=>1,'model_type'=>'App\\Models\\User','model_id'=>1]); echo 'Done: Admin assigned to super_admin role'; "infoShield: This generates all necessary permissions and assigns the super_admin role to the admin user (ID: 1). -
13
Optimize the Application
Run the following command to optimize the application for production:
php artisan optimize
web Part 2: React Website (Frontend)
Set up the React frontend website located inside the admin project
-
14
Configure React Environment
Create a
.envfile in thewebsitefolder and add the following configurations:# API Configuration (Points to the admin backend) APP_NAME=enter_your_app_name APP_ENV=local APP_KEY= APP_DEBUG=true APP_URL=enter_your_app_url APP_LOCALE=en APP_FALLBACK_LOCALE=en APP_FAKER_LOCALE=en_US APP_MAINTENANCE_DRIVER=file # APP_MAINTENANCE_STORE=database # PHP_CLI_SERVER_WORKERS=4 BCRYPT_ROUNDS=12 LOG_CHANNEL=stack LOG_STACK=single LOG_DEPRECATIONS_CHANNEL=null LOG_LEVEL=debug # Database Configuration DB_CONNECTION=mysql DB_HOST=127.0.0.1 DB_PORT=3306 DB_DATABASE=enter_your_database_name DB_USERNAME=enter_your_database_username DB_PASSWORD=enter_your_database_password DB_SOCKET= # Session SESSION_DRIVER=file SESSION_LIFETIME=120 SESSION_ENCRYPT=false SESSION_PATH=/ SESSION_DOMAIN=null # Broadcasting BROADCAST_CONNECTION=log # Firebase Realtime Database FIREBASE_FILE= FIREBASE_DB= # Filesystem FILESYSTEM_DISK=local # Queue QUEUE_CONNECTION=database # Cache CACHE_STORE=file # CACHE_PREFIX= # Memcached MEMCACHED_HOST=127.0.0.1 # Redis REDIS_CLIENT=phpredis REDIS_HOST=127.0.0.1 REDIS_PASSWORD= REDIS_PORT=6379 # Mail Configuration MAIL_MAILER=smtp MAIL_SCHEME= MAIL_HOST=enter_your_smtp_host MAIL_PORT=587 MAIL_USERNAME=enter_your_email@example.com MAIL_PASSWORD=enter_your_email_password_or_app_password MAIL_ENCRYPTION=tls MAIL_FROM_ADDRESS=enter_your_email@example.com MAIL_FROM_NAME="${APP_NAME}" # AWS (Optional) AWS_ACCESS_KEY_ID= AWS_SECRET_ACCESS_KEY= AWS_DEFAULT_REGION=us-east-1 AWS_BUCKET= AWS_USE_PATH_STYLE_ENDPOINT=false # Frontend VITE_APP_NAME="${APP_NAME}" MODE=DEMOwarningwarningImportant:- Update all placeholder values in the
.envfile before running the application. - Set
APP_URLto your application's domain or local URL. - Configure your Firebase credentials and upload the correct Firebase Service Account JSON file.
- Configure your payment gateway credentials (Razorpay, Flutterwave, Paystack) only if you plan to use those services.
- Replace the RouteMappy API URL and Map Key with your own credentials.
- After making changes to the
.envfile, runphp artisan optimize:clearfollowed byphp artisan optimize.
- Update all placeholder values in the
-
15
Serve Laravel Backend
In a separate terminal, navigate to the admin project root and serve the Laravel backend:
php artisan serveThe Laravel backend runs at
http://localhost:8000 -
16
Access the Applications
- Admin Panel: http://localhost:8000/admin
- React Website: http://localhost:8000
infoDefault Login:- Email:
admin@gmail.com - Password:
admin
terminal Complete Setup Quick Reference
Run these commands in sequence to set up both admin panel and website:
admin_panel_settings Admin Panel Setup
# Navigate to admin project
    cd C:\xampp\htdocs\carfindo_admin_customer_website

    # Copy environment file
    cp .env.example .env

    # Configure database credentials in .env file
    # DB_DATABASE=enter_your_database_name
    # DB_USERNAME=enter_your_database_username
    # DB_PASSWORD=enter_your_database_password
    # DB_SOCKET=


    # Install PHP dependencies
    composer install

    # Generate application key
    php artisan key:generate

    # Run migrations
    php artisan migrate

    # Seed the database
    php artisan db:seed --force

    # Generate Shield permissions
    php artisan shield:generate --all --option=permissions --panel=admin

    # Optimize the application
    php artisan optimize

    # Start Laravel server (in one terminal)
    php artisan serve

    # Publish Filament Assets
    php artisan filament:assets
web React Website Setup
# Navigate to website folder
    # Create .env file with configurations
    # (Copy .env.example to .env and update values)
Login Credentials
Use these default credentials to log in to the admin panel:
| Email: | admin@gmail.com |
| Password: | admin |
| Access Level: | Super Administrator |
shield
Security Alert: Change these credentials immediately after first login.
Troubleshooting
settings Environment Configuration Issues
If the application is not working correctly, verify:
- The
.envfile exists in the project root. - All required environment variables have been updated with your own credentials.
- The
APP_URLpoints to your application URL. - Run
php artisan optimize:clearafter modifying the.envfile.
storage Database Connection Issues
Verify the following:
- MySQL service is running.
- The database exists in phpMyAdmin.
- Database credentials in the
.envfile are correct. - Run
php artisan migrateif the tables have not been created.
folder_off Image & File Upload Issues
If uploaded images or files are not displayed:
- Run
php artisan storage:link. - Ensure the
storagedirectory has write permission. - Clear the application cache using
php artisan optimize:clear.
notifications_active Firebase Notification Issues
If push notifications are not working:
- Verify the Firebase Service Account JSON file is placed in the correct location.
- Ensure the Firebase values in the
.envfile are correct. - Confirm that your Firebase project has Cloud Messaging enabled.
cached Configuration & Cache Issues
If recent changes are not reflected:
- Run
php artisan optimize:clear. - Run
php artisan optimize. - Restart the Laravel server using
php artisan serve.
palette Website Customization Guide
Customize Everything Through Admin Panel (No Code Changes Required)
info
Note: All website content can be managed directly from the Admin
Panel. No code changes needed!
1. App Settings (Settings → App Settings)
App Settings in Admin Panel
Admin Panel: Settings → App Settings
Go to: Settings → App Settings
| Field | What It Changes | Action |
|---|---|---|
| App Name* | Shows in browser tab title + footer bottom | Edit |
| App Version* | Current application version number | Edit |
| Default Country | Default country for users | Edit |
| Phone Code | Default prefix in registration phone field (e.g., +91) | Edit |
| About Us* | Company description | Edit |
| Theme Color (Hex) | Changes entire website color scheme — buttons, highlights, header accents, borders, icons, hover states | Edit |
| Default Currency* | Every price (₹, $, etc.) on listings/search/detail changes | Edit |
| Currency Symbol* | Symbol shown next to prices (₹, $, €) | Edit |
| Currency Short Code* | Short code (INR, USD, EUR) | Edit |
| App Logo | Top-left header logo changes | Add | Edit |
| Favicon | Browser tab icon changes (32x32 or 64x64px) | Add | Edit |
| Hero Section Image | Home page hero background image changes | Add | Edit |
2. CMS - Home Settings (Settings → CMS)
Home Settings in Admin Panel
Admin Panel: Settings → CMS (Home Settings)
Go to: Settings → CMS
| Section | Field | What It Changes | Action |
|---|---|---|---|
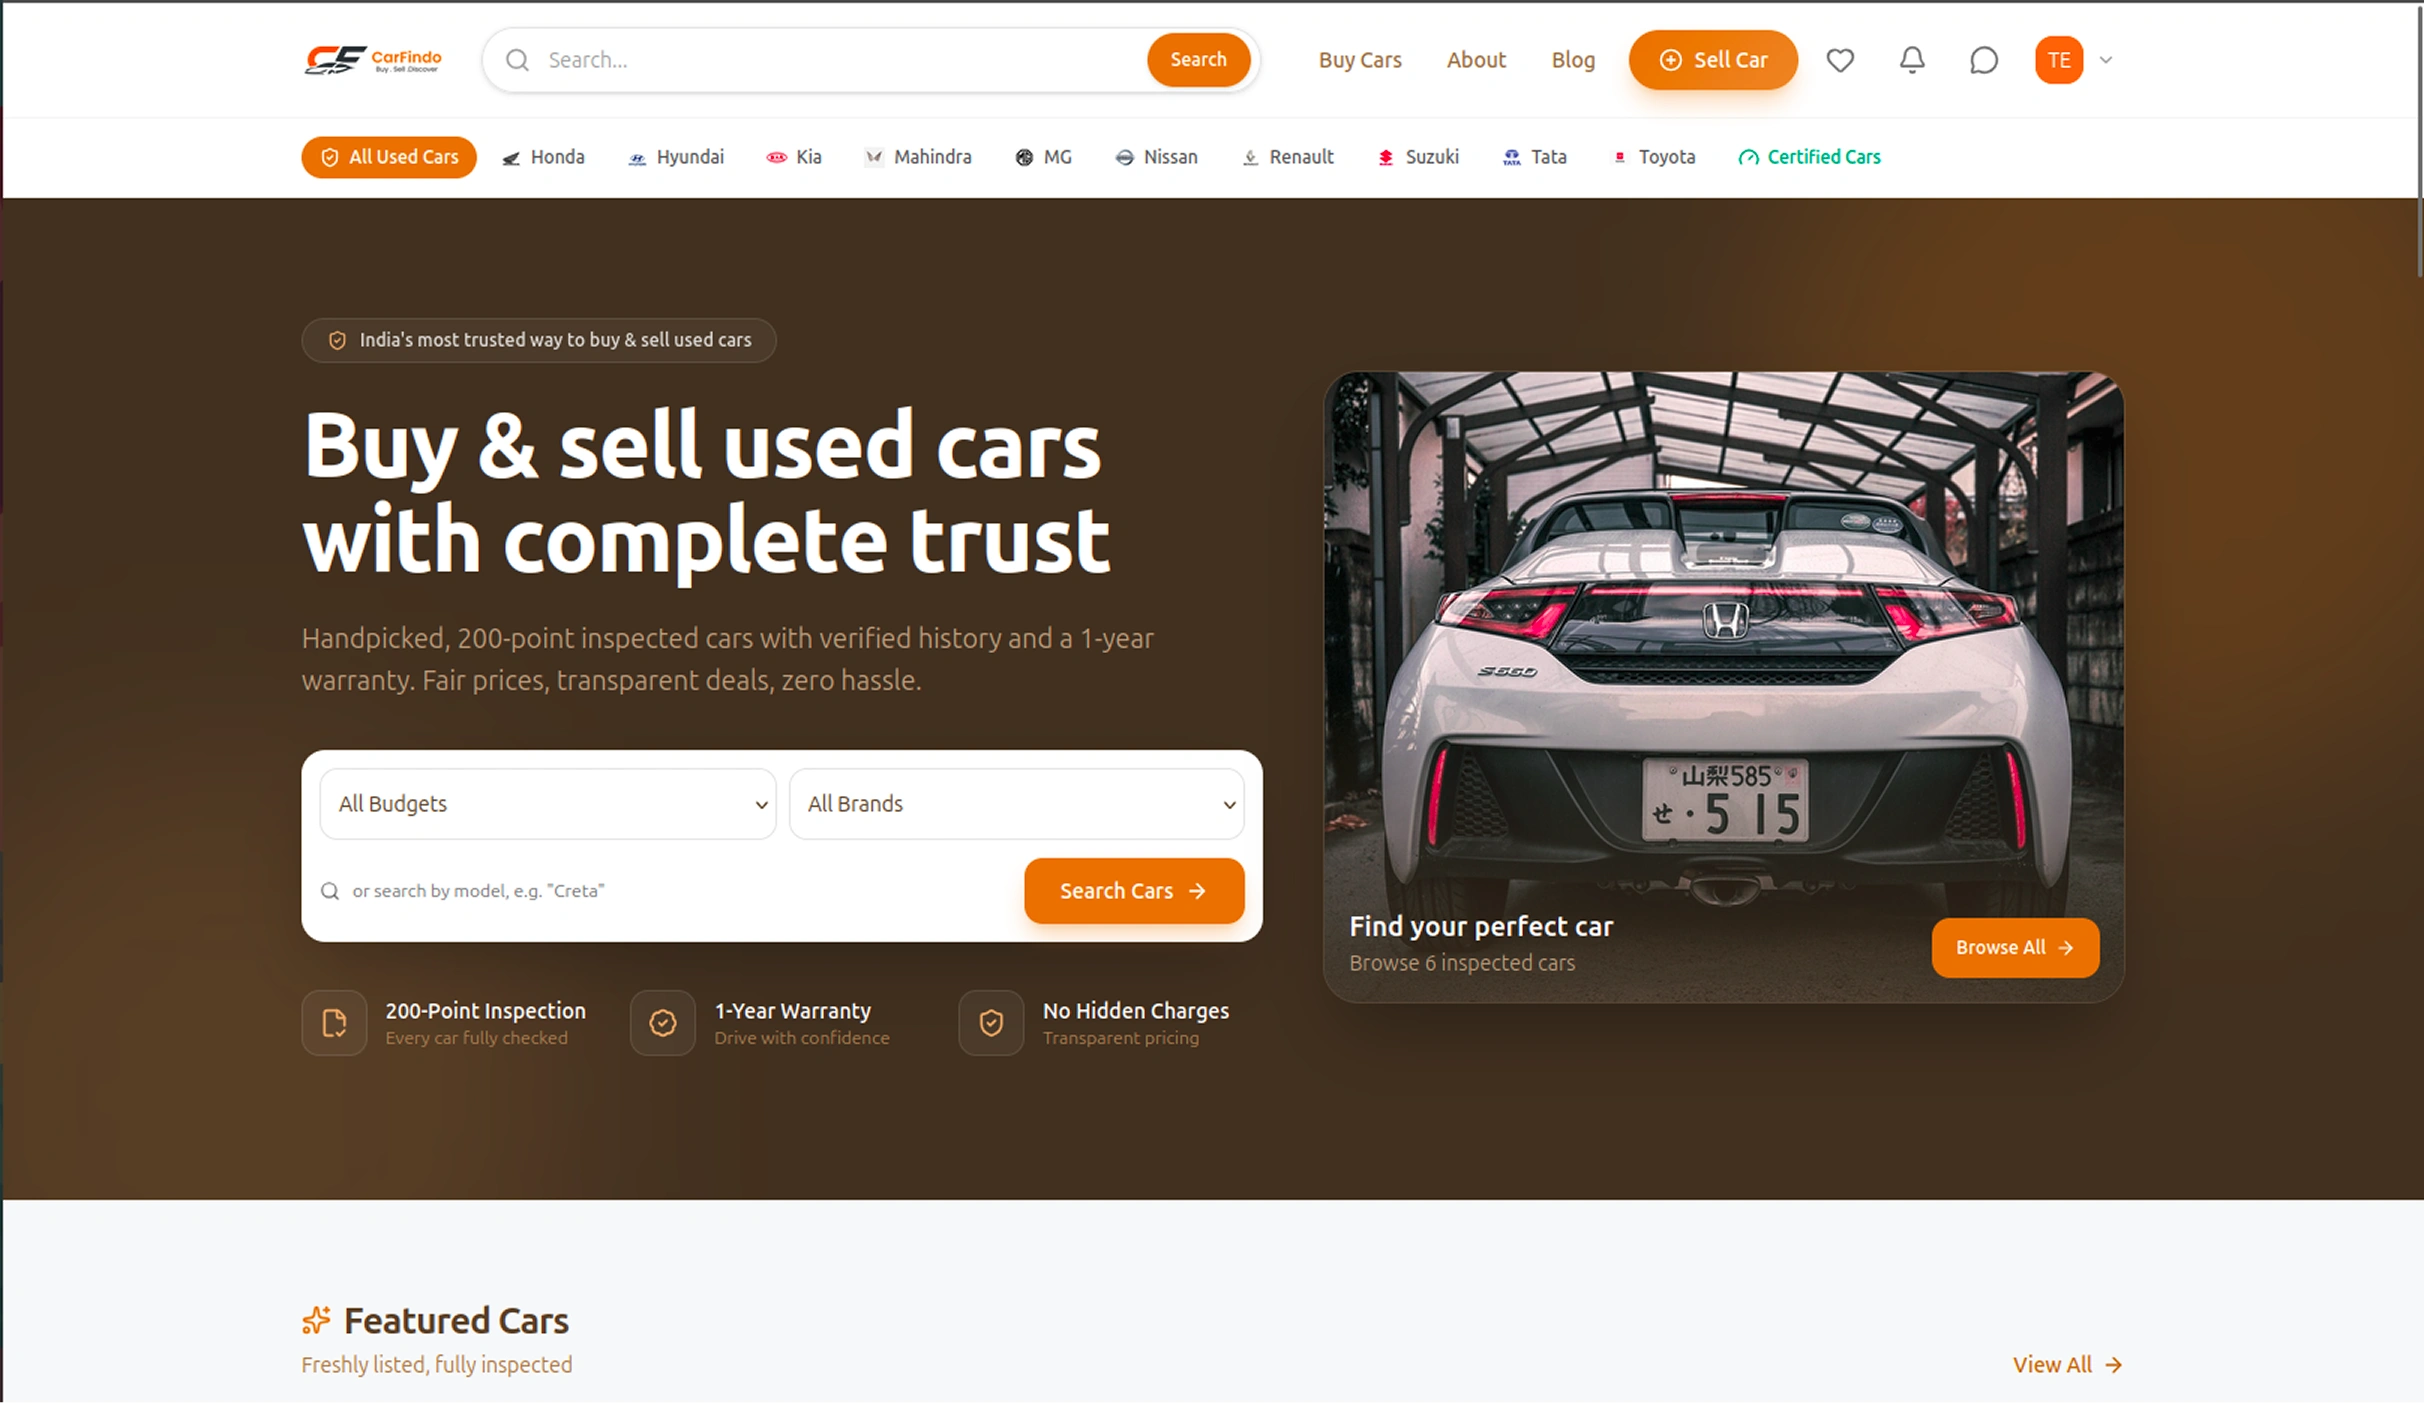
| Hero Section | Hero Badge | Small badge above main title | Edit |
| Hero Title | Big text under navbar (main heading) | Edit | |
| Hero Subtitle | Text below main heading | Edit | |
| Hero Card Title / Subtitle / Button | Orange box inside hero (left side) | Edit | |
| Trust Badges | Trust Badge 1 | Icon + Title + Subtitle (e.g., "200-Point Inspection") | Add | Edit |
| Trust Badge 2 | Icon + Title + Subtitle (e.g., "Warranty") | Add | Edit | |
| Trust Badge 3 | Icon + Title + Subtitle (e.g., "VerifiedSellers") | Add | Edit | |
| Brand Section | Brand Title | Heading above "Shop by Brand" grid | Edit |
| Brand Subtitle | Text below Brand Title | Edit | |
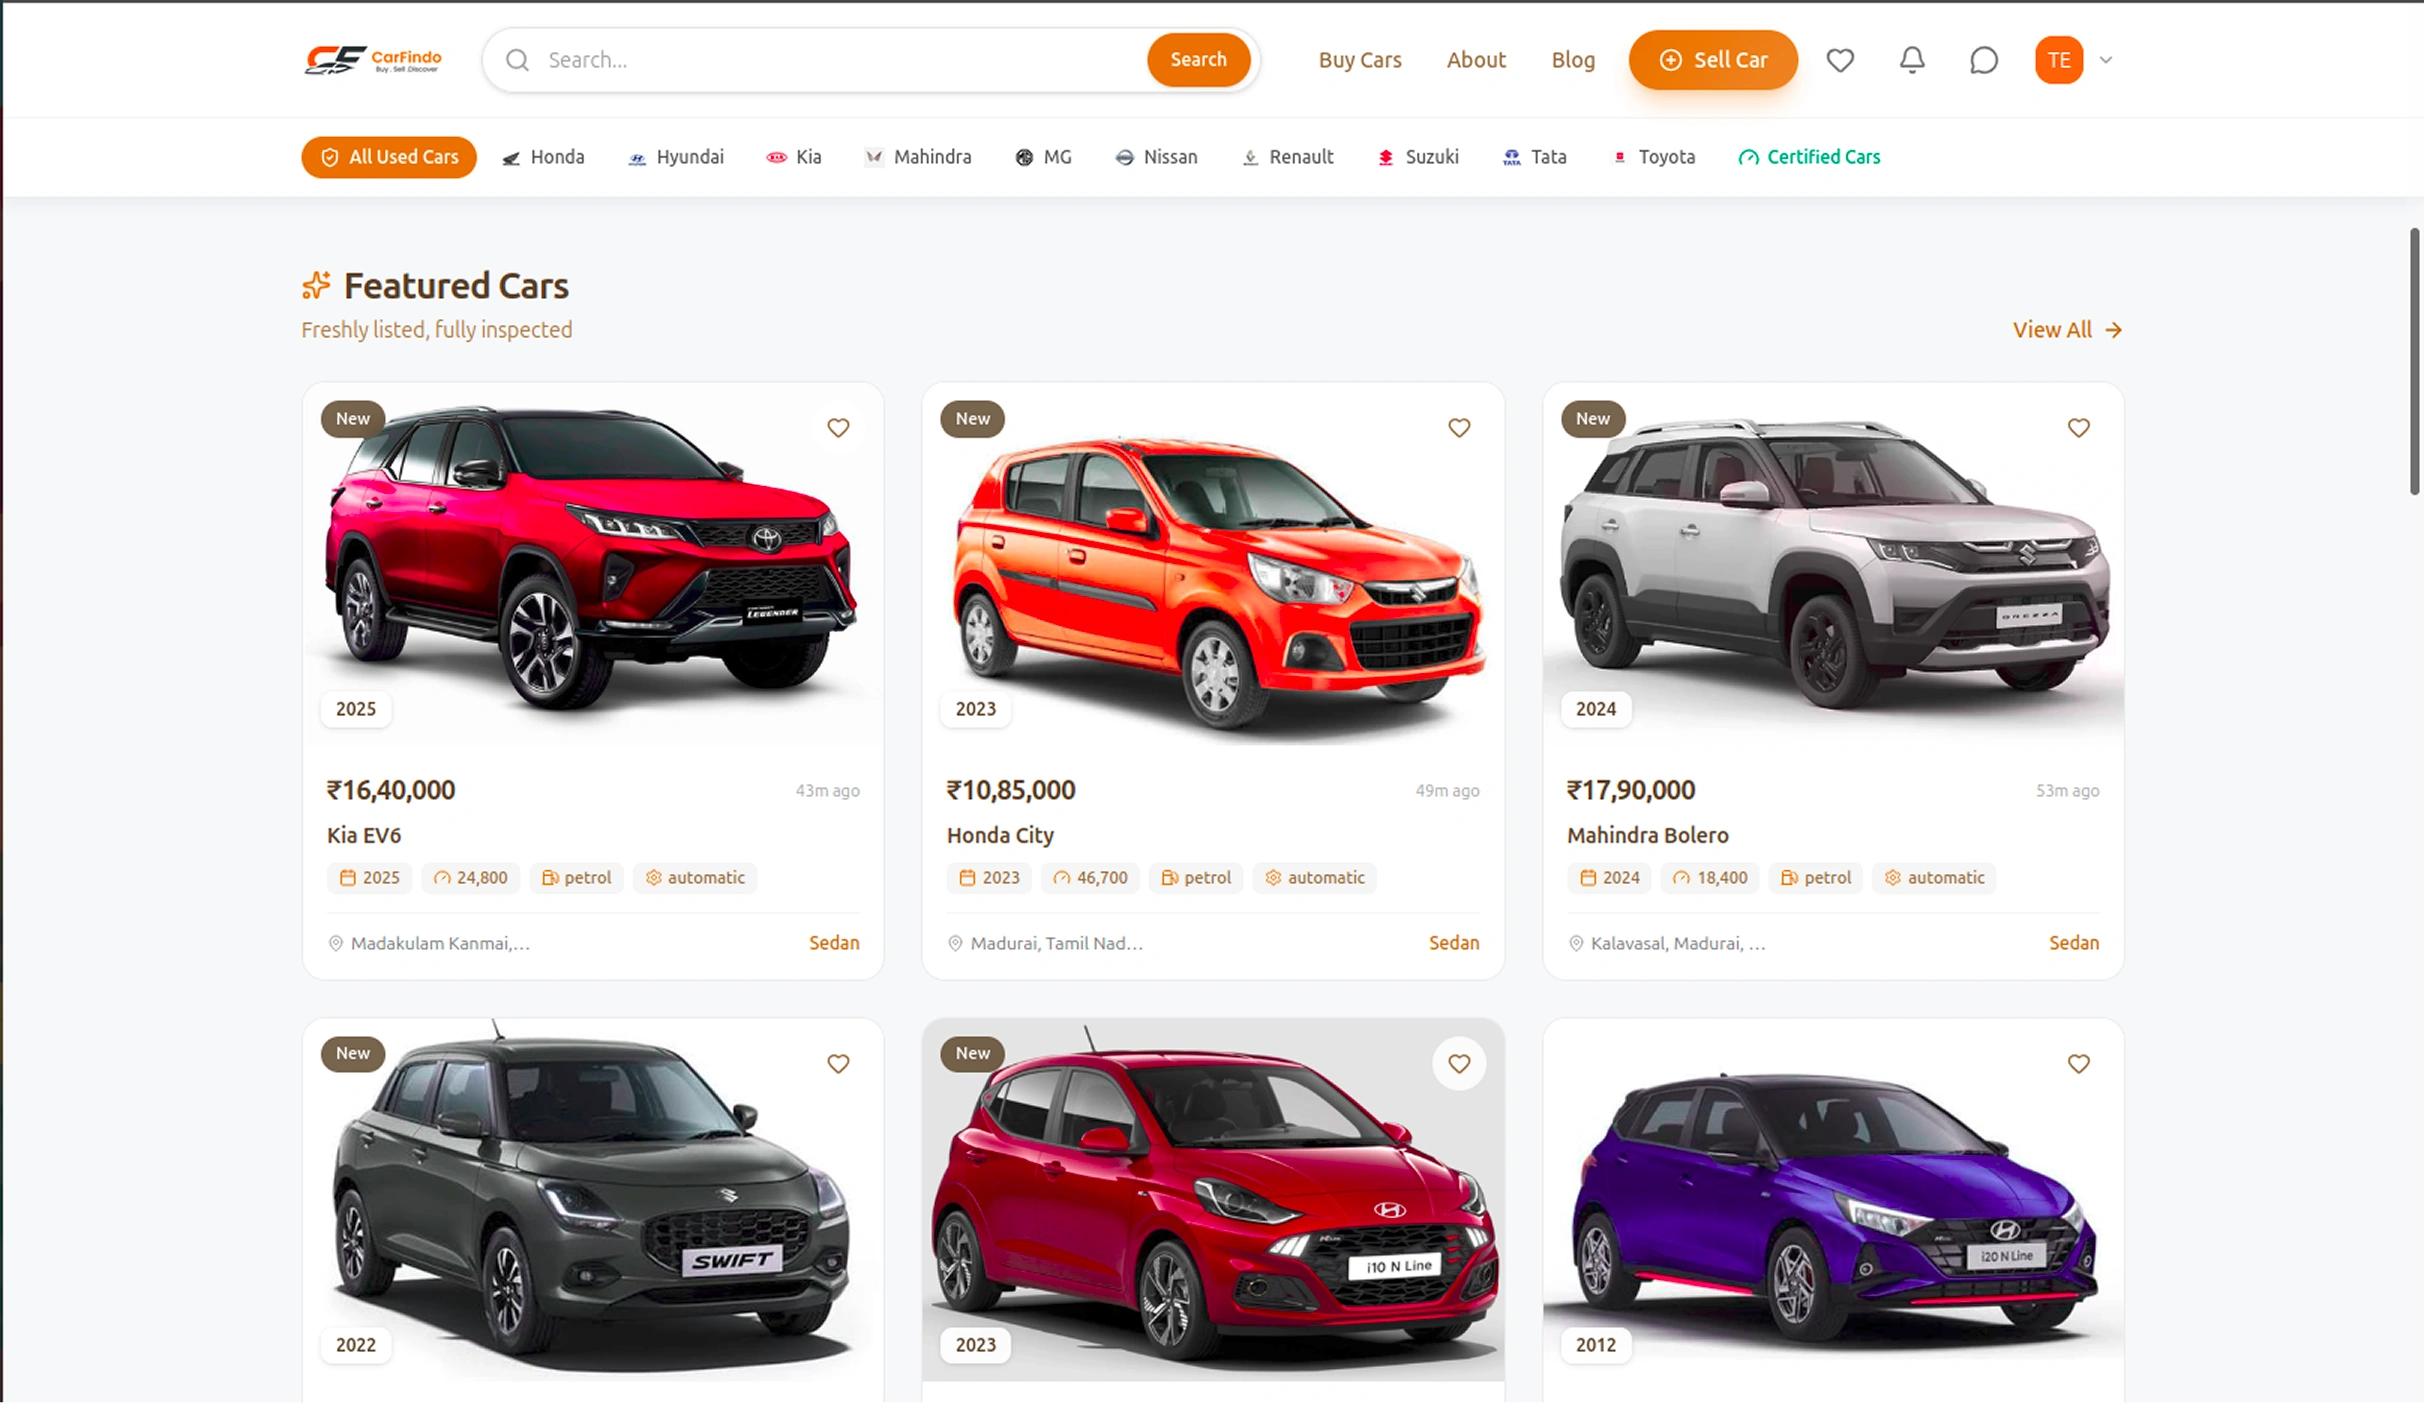
| Featured Section | Featured Title | Heading above "Featured Cars" carousel | Edit |
| Featured Subtitle | Text below Featured Title | Edit | |
| Why Section | Why Title | Heading above "Why buy from us" 4-card grid | Edit |
| Why Card 1 | Icon + Title + Description | Add | Edit | |
| Why Card 2 | Icon + Title + Description | Add | Edit | |
| Why Card 3 | Icon + Title + Description | Add | Edit | |
| Sell Section | Sell Title | Heading above "Sell your car" banner section | Edit |
| Sell Subtitle | Text below Sell Title | Edit | |
| Sell Button | Button text on sell banner | Edit | |
| CTA Section | CTA Title | Bottom "Can't find what you're looking for?" section | Edit |
| CTA Description | Text below CTA Title | Edit |
3. Marketplace → Categories

Categories in Admin Panel
Admin Panel: Marketplace → Categories
Go to: Marketplace → Categories
| Field | What It Changes | Action |
|---|---|---|
| Category Name* | Appears on Home (category nav) + /categories page + category cards | Add | Edit |
| Status* | Toggle Active ON/OFF — appears/disappears everywhere | Toggle |
| Show Brand Field | Toggle brand field visibility | Toggle |
| Show Model Field | Toggle model field visibility | Toggle |
| Category Icon* | Icon shown on category cards | Add | Edit |
Actions:
Add | Edit | Delete
4. Marketplace → Subcategories (Body Types)
Subcategories in Admin Panel
Admin Panel: Marketplace → Subcategories
Go to: Marketplace → Subcategories
| Field | What It Changes | Action |
|---|---|---|
| Parent Category* | Assign to parent category | Dropdown |
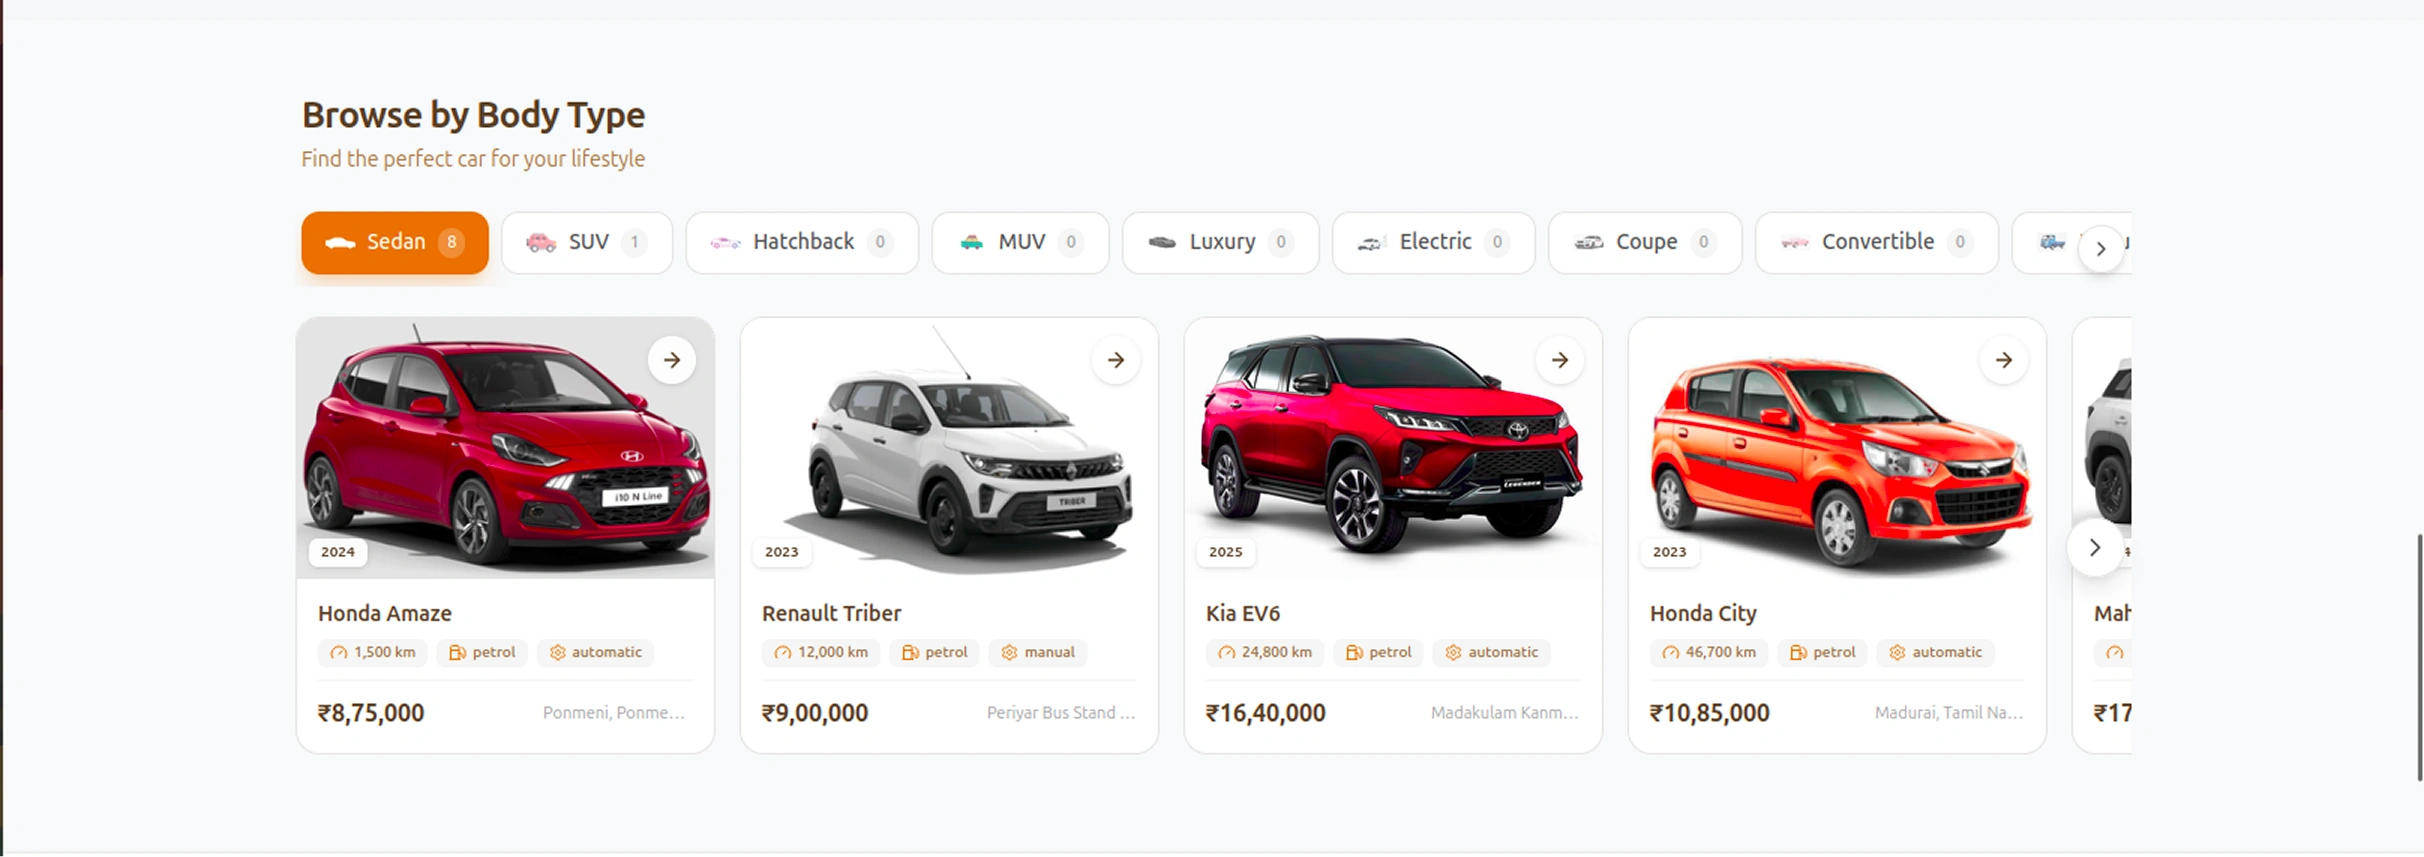
| Subcategory Name* | Appears as chips on Home "Browse by Body Type" + search filter sidebar + Add Listing form | Add | Edit |
| Slug | URL-friendly slug | Auto-generate | Edit |
| Status* | Toggle Active ON/OFF — appears/disappears everywhere | Toggle |
| Subcategory Icon* | Icon shown on body type chips | Add | Edit |
Actions:
Add | Edit | Delete
5. Marketplace → Brands
Brands in Admin Panel
Admin Panel: Marketplace → Brands
Go to: Marketplace → Brands
| Field | What It Changes | Action |
|---|---|---|
| Brand Name* | Home "Shop by Brand" grid + Sell Car page brand boxes + search filter + Add Listing brand dropdown | Add | Edit |
| Slug* | URL-friendly slug | Auto-generate | Edit |
| Brand Icon | Icon shown on brand tiles | Add | Edit |
| Applicable Subcategories | Which body types this brand applies to | Select |
| Status | Toggle Active OFF → brand disappears from all pages. Toggle ON → brand reappears everywhere | Toggle |
Actions:
Add | Edit | Delete
6. Marketplace → Models
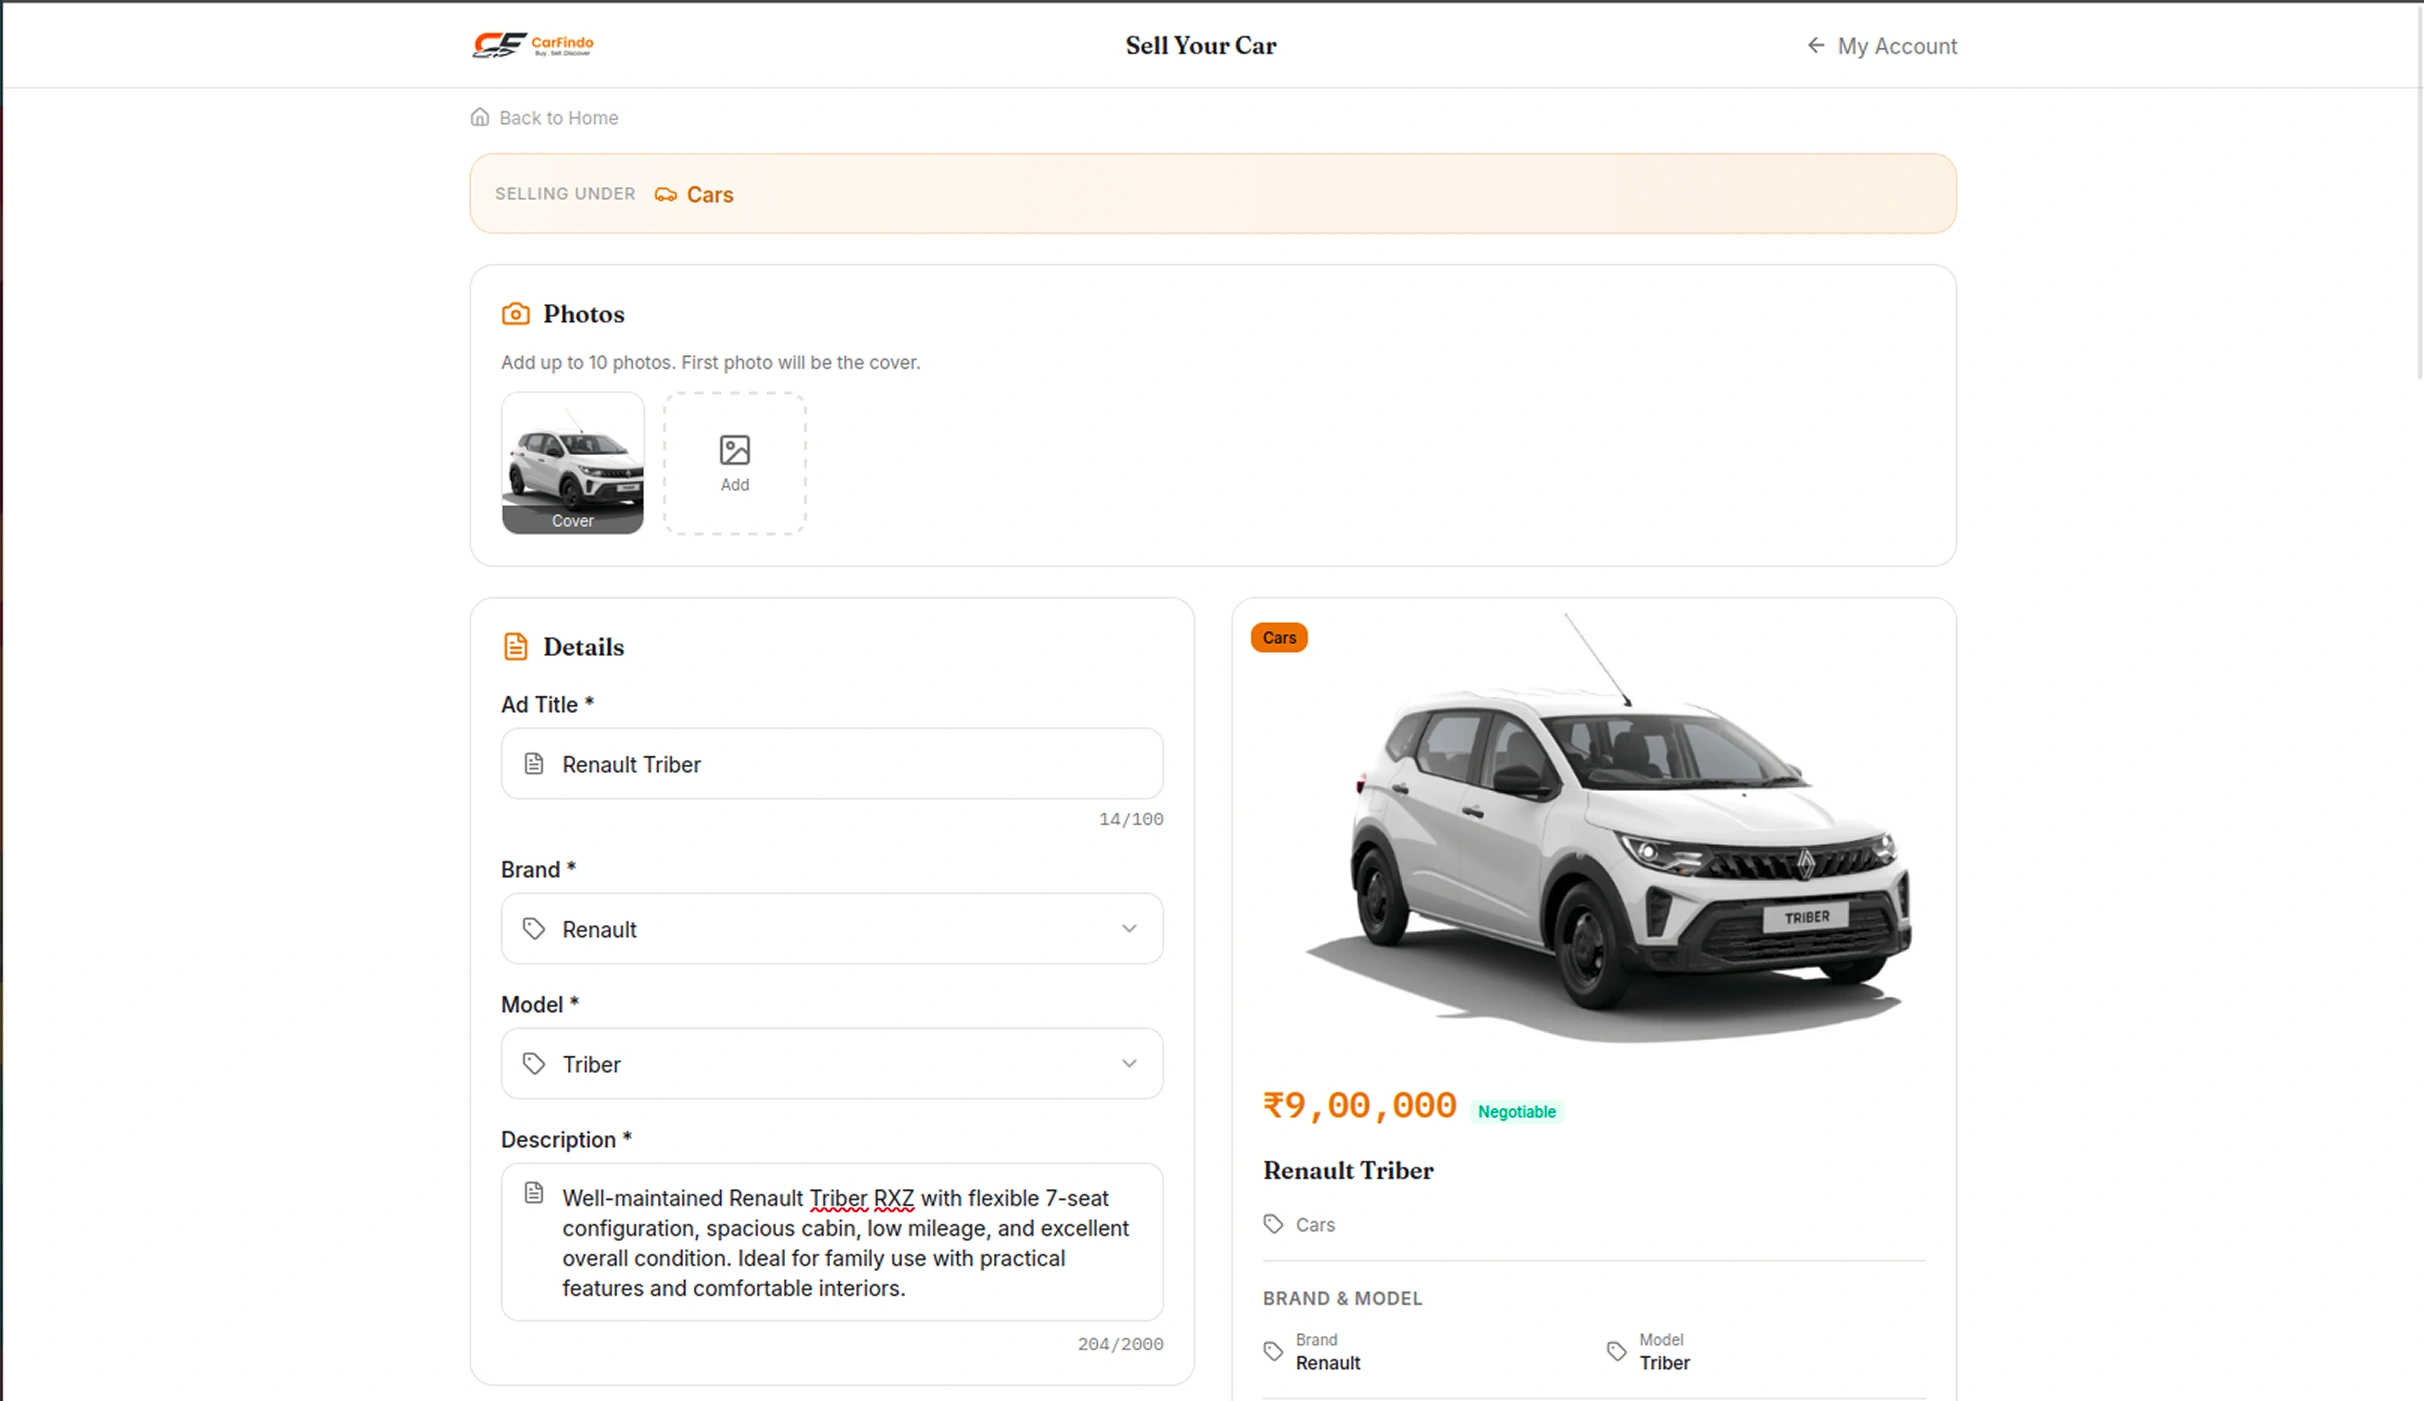
Models in Admin Panel
Admin Panel: Marketplace → Models
Go to: Marketplace → Models
| Field | What It Changes | Action |
|---|---|---|
| Brand | Parent brand (e.g., Maruti) | Dropdown |
| Model Name* | Add Listing Model dropdown (after selecting a brand) → e.g., Baleno, Swift | Add | Edit |
| Slug | URL-friendly slug | Auto-generate | Edit |
| Status | Active/Inactive status | Toggle |
Actions:
Add | Edit | Delete
7. Marketplace → Attributes
Admin Panel: Marketplace → Attributes
Go to: Marketplace → Attributes
| Field | What It Changes | Action |
|---|---|---|
| Attribute Name* | Add Listing "Car Attributes" section + listing detail specs + search filter options (e.g., Body Type, Fuel) | Add | Edit |
| Slug* | URL-friendly slug | Auto-generate | Edit |
| Display Label* | Label shown in UI | Edit |
| Field Type* | Text, Select, Checkbox, etc. | Dropdown |
| Required | Make attribute mandatory in form | Toggle |
| Filterable | Show as filter in search sidebar | Toggle |
| Active | Toggle Active ON/OFF | Toggle |
| Applicable Subcategories | Which body types this attribute applies to | Select |
Actions:
Add | Edit | Delete
8. Marketplace → Cities
Cities in Admin Panel
Admin Panel: Marketplace → Cities
Go to: Marketplace → Cities
| Field | What It Changes | Action |
|---|---|---|
| City Name* | Search location filter dropdown + location suggestions | Add | Edit |
| Slug* | URL-friendly slug | Auto-generate | Edit |
| State | State of the city | Edit |
| Status* | Active/Inactive status | Toggle |
Actions:
Add | Edit | Delete
9. Marketplace → Listings
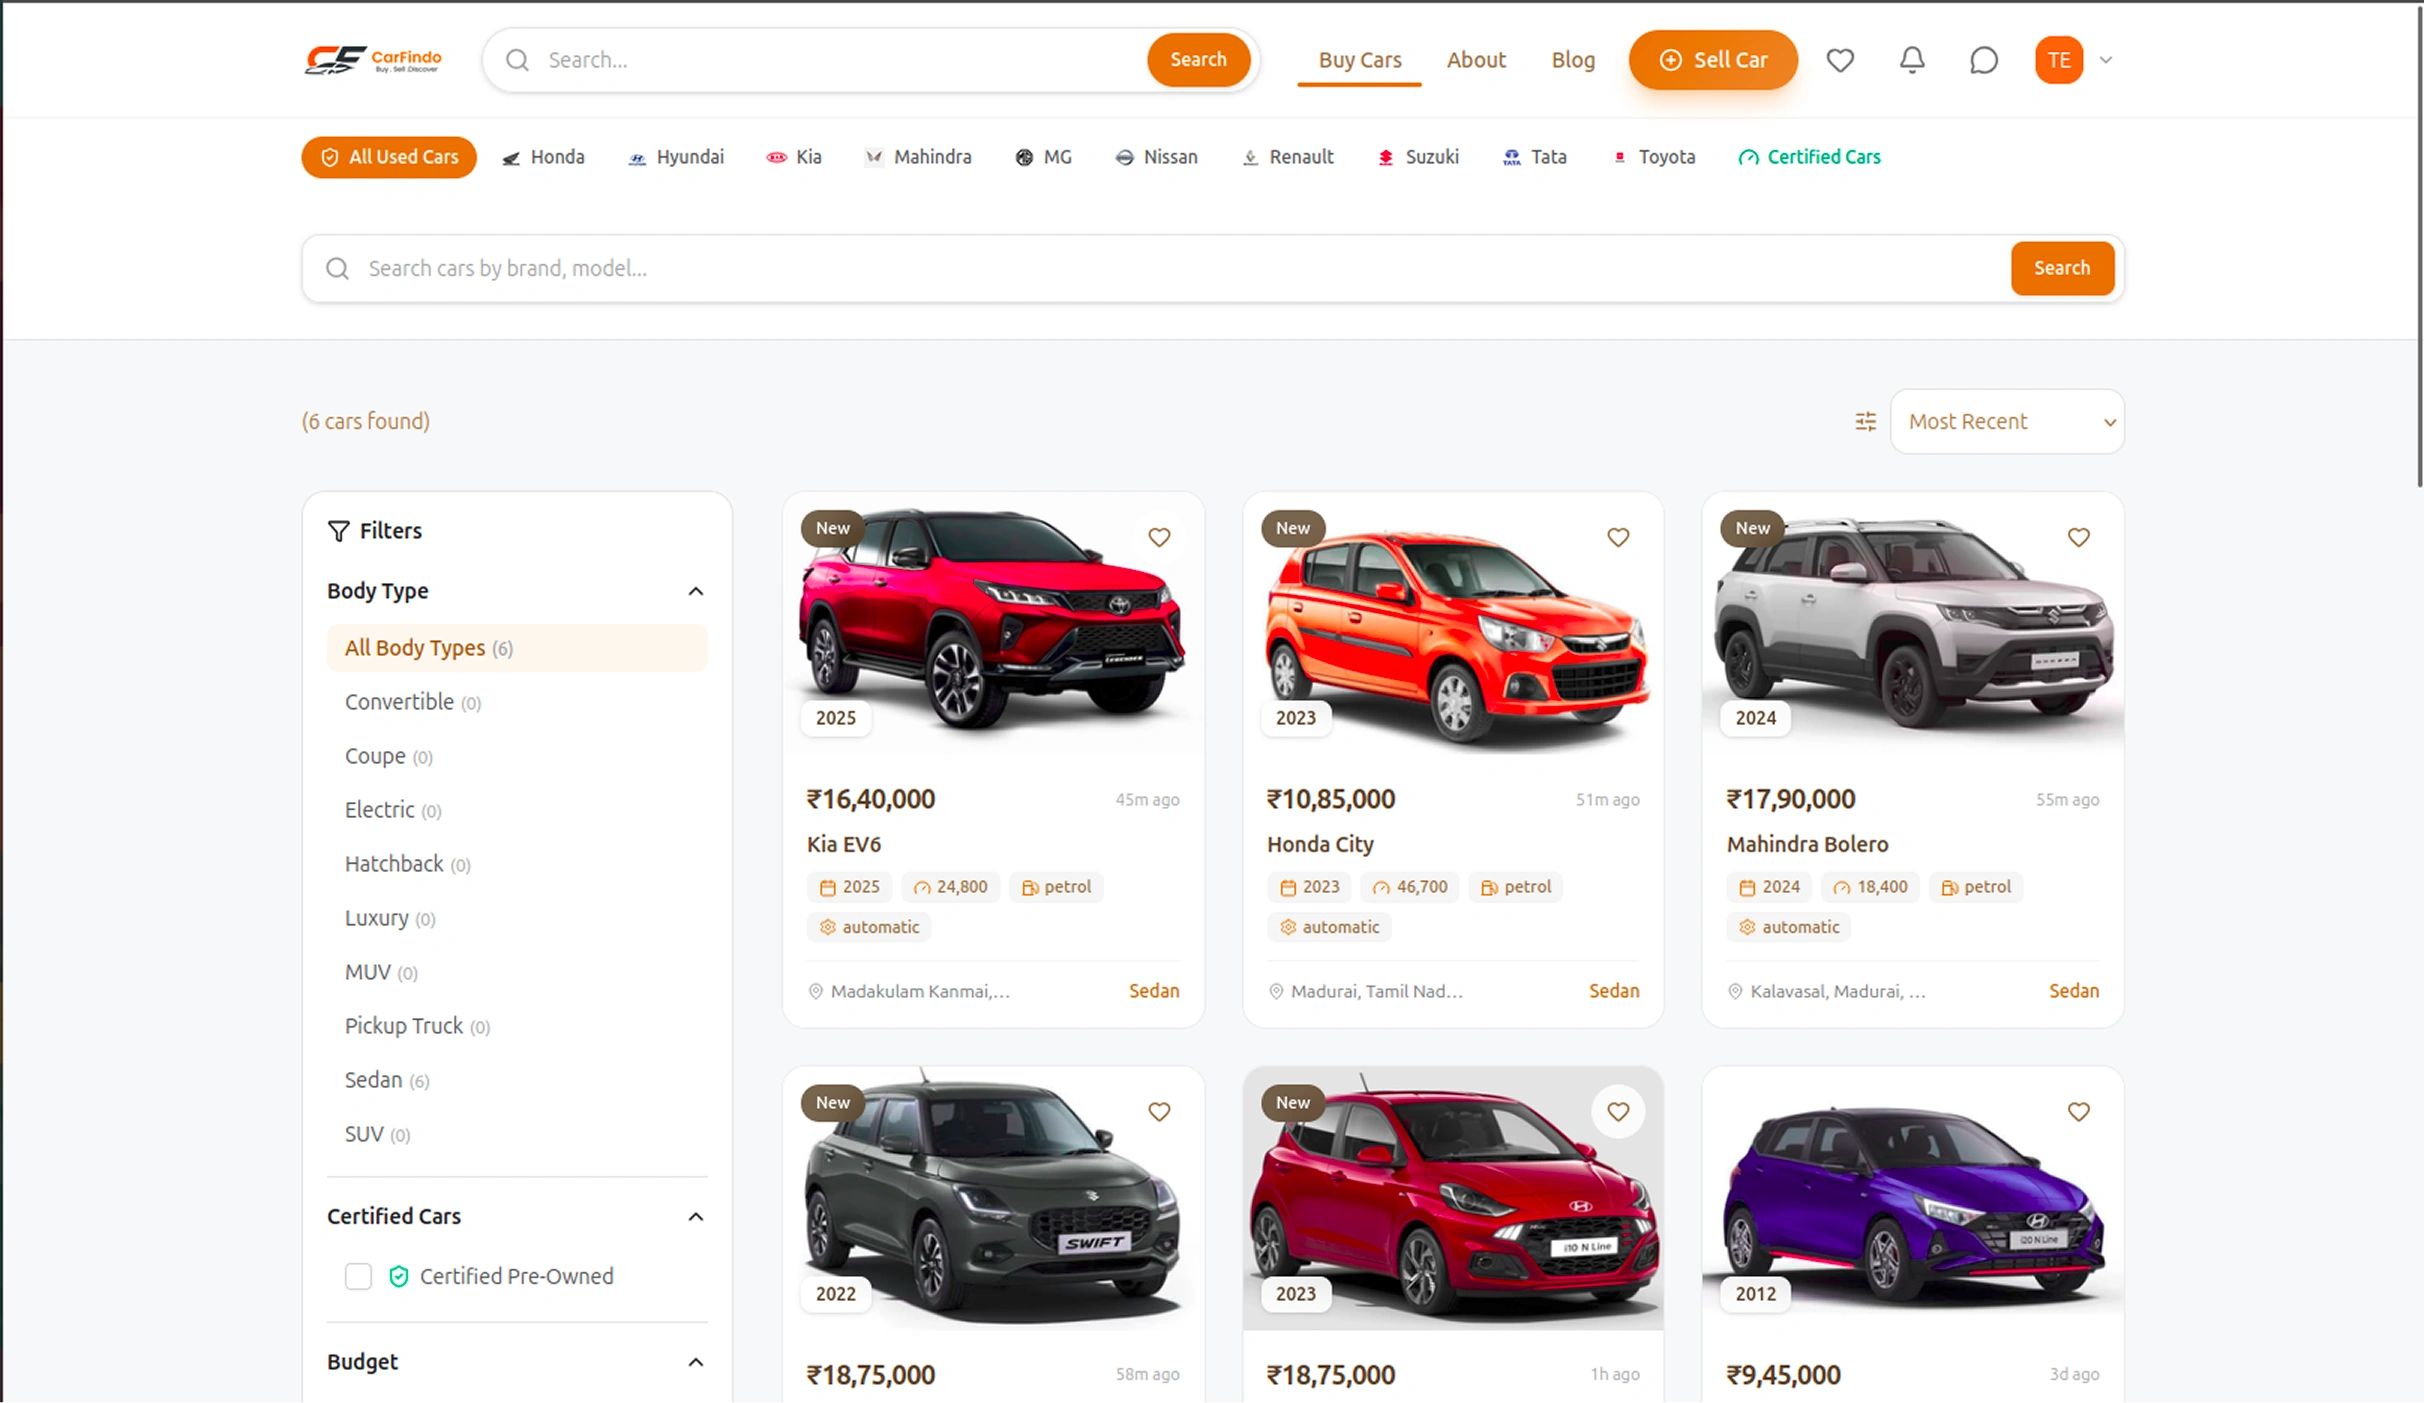
Listings in Admin Panel
Admin Panel: Marketplace → Listings
Go to: Marketplace → Listings
| Field | What It Changes | Action |
|---|---|---|
| Title* | Car listing title | Edit |
| Price (INR) | Car price on Home/Listings/Search + listing detail page | Edit |
| Description | Car description on listing detail page | Edit |
| Images | Car photos on Home/Listings/Search + listing detail page | Add | Edit | Delete |
| Status* | Set status Sold / Paused → car hides from active browse; shows as sold on detail | Dropdown |
| Price Negotiable | Toggle price negotiability | Toggle |
| Certified Pre-Owned | Toggle CPO status | Toggle |
Actions:
View | Edit | Delete
10. Content Menus
| Admin Panel Location | What It Changes | Action |
|---|---|---|
| Content → Blog Posts | Publish → new article appears on /blog + clicking opens /blog/{slug} | Add | Edit | Delete |
| Content → About Pages | /about content | Edit |
| Communication → Contact Page | /contact content/form | Edit |
| Legal → FAQ | /faq accordion items | Add | Edit | Delete |
| Legal → Terms Condition | /terms page | Edit |
| Legal → Privacy Policy | /privacy page | Edit |
11. Trust & Certification
| Admin Panel Location | What It Changes | Action |
|---|---|---|
| Trust & Certification → Verification Requests | Approve →Seller's profile + listings show a verified badge immediately | View | Approve | Reject |
| Trust & Certification → Vehicle History | History shown on that car's detail page | View | Edit | Delete |
| Trust & Certification → Inspection Reports | 200-point inspection report shown on that car's detail page | View | Edit | Delete |
12. Marketing
| Admin Panel Location | What It Changes | Action |
|---|---|---|
| Marketing → Newsletter Campaigns | Click "Send Now" → all active subscribers receive the email | Add | Edit | Send Now |
| Marketing → Newsletter Subscribers | The footer subscribe adds a new subscriber here | View | Delete |
Quick Reference - Where to Customize
| # | Section | Admin Panel Location | What It Changes | Actions |
|---|---|---|---|---|
| 1 | App Settings | Settings → App Settings | App Name, Logo, Favicon, Theme Color, Currency, Hero Image, Phone Code | Add | Edit |
| 2 | CMS - Home Settings | Settings → CMS | Hero Badge/Title/Subtitle, Hero Card, Trust Badges, Brand Section, Featured Section, Why Cards, Sell Section, CTA Section | Add | Edit |
| 3 | Categories | Marketplace → Categories | Category name, icon, status — appears on Home, /categories page, category cards | Add | Edit | Delete |
| 4 | Subcategories | Marketplace → Subcategories | Body Type names, icons, status — Home chips, search filter, Add Listing form | Add | Edit | Delete |
| 5 | Brands | Marketplace → Brands | Brand name, icon, status — Home "Shop by Brand" grid, Sell Car page, search filter, Add Listing dropdown | Add | Edit | Delete |
| 6 | Models | Marketplace → Models | Add Listing Model dropdown (after selecting brand) | Add | Edit | Delete |
| 7 | Attributes | Marketplace → Attributes | Add Listing "Car Attributes" section, listing detail specs, search filter options | Add | Edit | Delete |
| 8 | Cities | Marketplace → Cities | Search location filter dropdown, location suggestions | Add | Edit | Delete |
| 9 | Listings | Marketplace → Listings | Title, Price, Images, Status (Sold/Paused hides from active browse) | View | Edit | Delete |
| 10 | Content Pages | Content → Blog, About | Blog posts on /blog, About page on /about | Add | Edit | Delete |
| 11 | Legal Pages | Legal → FAQ, Terms, Privacy | FAQ on /faq, Terms on /terms, Privacy on /privacy | Add | Edit | Delete |
| 12 | Verification | Trust & Certification → Verification Requests | Approve →Seller gets verified badge on profile + listings | View | Approve | Reject |
| 13 | Vehicle History & Inspections | Trust & Certification → Vehicle History, Inspection Reports | History + inspection report shown on car detail page | View | Edit | Delete |
| 14 | Newsletter | Marketing → Newsletter Campaigns, Newsletter Subscribers | Send campaigns to subscribers; footer subscribe adds subscribers | Add | Edit | Send Now | Delete |
Theme Color Customization
How to Change Theme Color
- Go to Settings → App Settings
- Find the "Theme Color (Hex)" field
- Enter a valid Hex color code (e.g.,
#f97316,#4032ae) - Save the changes
- The website will automatically update with the new color scheme
Where the Theme Color Applies
- All buttons and call-to-action elements
- Navigation links and active states
- Section headings and borders
- Icons and accent elements
- Hover and focus states
- Footer links and branding
- Highlight boxes and notification badges
lightbulb
Pro Tip: All changes made in the admin panel reflect instantly on
the website. No need to rebuild or redeploy! The Theme Color field allows you to
completely rebrand the website's look and feel with just a single color change.
phone_android Customer Application (React Native - Separate App)
info
Customer Application Setup
This guide explains how to install, configure and run the Customer Application (React Native) on both Android and iOS devices. This is a separate application from the Unified Application (Admin + Website). Follow every step carefully before building the application.
Prerequisites
Step 1: Install Node.js
Download and install Node.js from the official website.
https://nodejs.org/en/download# Verify Installation
node -v
npm -v
Step 2: Install Android Studio
Download Android Studio from the official website.
https://developer.android.com/studio- Install Android SDK.
- Install Build Tools.
- Create an Android Virtual Device (AVD).
- Configure Android environment variables.
Step 3: Install Xcode (iOS Only)
- Download Xcode from the Mac App Store.
- Install Command Line Tools.
- Create an iOS Simulator.
Setup & Installation
Step 1: Copy Customer Folder
Copy the Customer folder into your preferred location.
info
Note: If you rename the folder, remember to update the Bundle ID before building the application.
Step 2: Install Dependencies
Open terminal inside the Customer Application and run:
npm install
If you use Yarn, execute:
yarn install
Step 3: Install iOS Pods
Navigate into the iOS folder.
cd ios
pod install
Step 4: Run the Application
Android
npx react-native run-android
iOS
npx react-native run-ios
check_circle
The Customer Application will launch on your connected device or emulator after the build completes successfully.
app_registration App Name & Icon
info
Customize Your Application
You can personalize the Customer Application by changing the app name and launcher icon before publishing it to the Play Store or App Store.
Changing App Name
For Android, open the following file:
folder_open CustomerApp/android/app/src/main/res/values/strings.xml
<string name="app_name">Your App Name</string>
Replace Your App Name with the name you want to display
on the device home screen.
iOS App Name
Open the following project in Xcode:
folder_open ios/CustomerApp.xcodeproj
- Select the Customer Application target.
- Open the General tab.
- Update the Display Name.
- Save the project.
Changing App Icon
Replace the default launcher icons with your own branded icons.
android Android Launcher Icon
- Replace all icons inside
android/app/src/main/res/mipmap-*. - Replace adaptive icons in
mipmap-anydpi-v26. - Keep the same file names.
- Do not change folder names.
phone_iphone iOS App Icon
- Open the project using Xcode.
- Navigate to Assets.xcassets → AppIcon.
- Replace all required icon sizes.
- Build the application again.
warning
Make sure all launcher icons follow Android and Apple size guidelines. Incorrect icon dimensions may cause build or submission errors.
check_circle
Your application name and launcher icon have been successfully customized. Rebuild the application to see the updated branding.
package Package Name Configuration
info
Change Your Application Package Name
Before publishing your application, update the package name (Android) and Bundle Identifier (iOS) so your application has a unique identity on Google Play and the App Store.
Android Configuration
Open the following file:
folder_open CustomerApp/android/app/build.gradle
android {

    defaultConfig {

        applicationId "com.yourcompany.yourapp"

    }

}
Update the following locations:
- applicationId inside
build.gradle - package name inside
AndroidManifest.xml - Java/Kotlin package folders if required
- MainActivity package declaration
- MainApplication package declaration
iOS Configuration
Open the following project:
folder_open ios/CustomerApp.xcodeproj
- Select the Customer project.
- Select the application target.
- Open the General tab.
- Update the Bundle Identifier.
- Ensure all targets use the same Bundle Identifier.
warning
Never use a package name that already exists on Google Play or App Store. Every published application must have a unique package name.
error
Important: If you change the package name after publishing your application, Google Play and Apple App Store will treat it as a completely new application.
check_circle
After updating the package name and bundle identifier, clean the project and rebuild the application before generating a release build.
construction Custom Work
If you require additional features, UI changes, third-party integrations, new modules, or any other customization that is not included in the default package, our development team can help tailor the application to your business requirements.
build Custom Development Services
- New feature development
- UI/UX customization
- Payment gateway integration
- SMS & Email service integration
- Map provider integration
- API integration with third-party services
- Mobile application customization
- Admin panel enhancements
- Performance optimization
- Deployment assistance
Contact Us
For custom development requests, please contact our team using the details below.
language
Website
https://menpanitech.com/
mail
Email
sales@menpanitech.com
info
Note: Custom development services are not included with the regular purchase. The implementation cost and delivery time depend on the complexity of the requested features.
history Version History
new_releases Initial Release
This is the first official release of the CarFindo platform, introducing the core functionality required to operate a complete used-car marketplace solution.
new_releases
Version 1.0.0
Initial Release-
rocket_launch
Initial Platform Release
First stable release of the CarFindo used-car marketplace platform.
-
app_registration
Auth & Onboarding
Email + phone registration with OTP verification, login, and forgot/reset password functionality.
-
search
Browse & Search
Categories, subcategories, filters/search with live suggestions, trending and recent searches.
-
sell
Create & Manage Listings
Multi-step wizard with auto-save draft, VIN/RC validation, normalization, and masking. Manage, edit, pause, clone, relist, and mark sold.
-
chat
Buyer-Seller Chat
DB-persisted conversations mirrored to Firebase Realtime DB with live subscriptions, emoji picker, and photo attachment.
-
star
Post-Sale Rating
Seller selects buyer, buyer confirms/denies purchase, seller rates buyer with stars and review.
-
verified
Seller Verification
Business/GST/license submission with admin review and verifiedSeller badges on profiles.
-
notifications
In-App Notifications
Notification feed, unread counts, and mark-all-read functionality.
-
campaign
Newsletter
Subscribe/unsubscribe with queued campaign delivery.
-
admin_panel_settings
Complete Admin Dashboard
Manage customers, listings, brands, categories, inspections, vehicle history, blog, FAQ, legal pages, and more.
-
mobile_friendly
Customer Mobile App
React Native application for customers to browse, buy, and sell cars on the go.
local_fire_department Firebase Configuration
Admin Panel Configuration
Project Setup
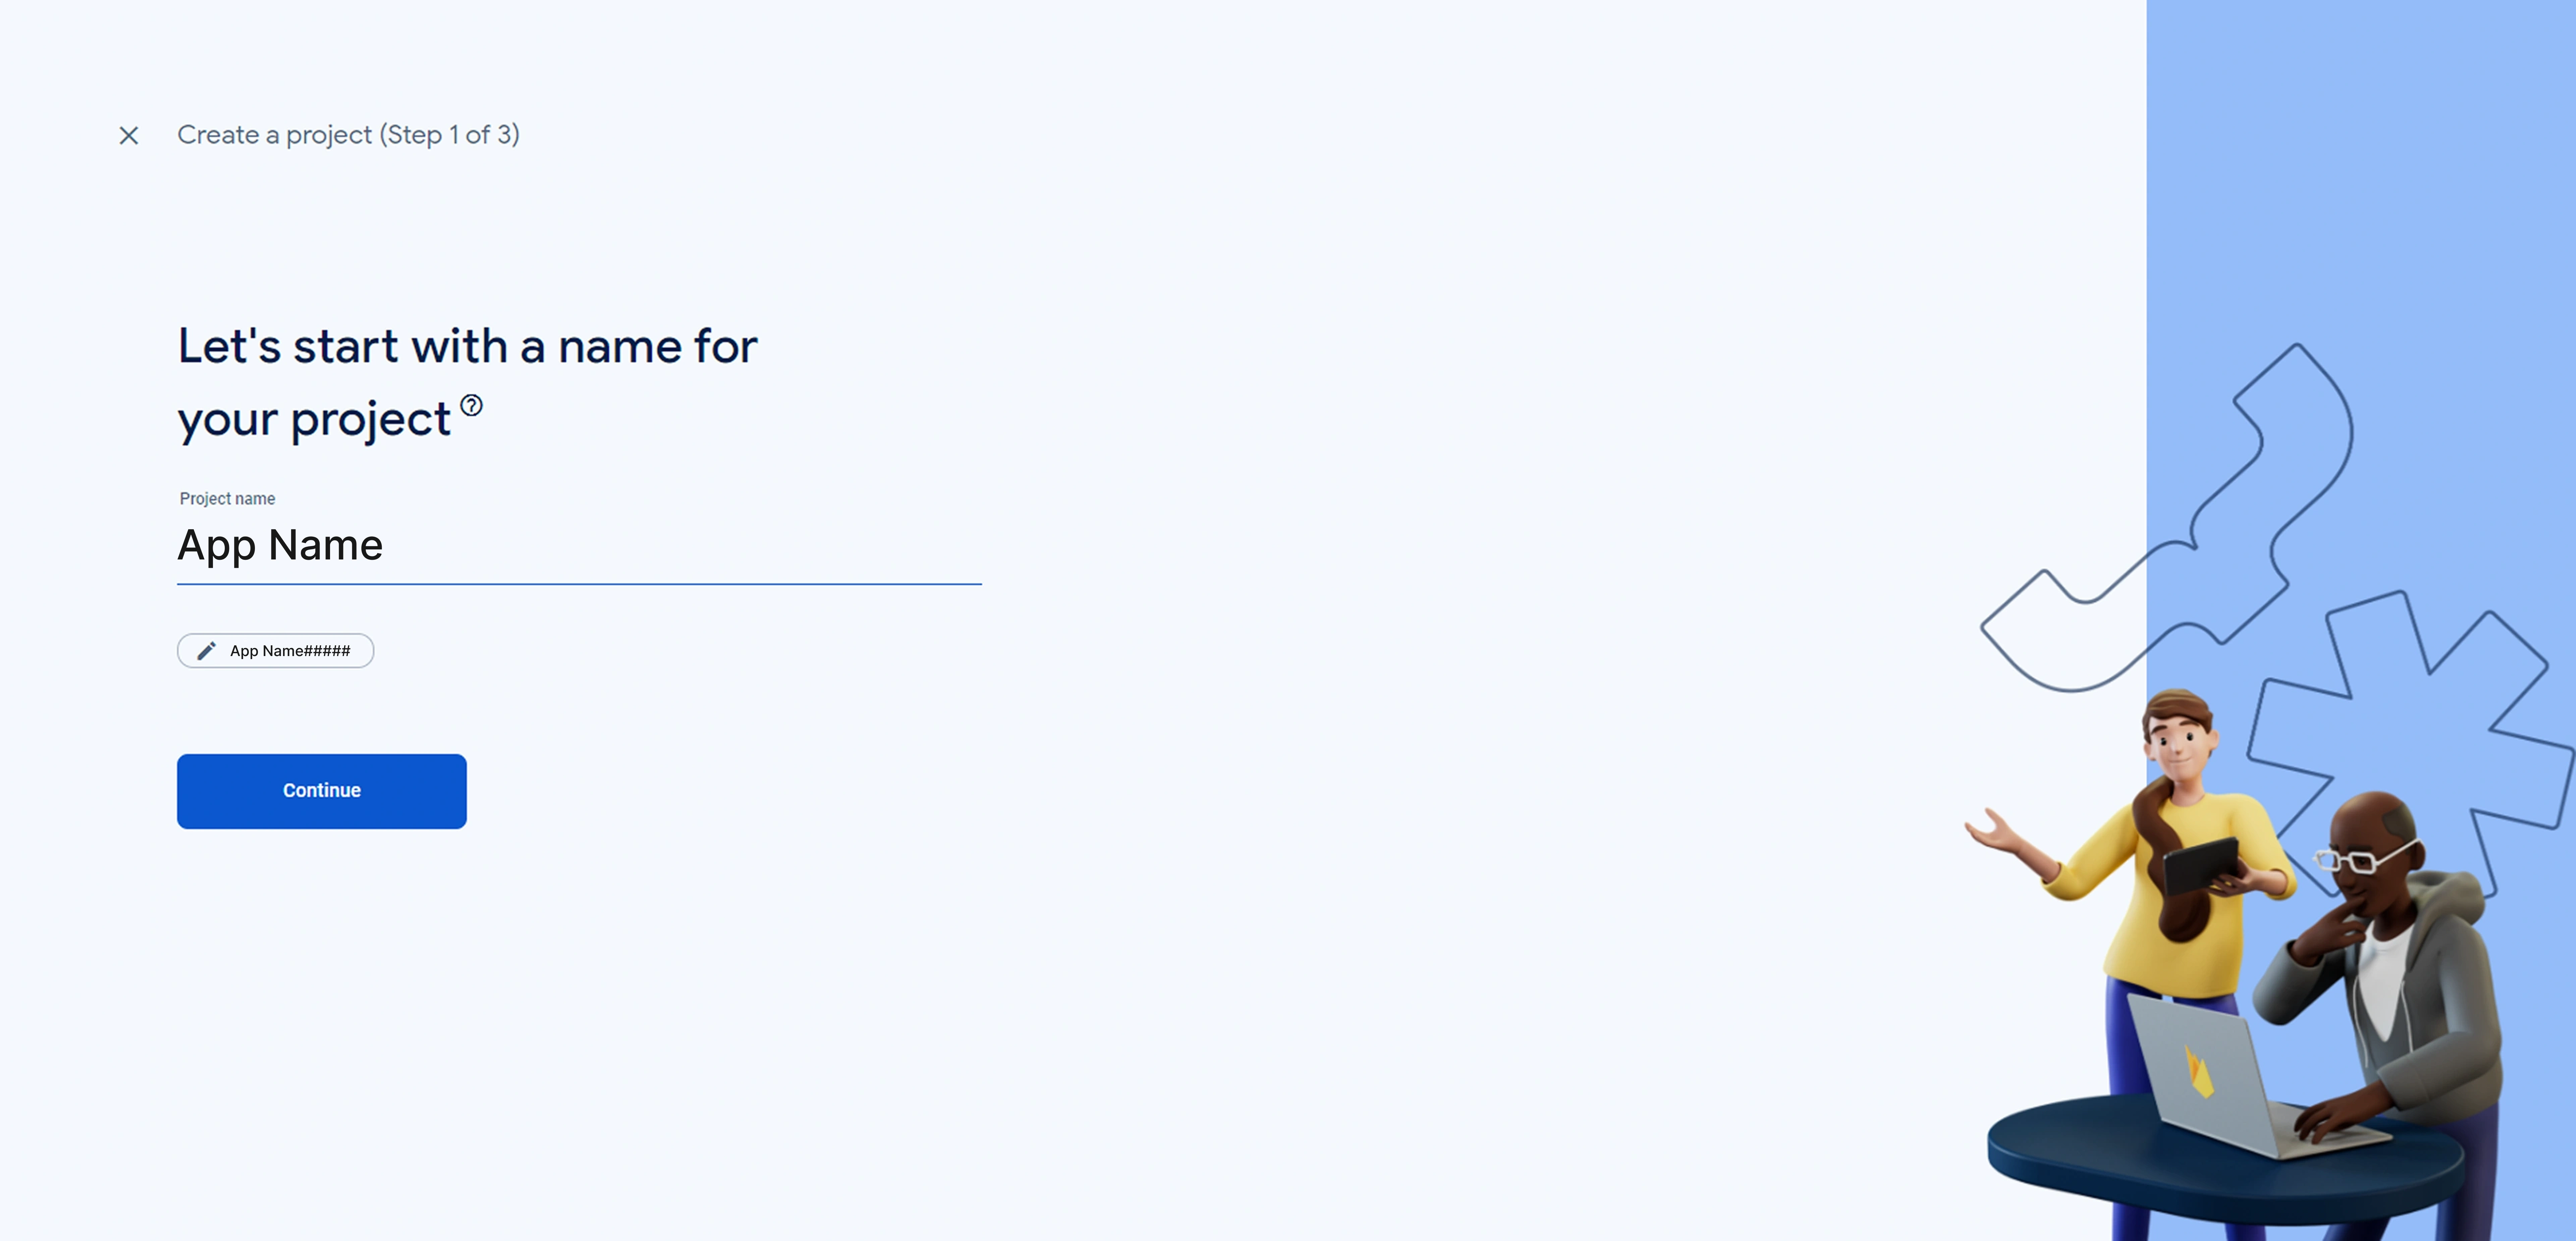
- Go to Firebase Console and create a new project
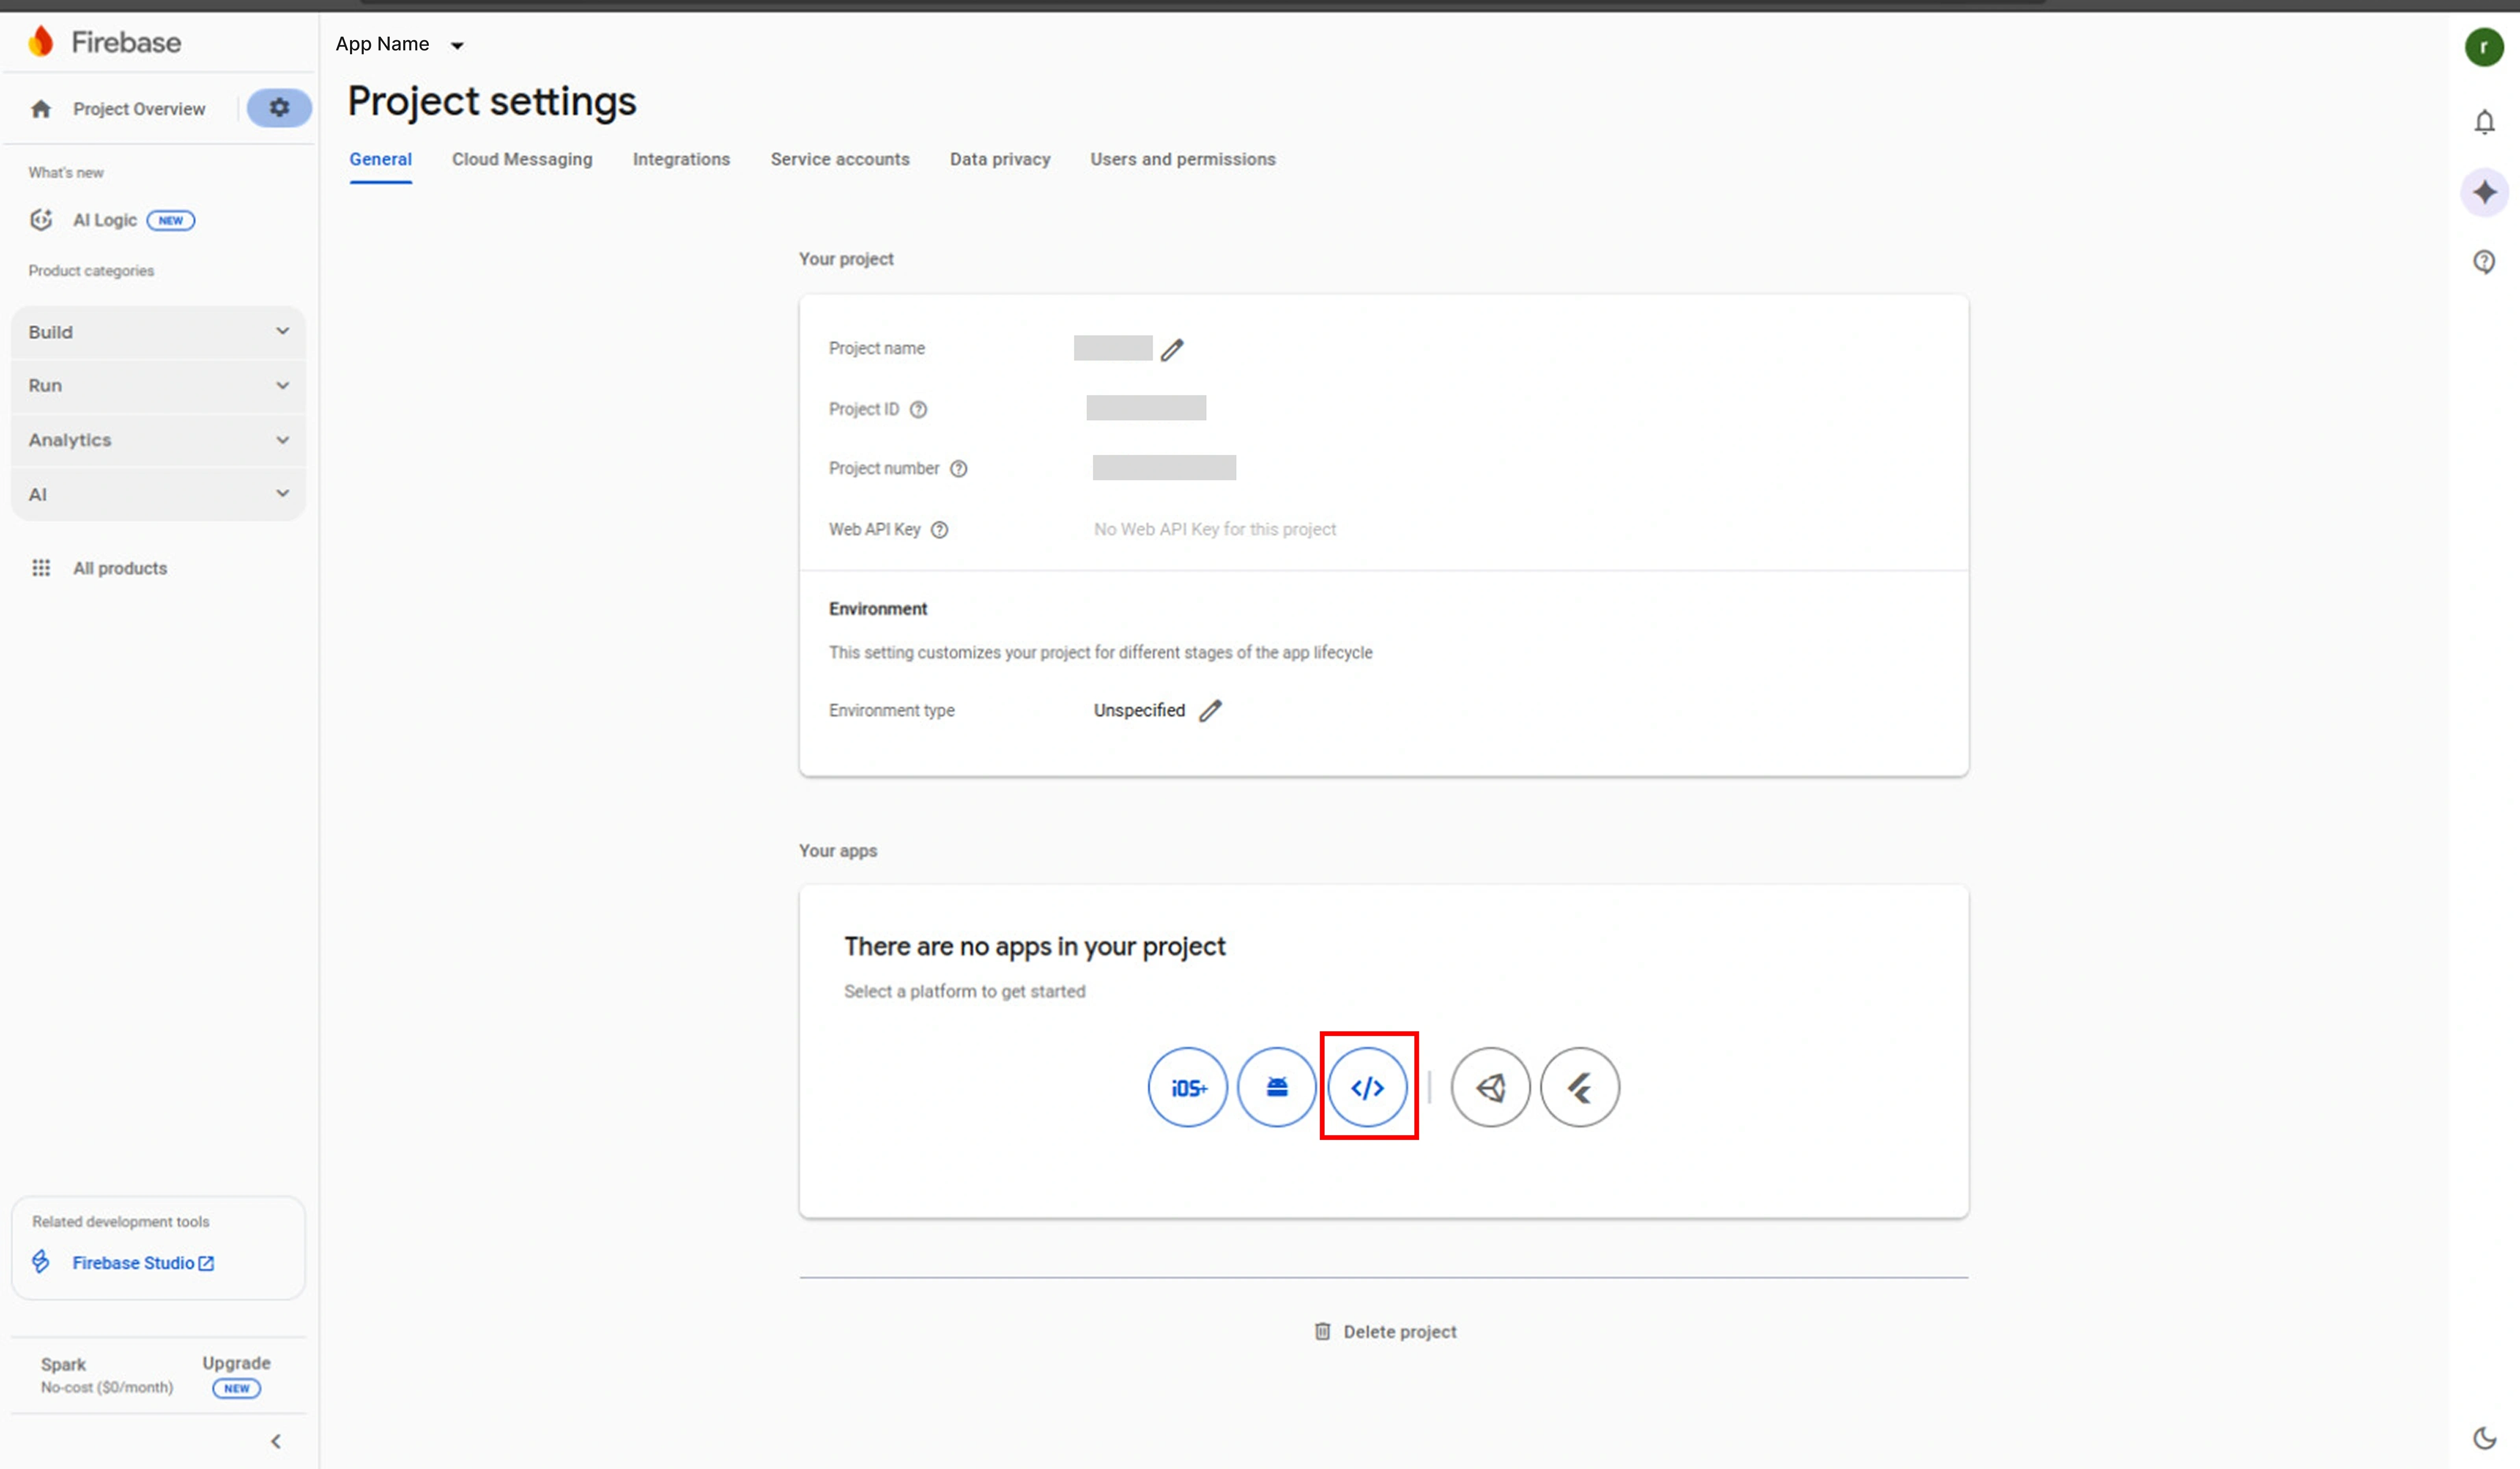
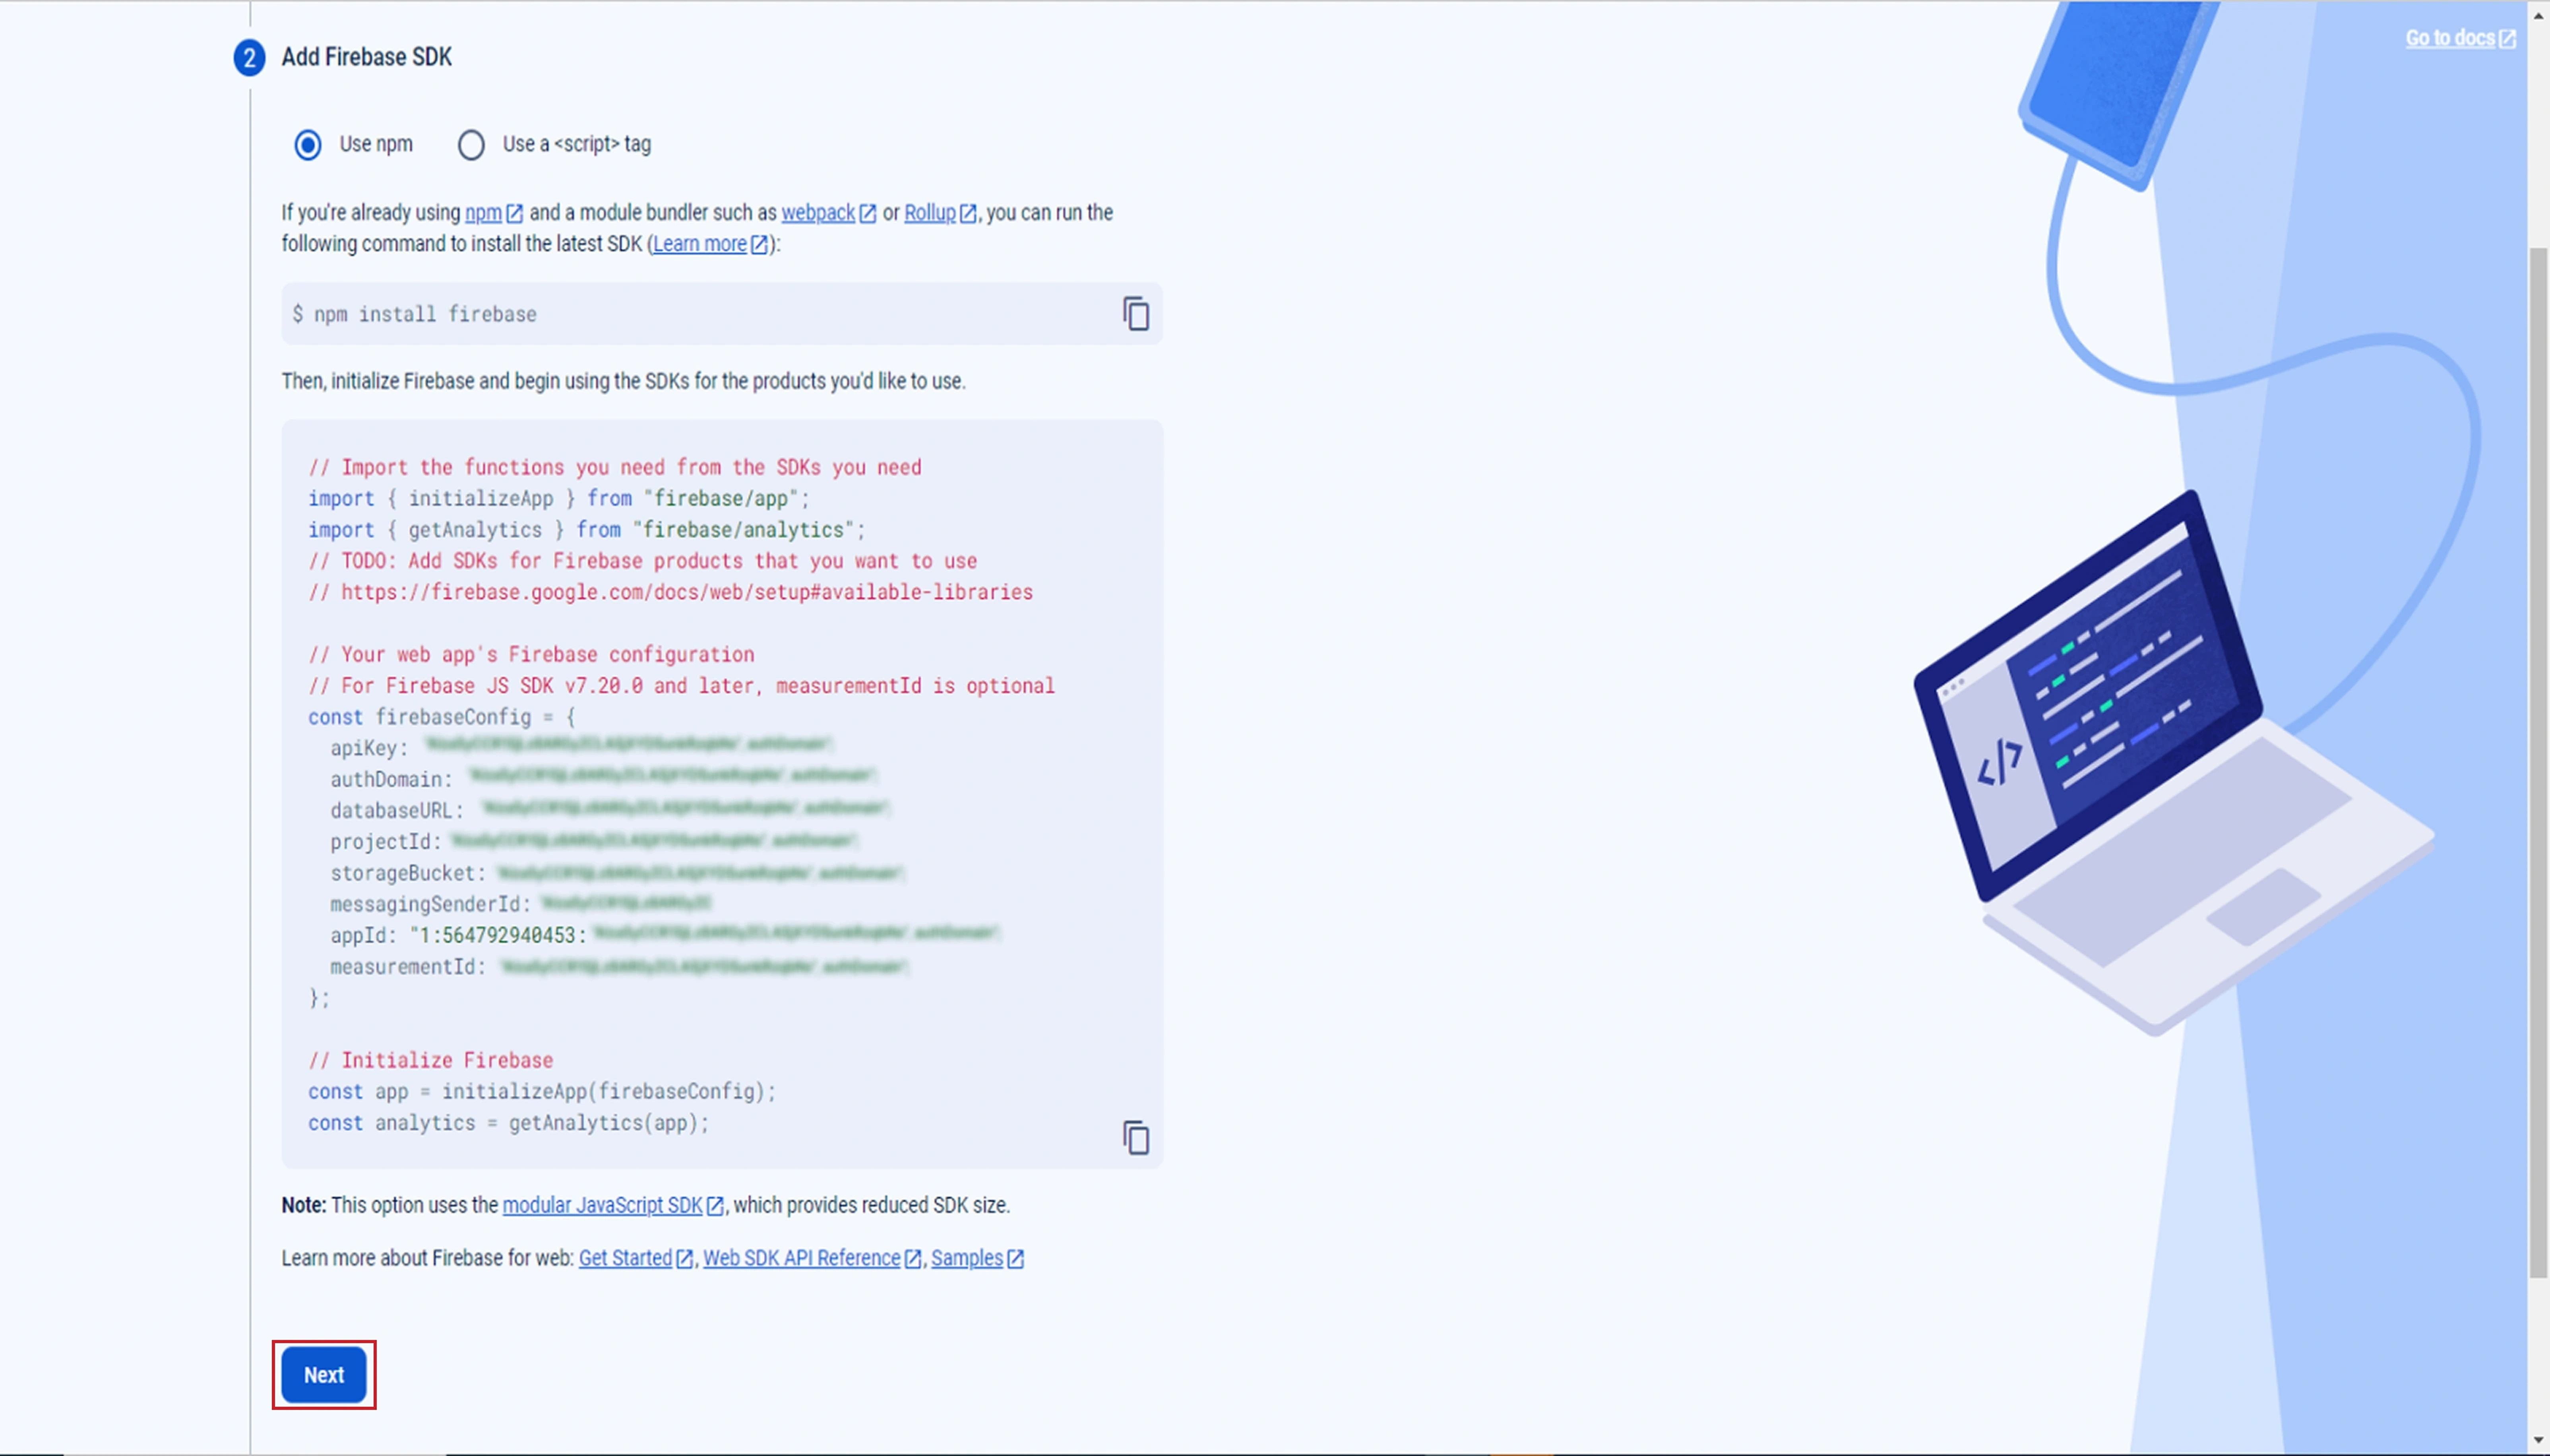
- Create a web app in your Firebase project
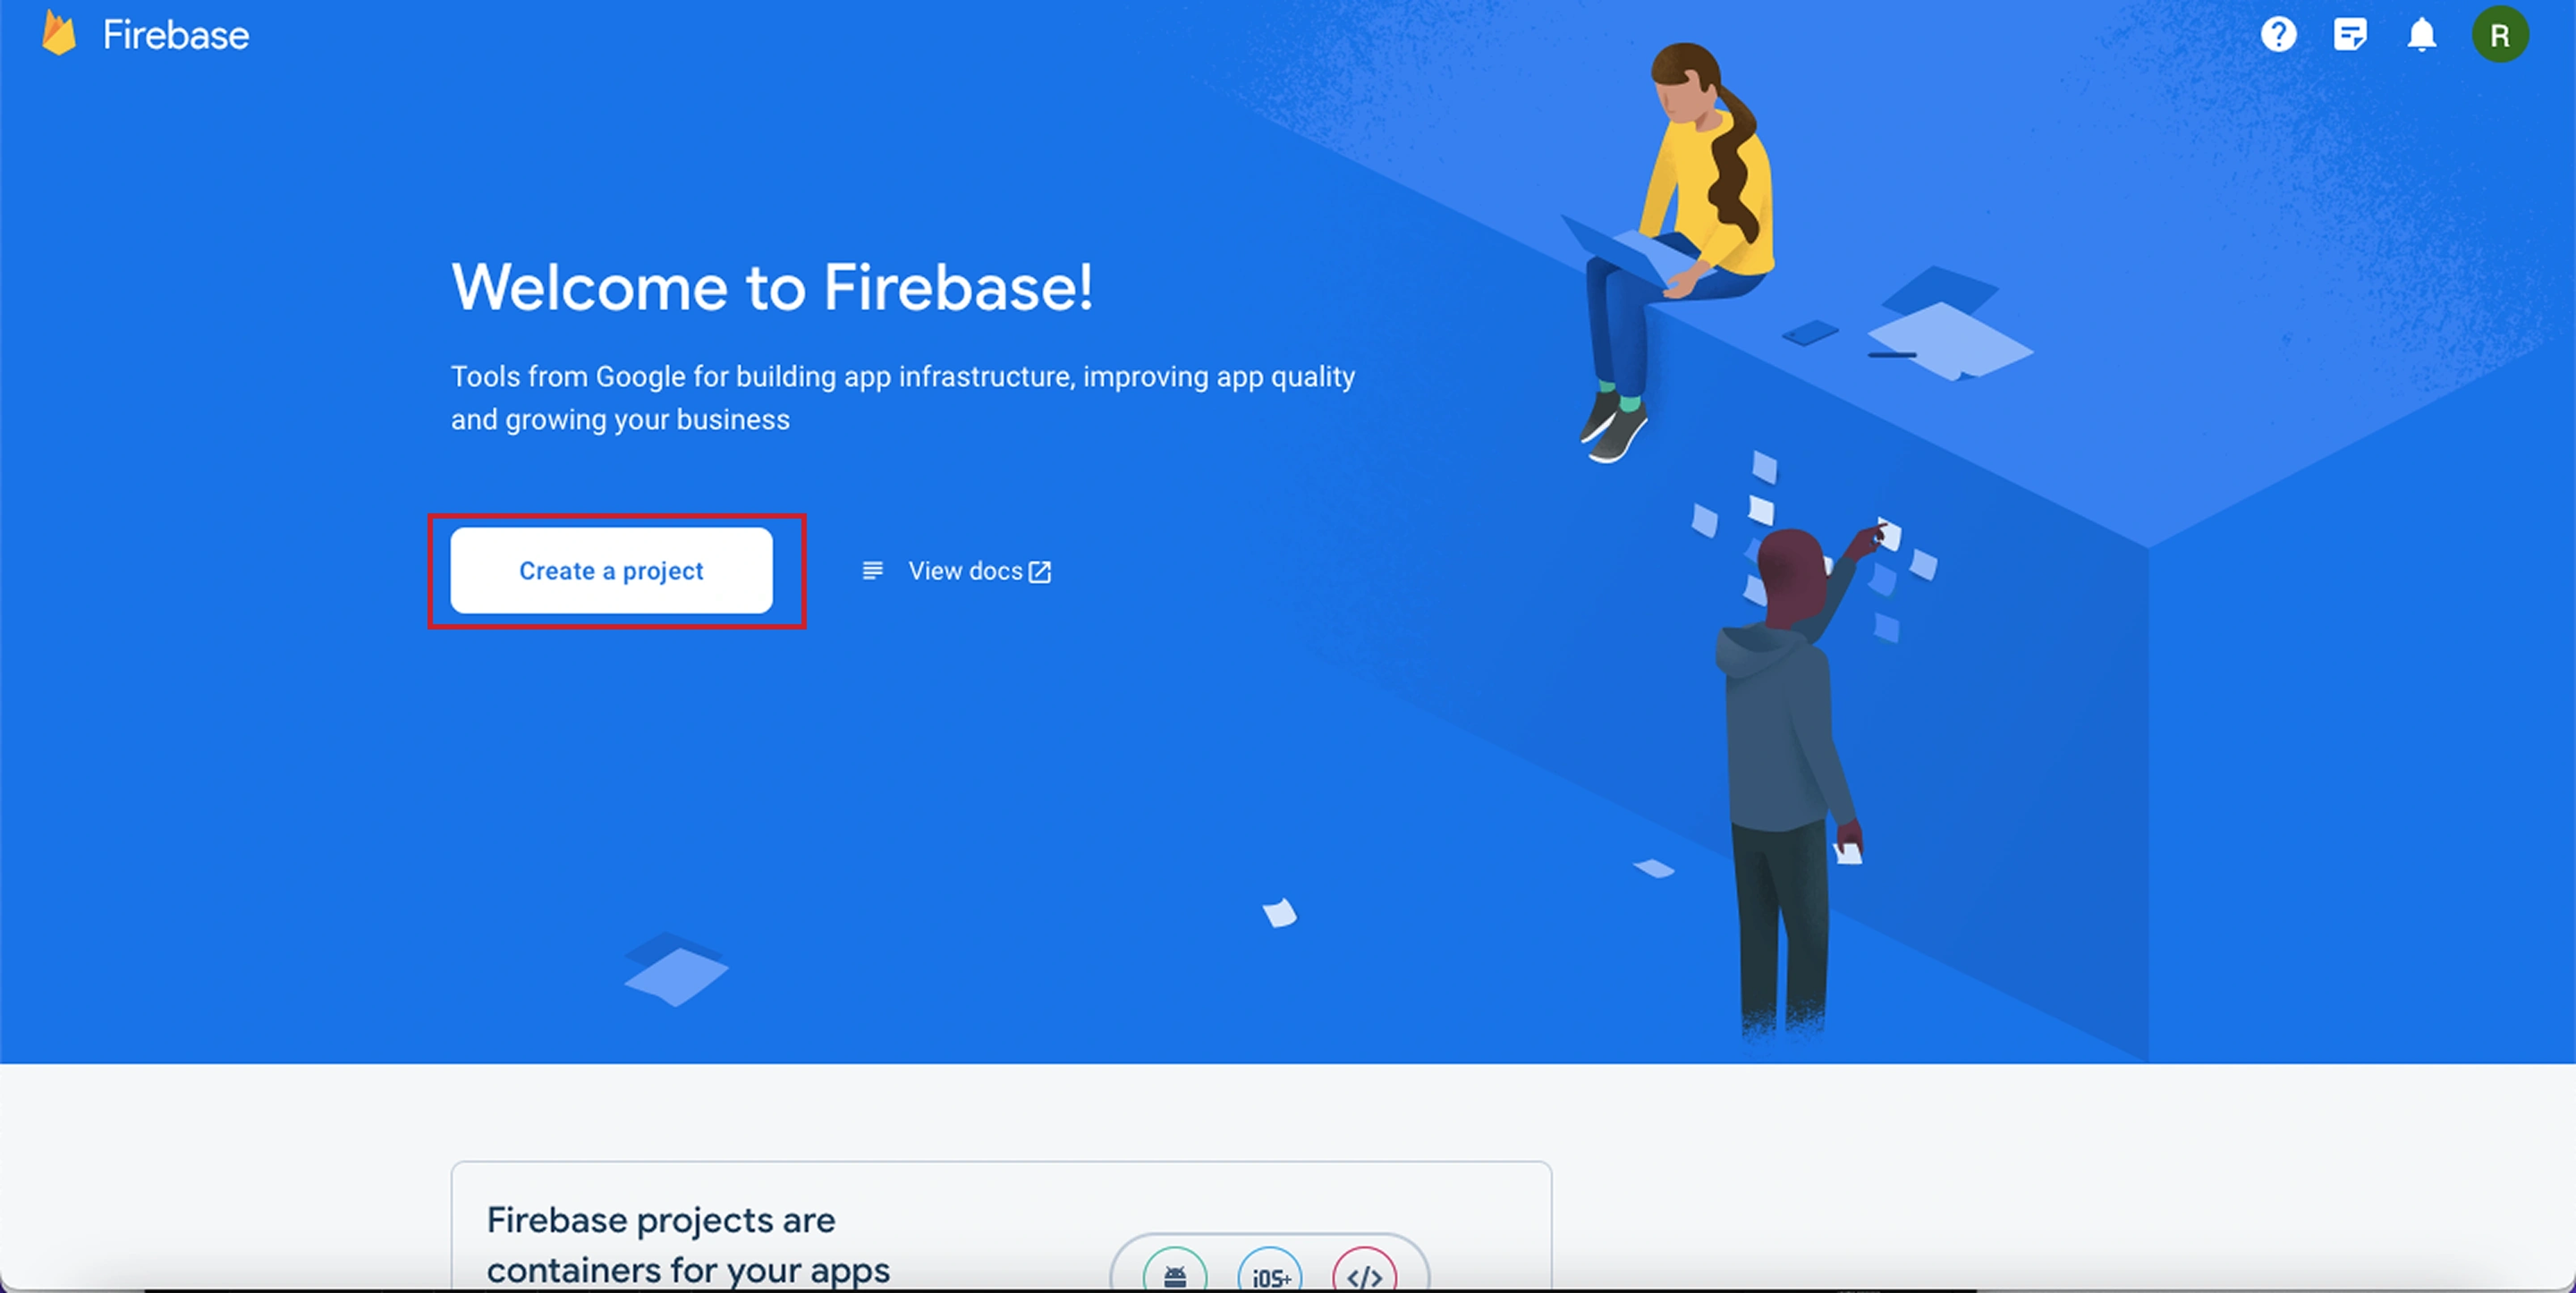
Database Configuration
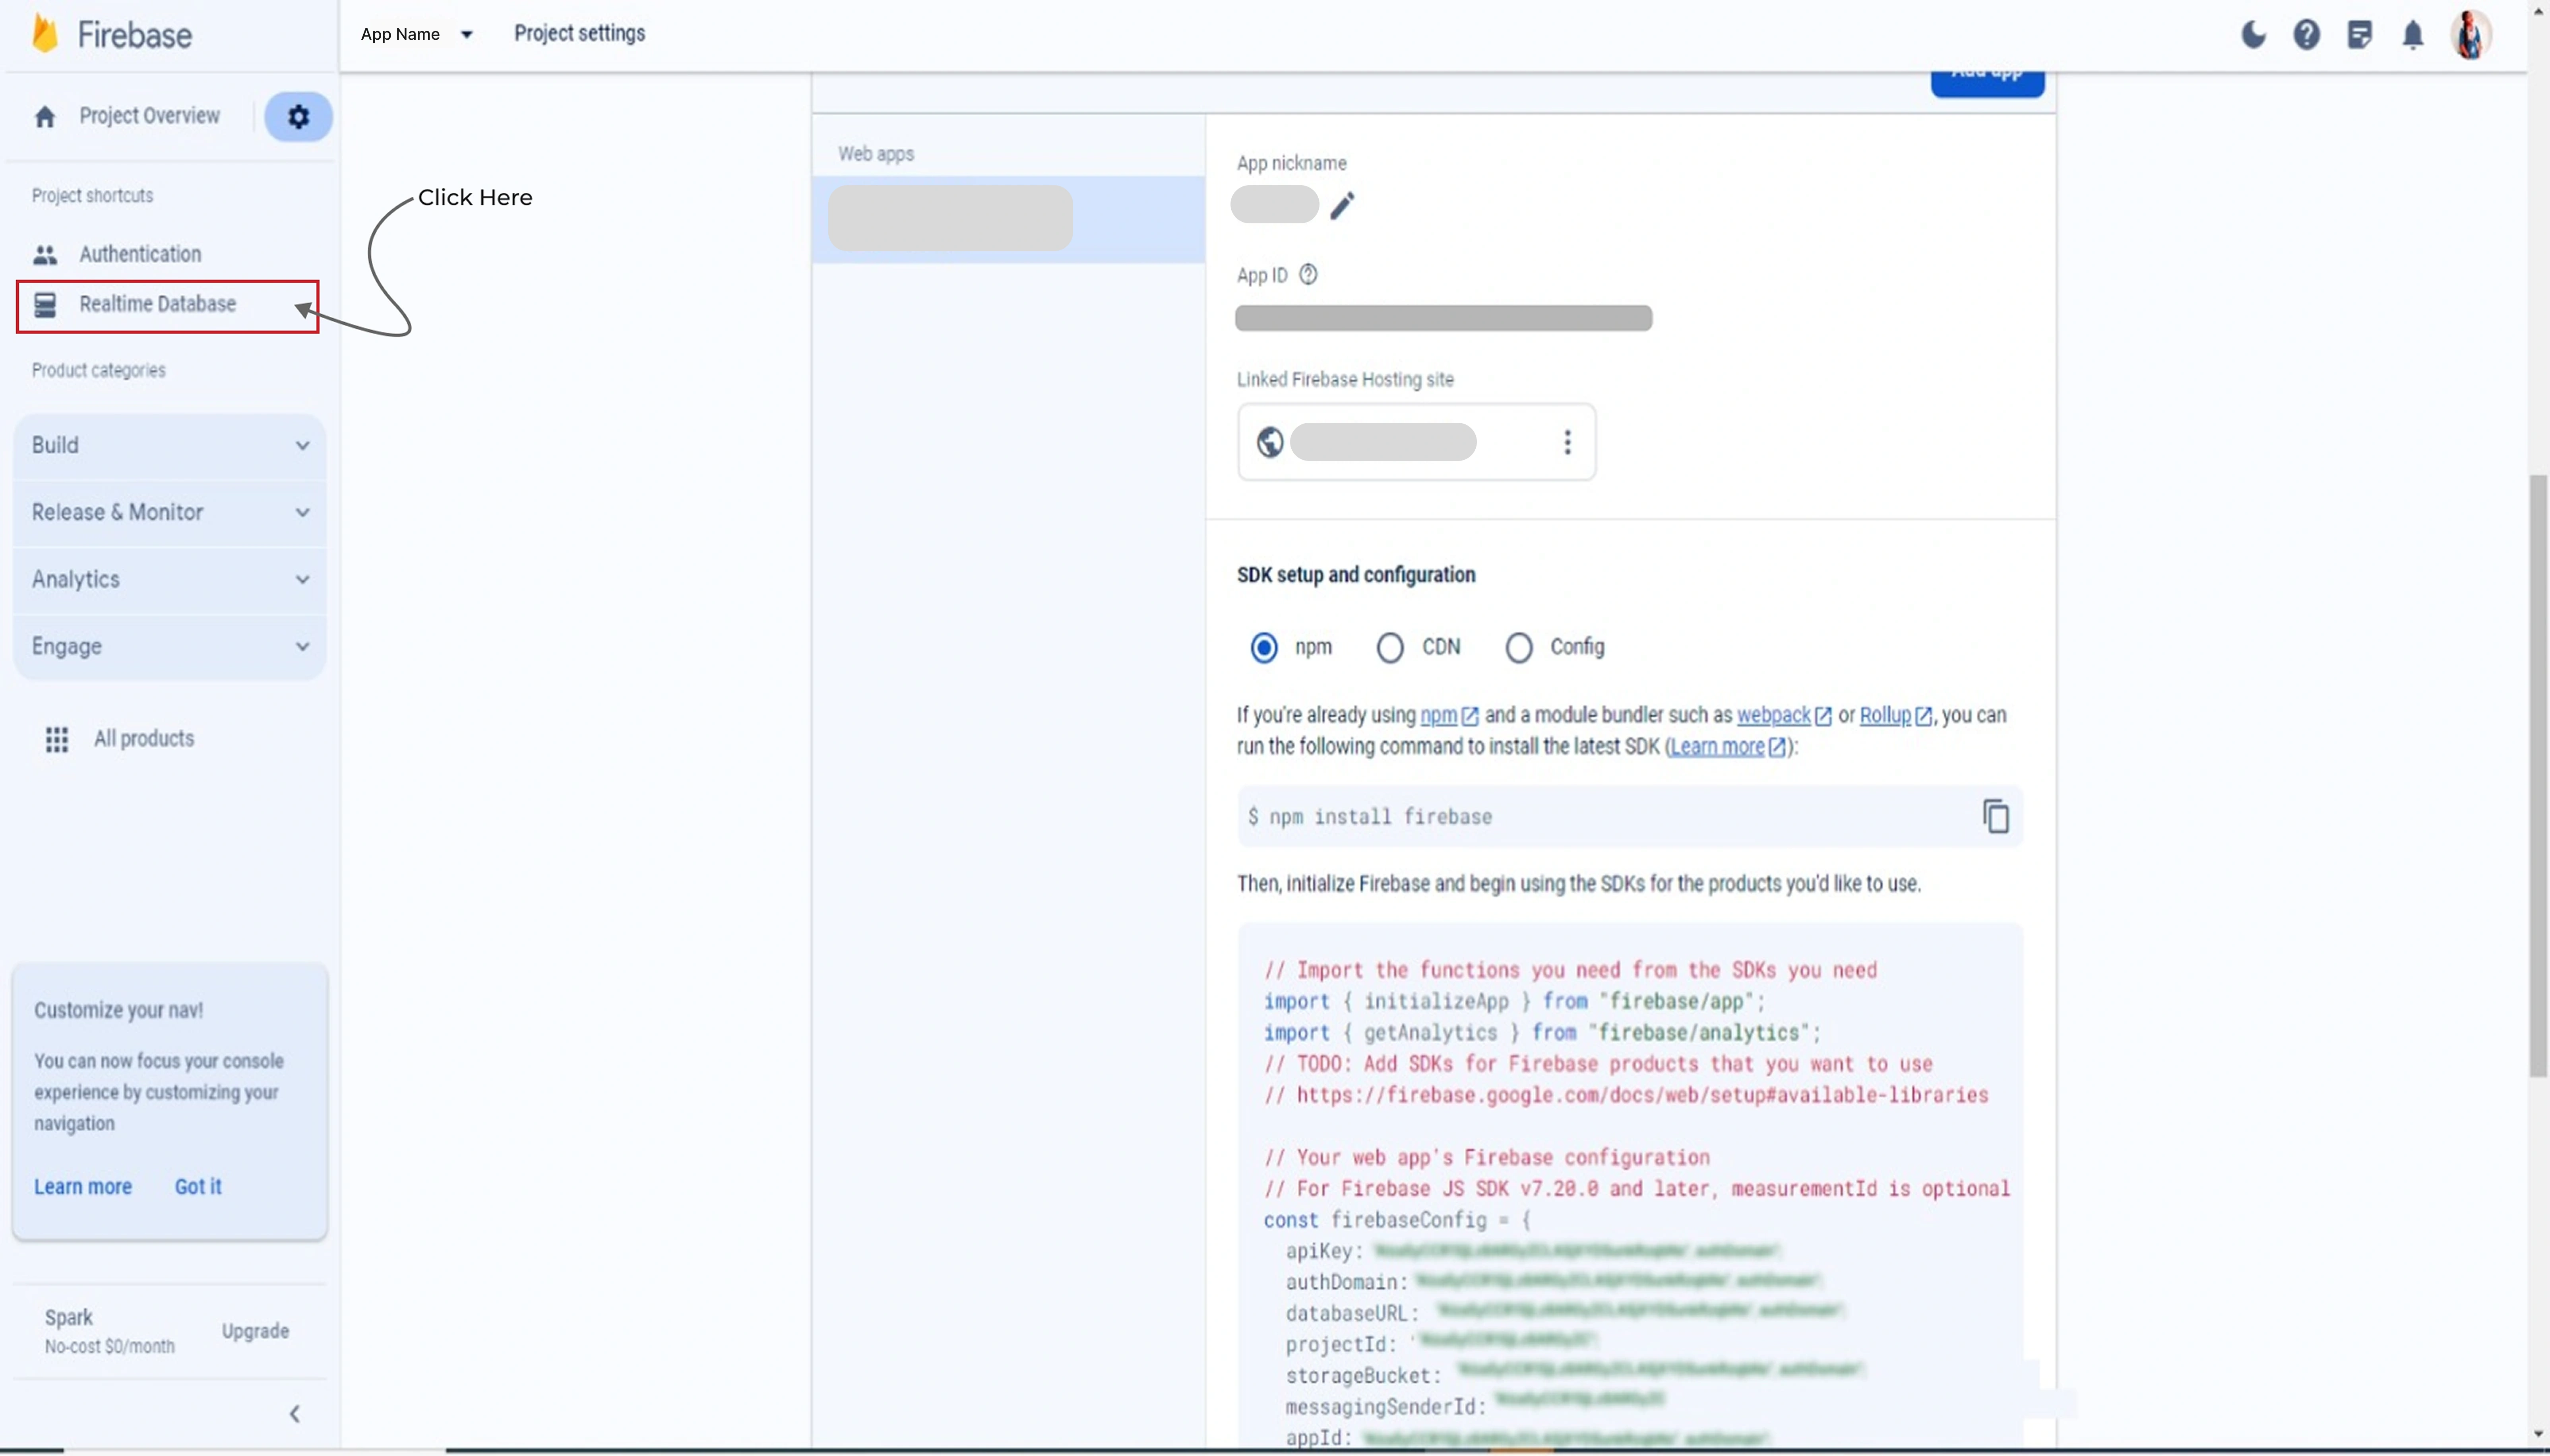
- Navigate to your project dashboard and create the Database
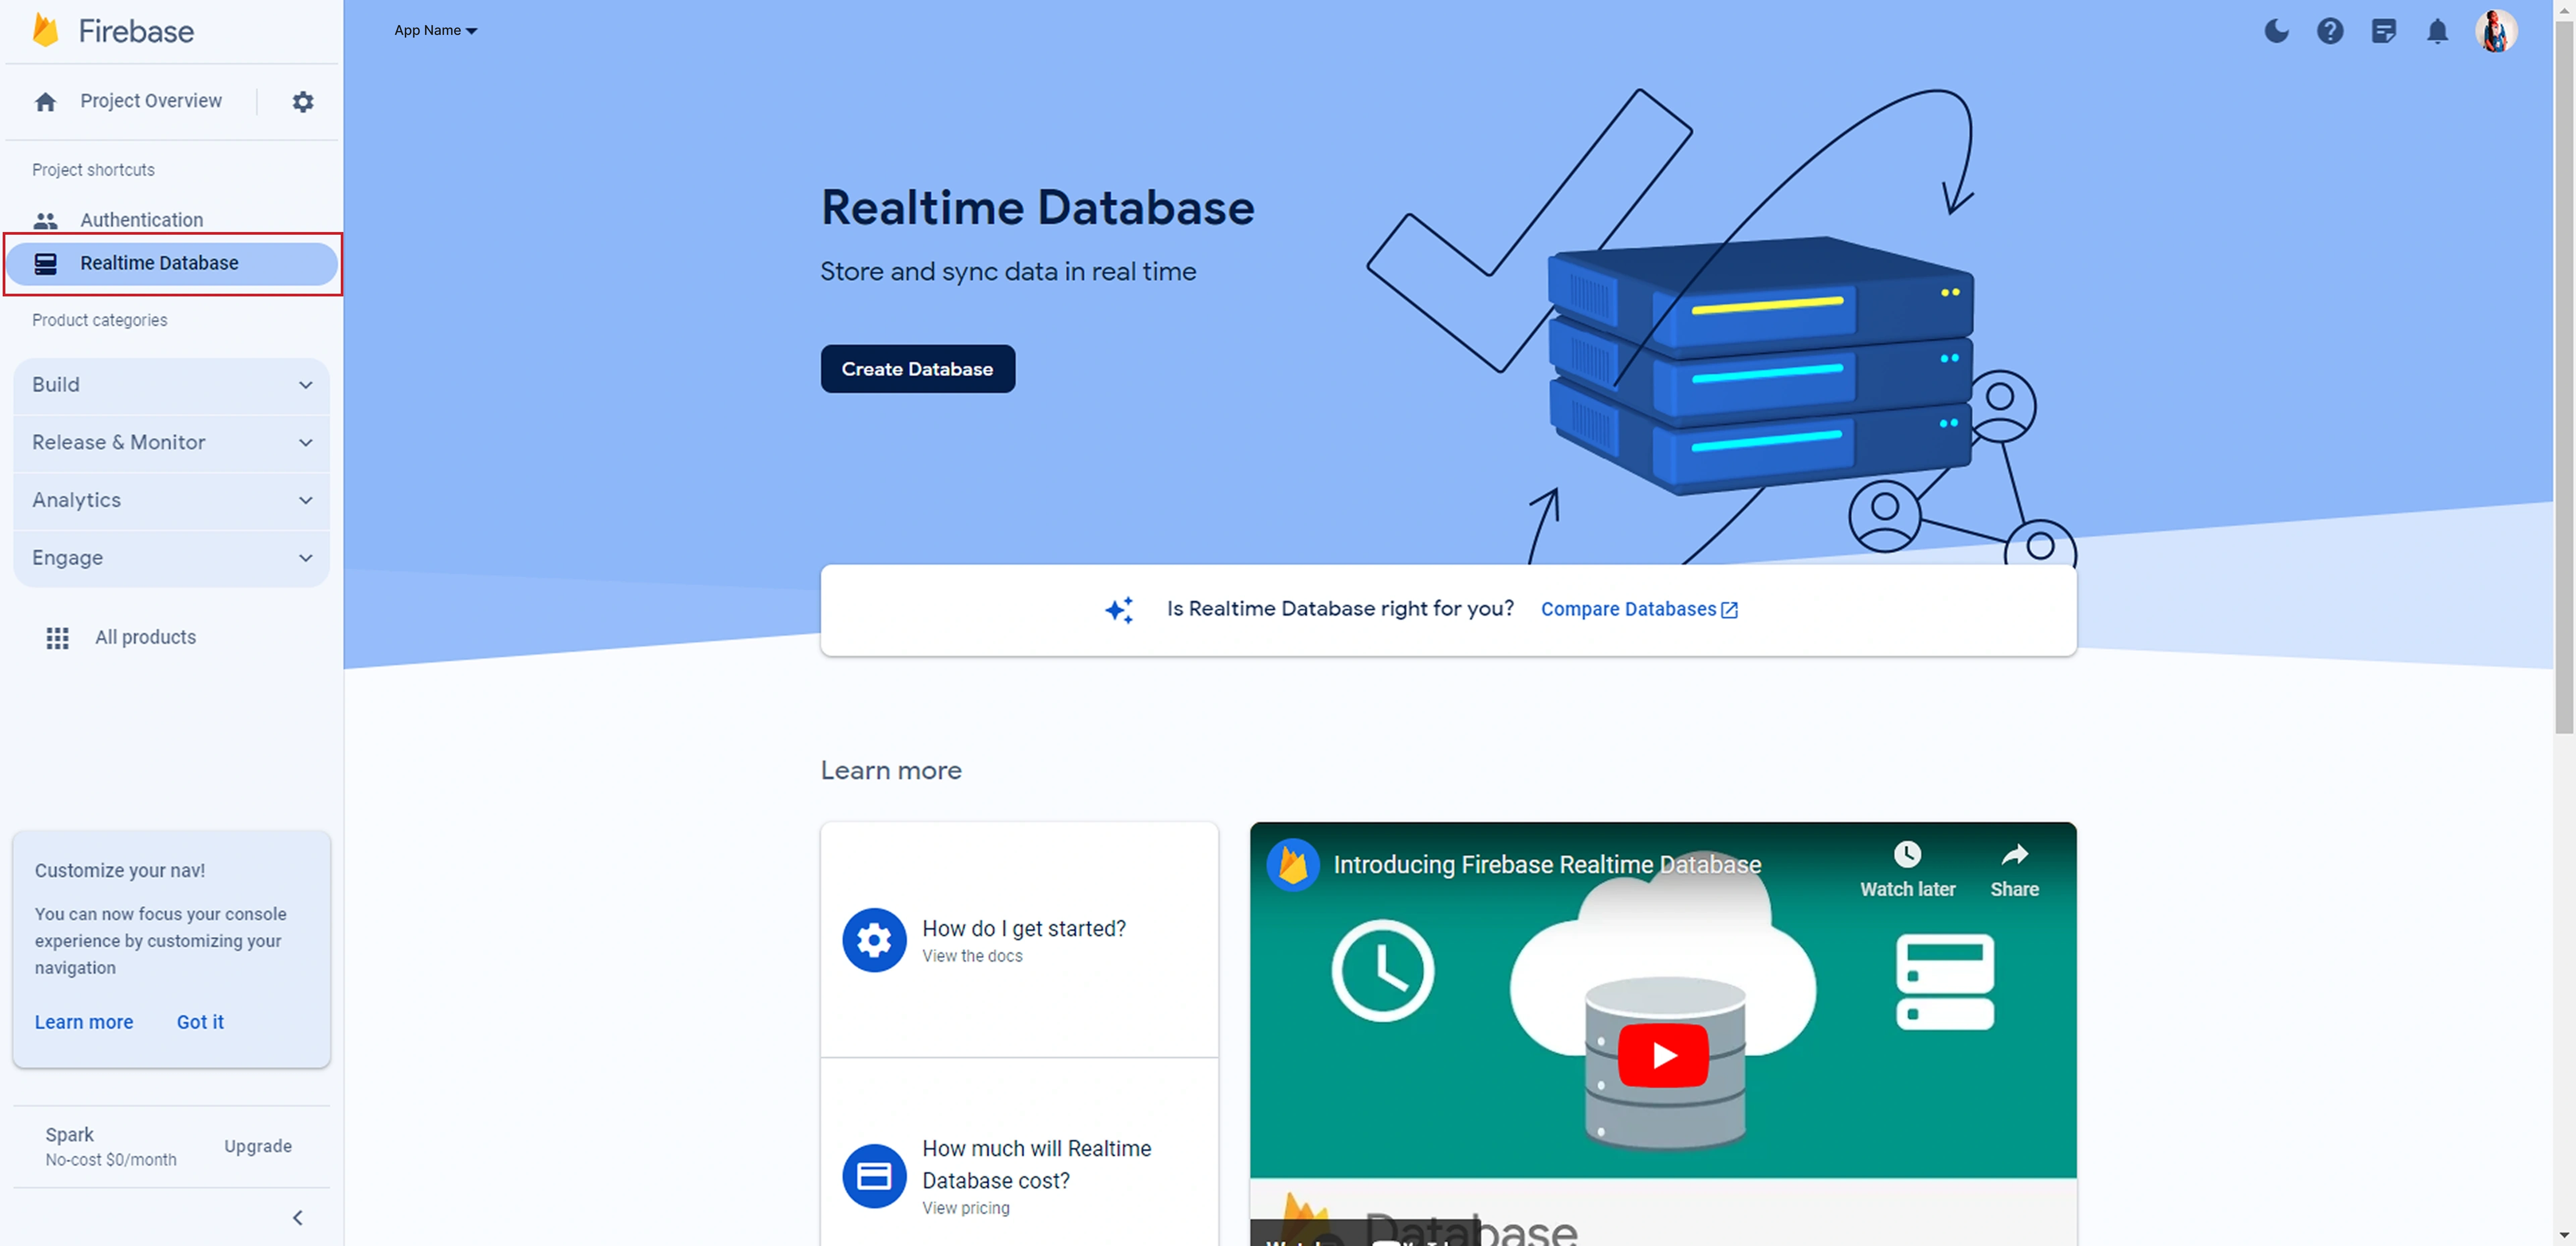
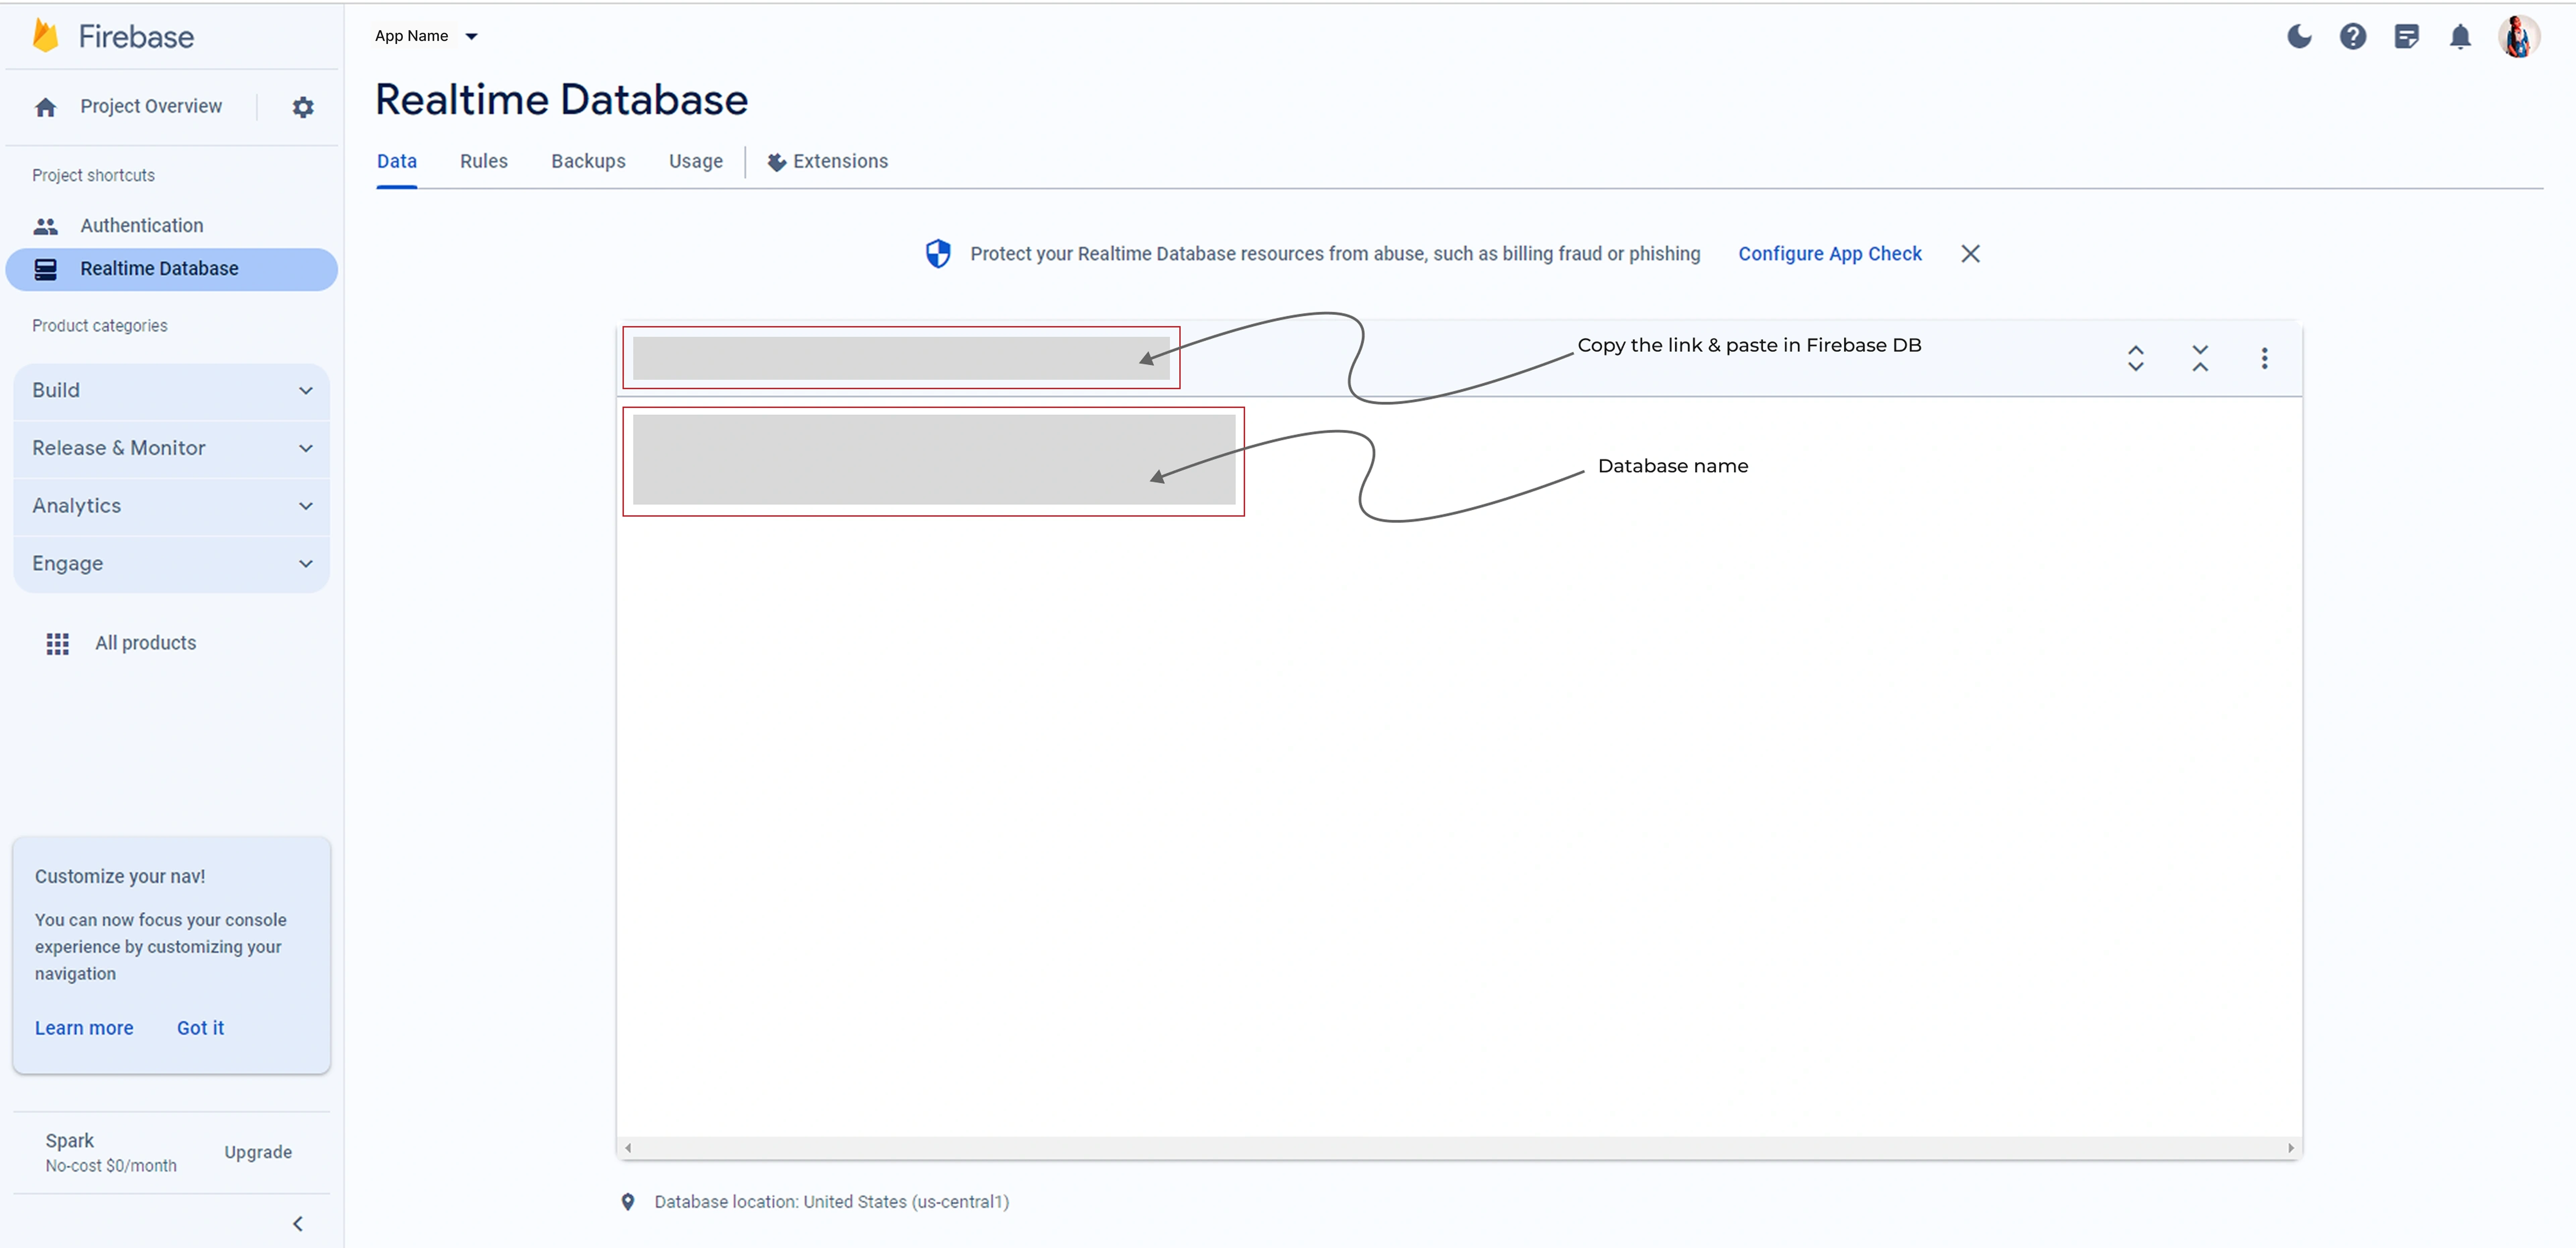
Service Account Setup
- Go to Settings → Project settings → Advanced permissions settings
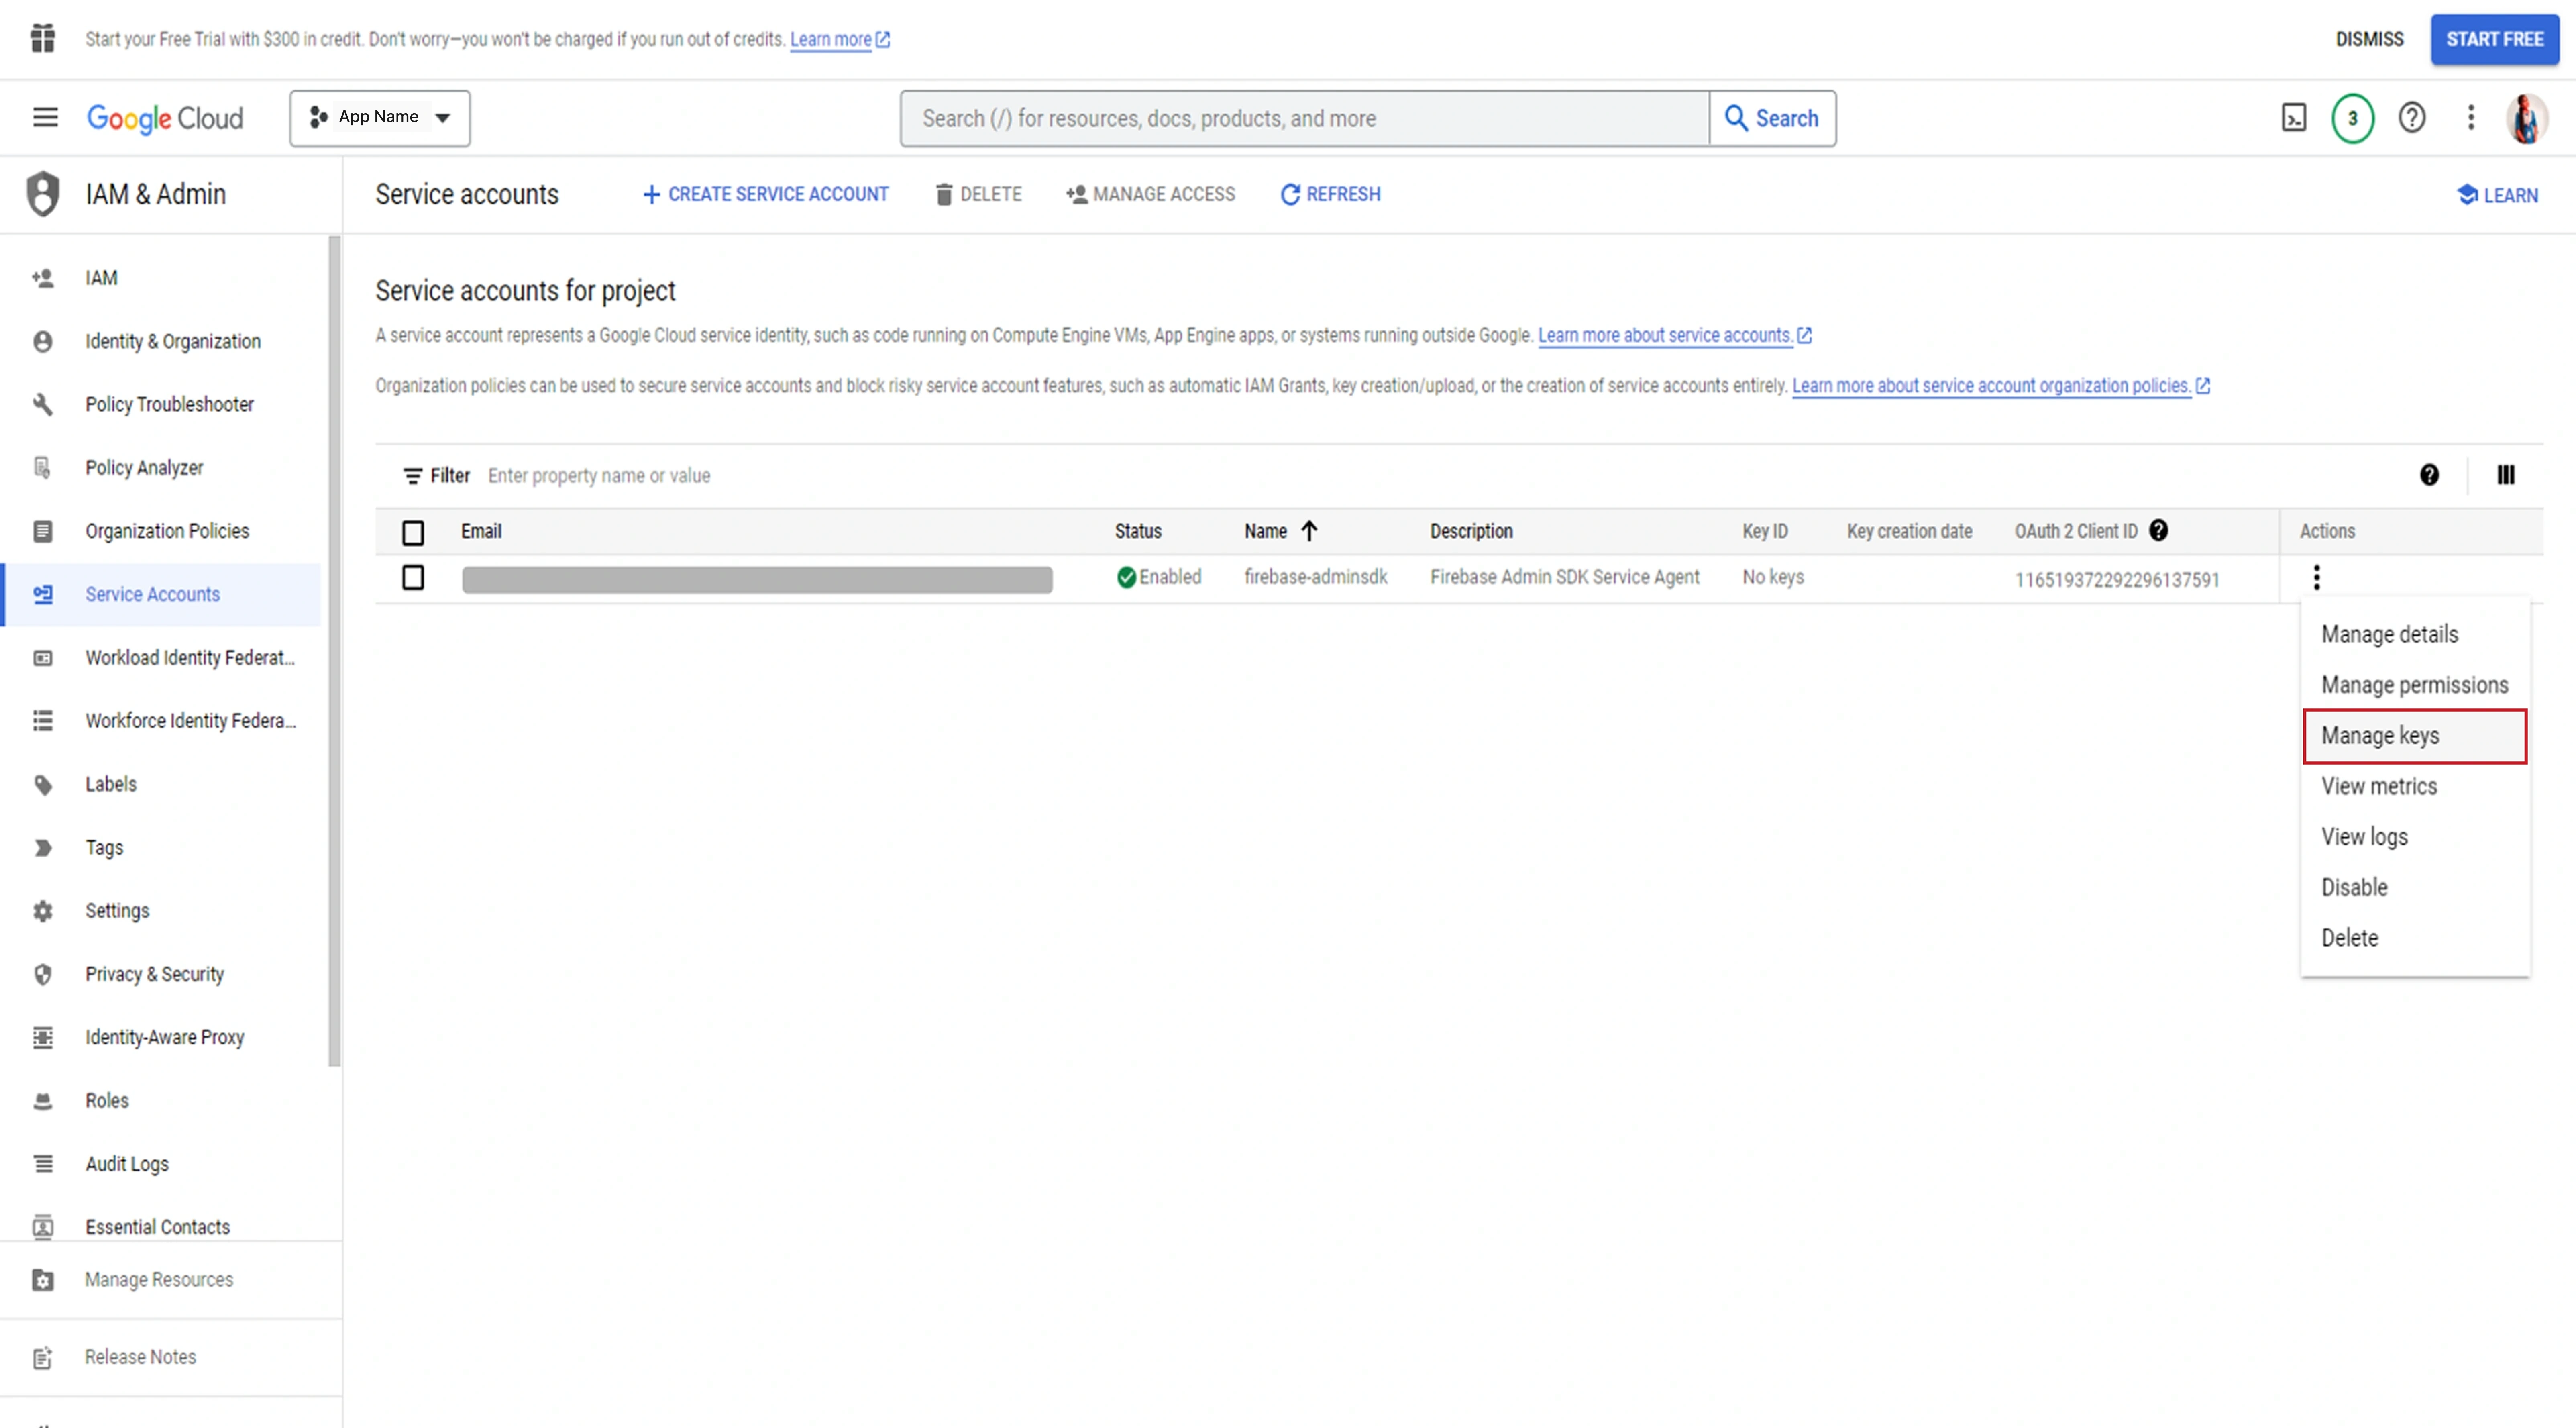
- Click on "Service Accounts" under Firebase Admin SDK section
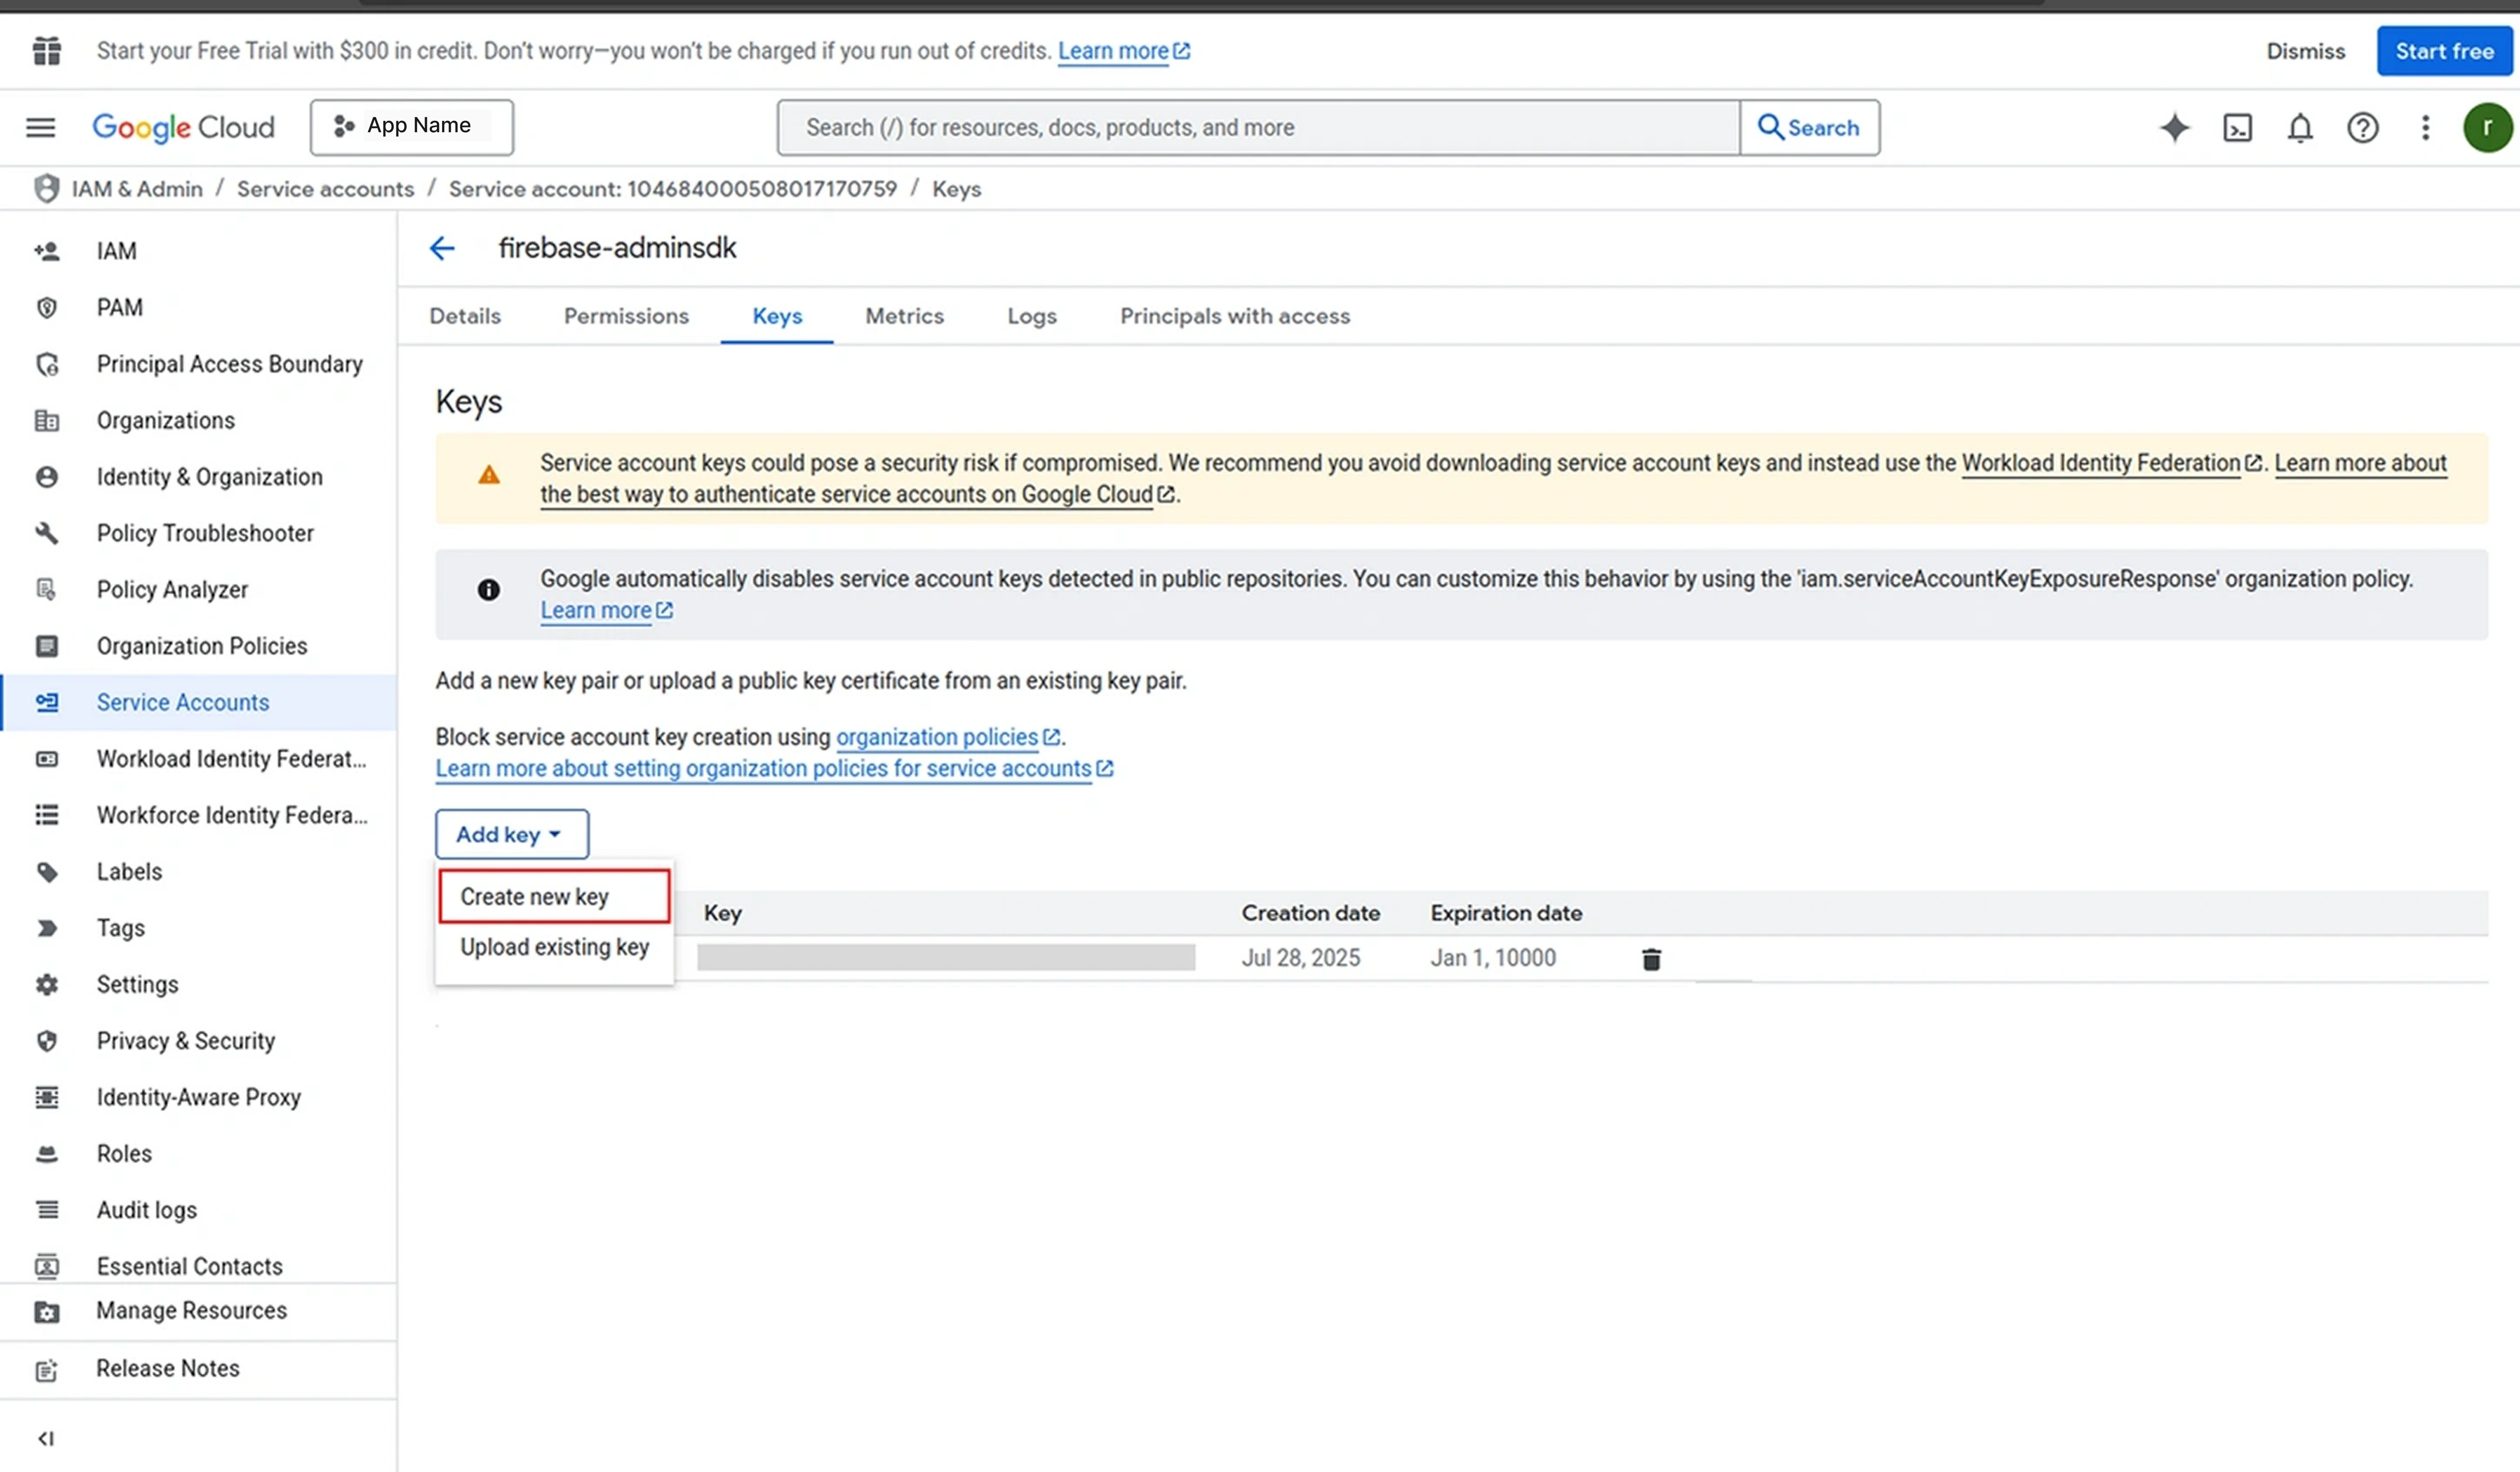
- Click "Actions" → "Manage Keys" → "Add Key" → "Create new key"
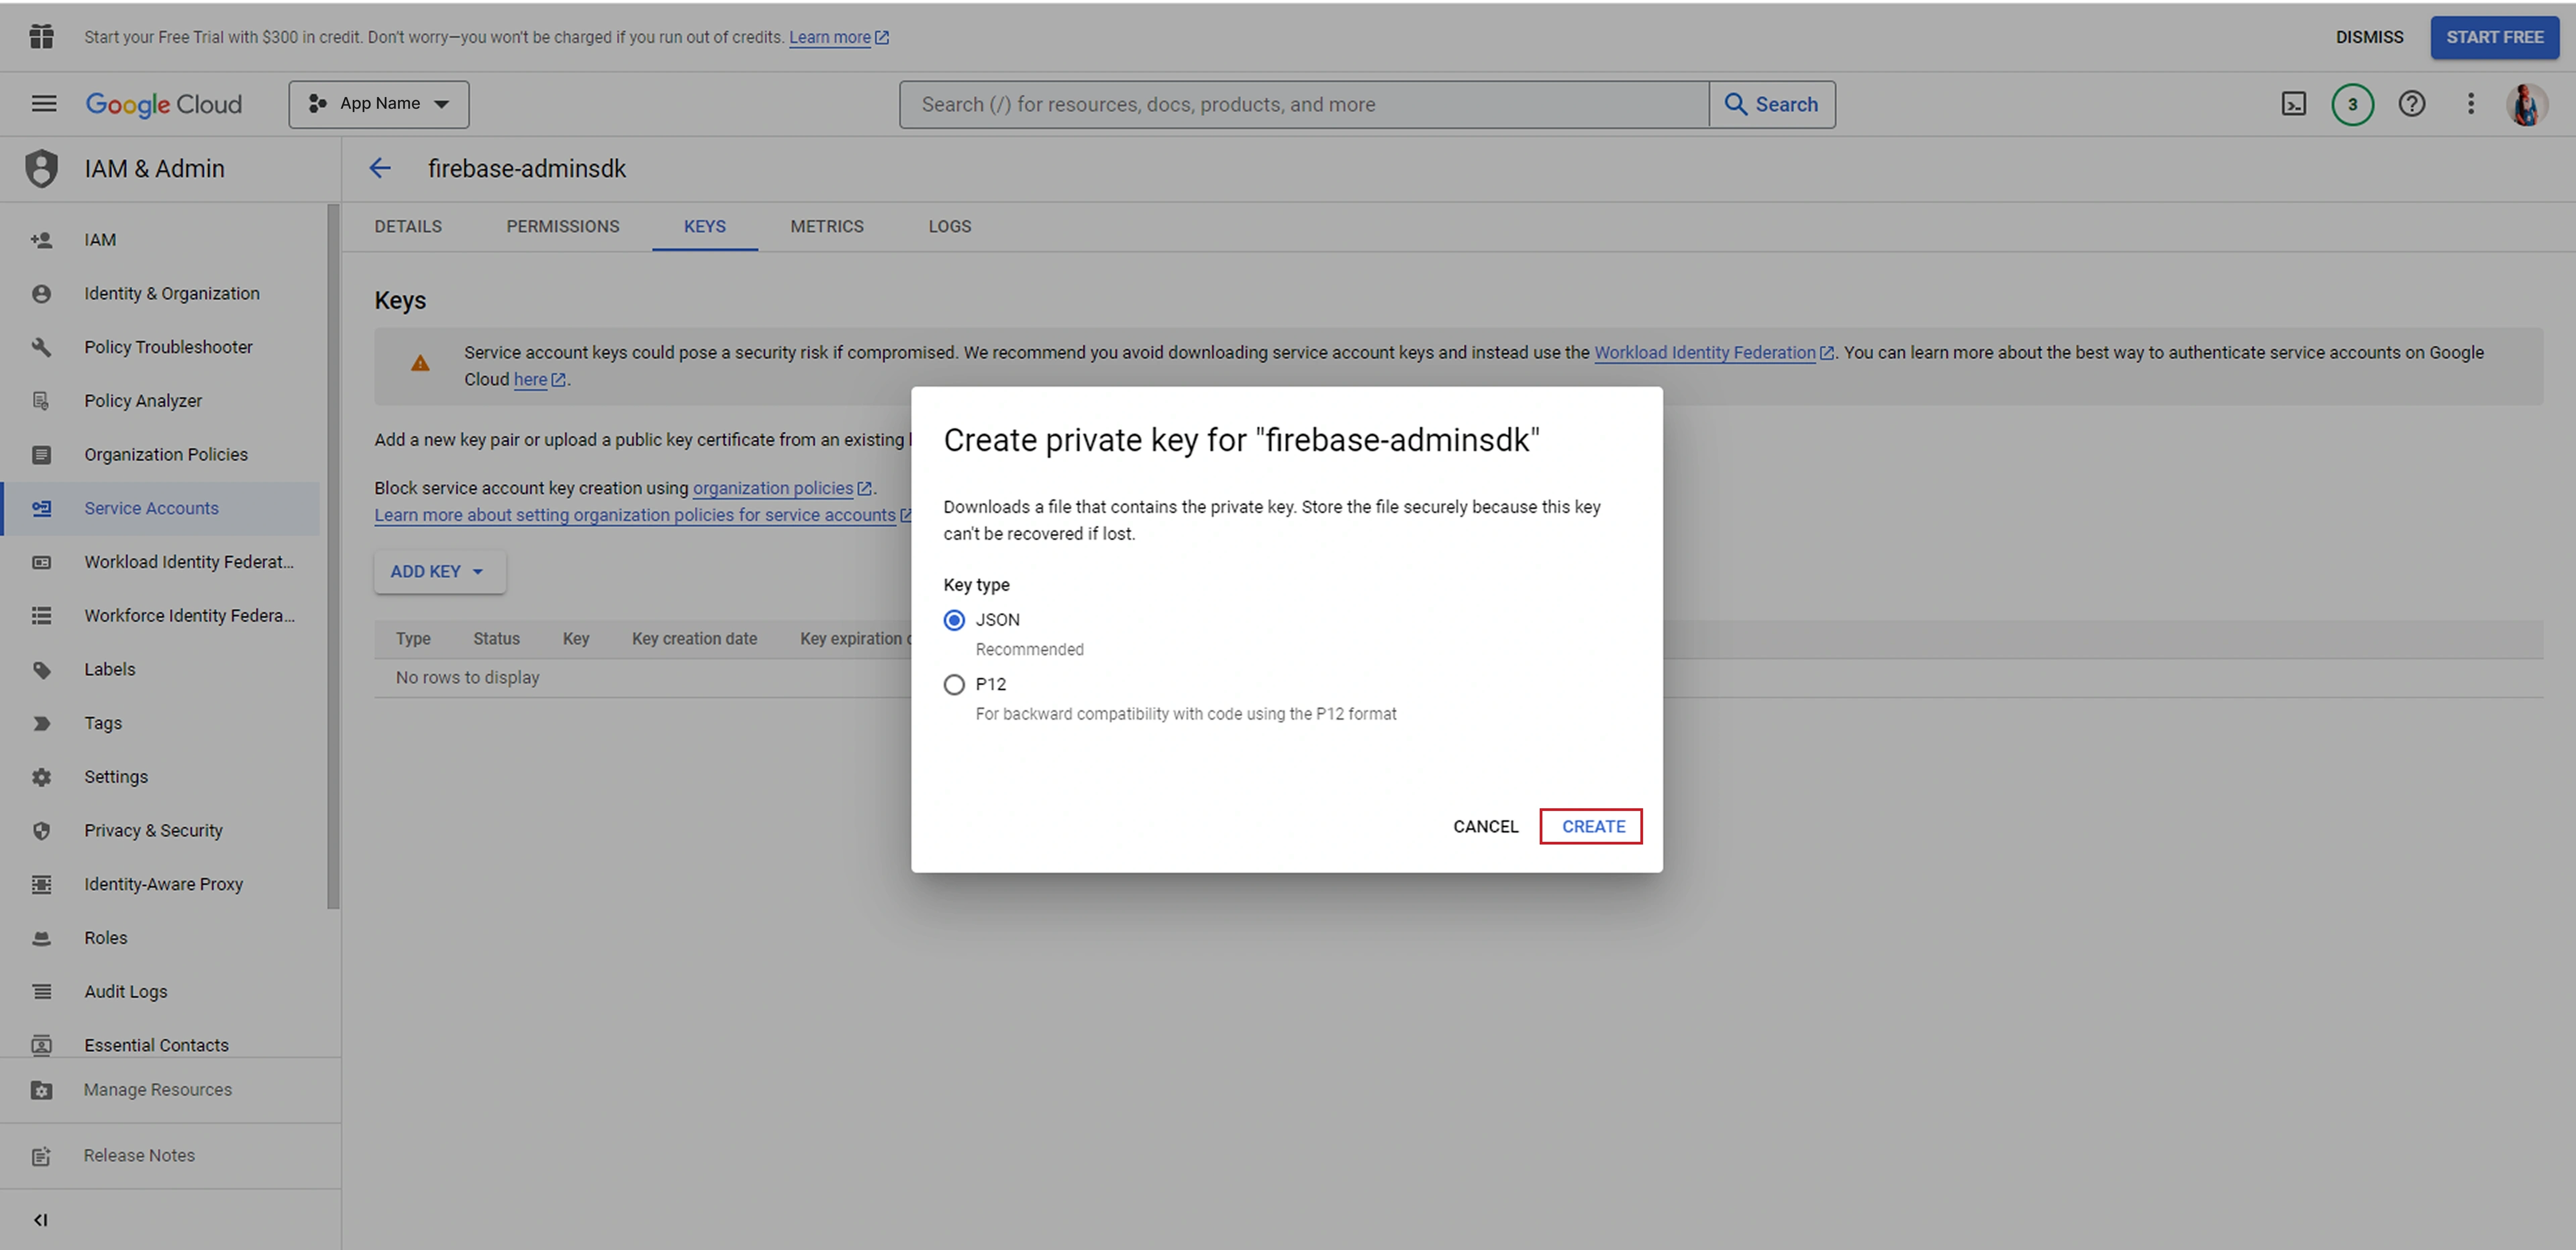
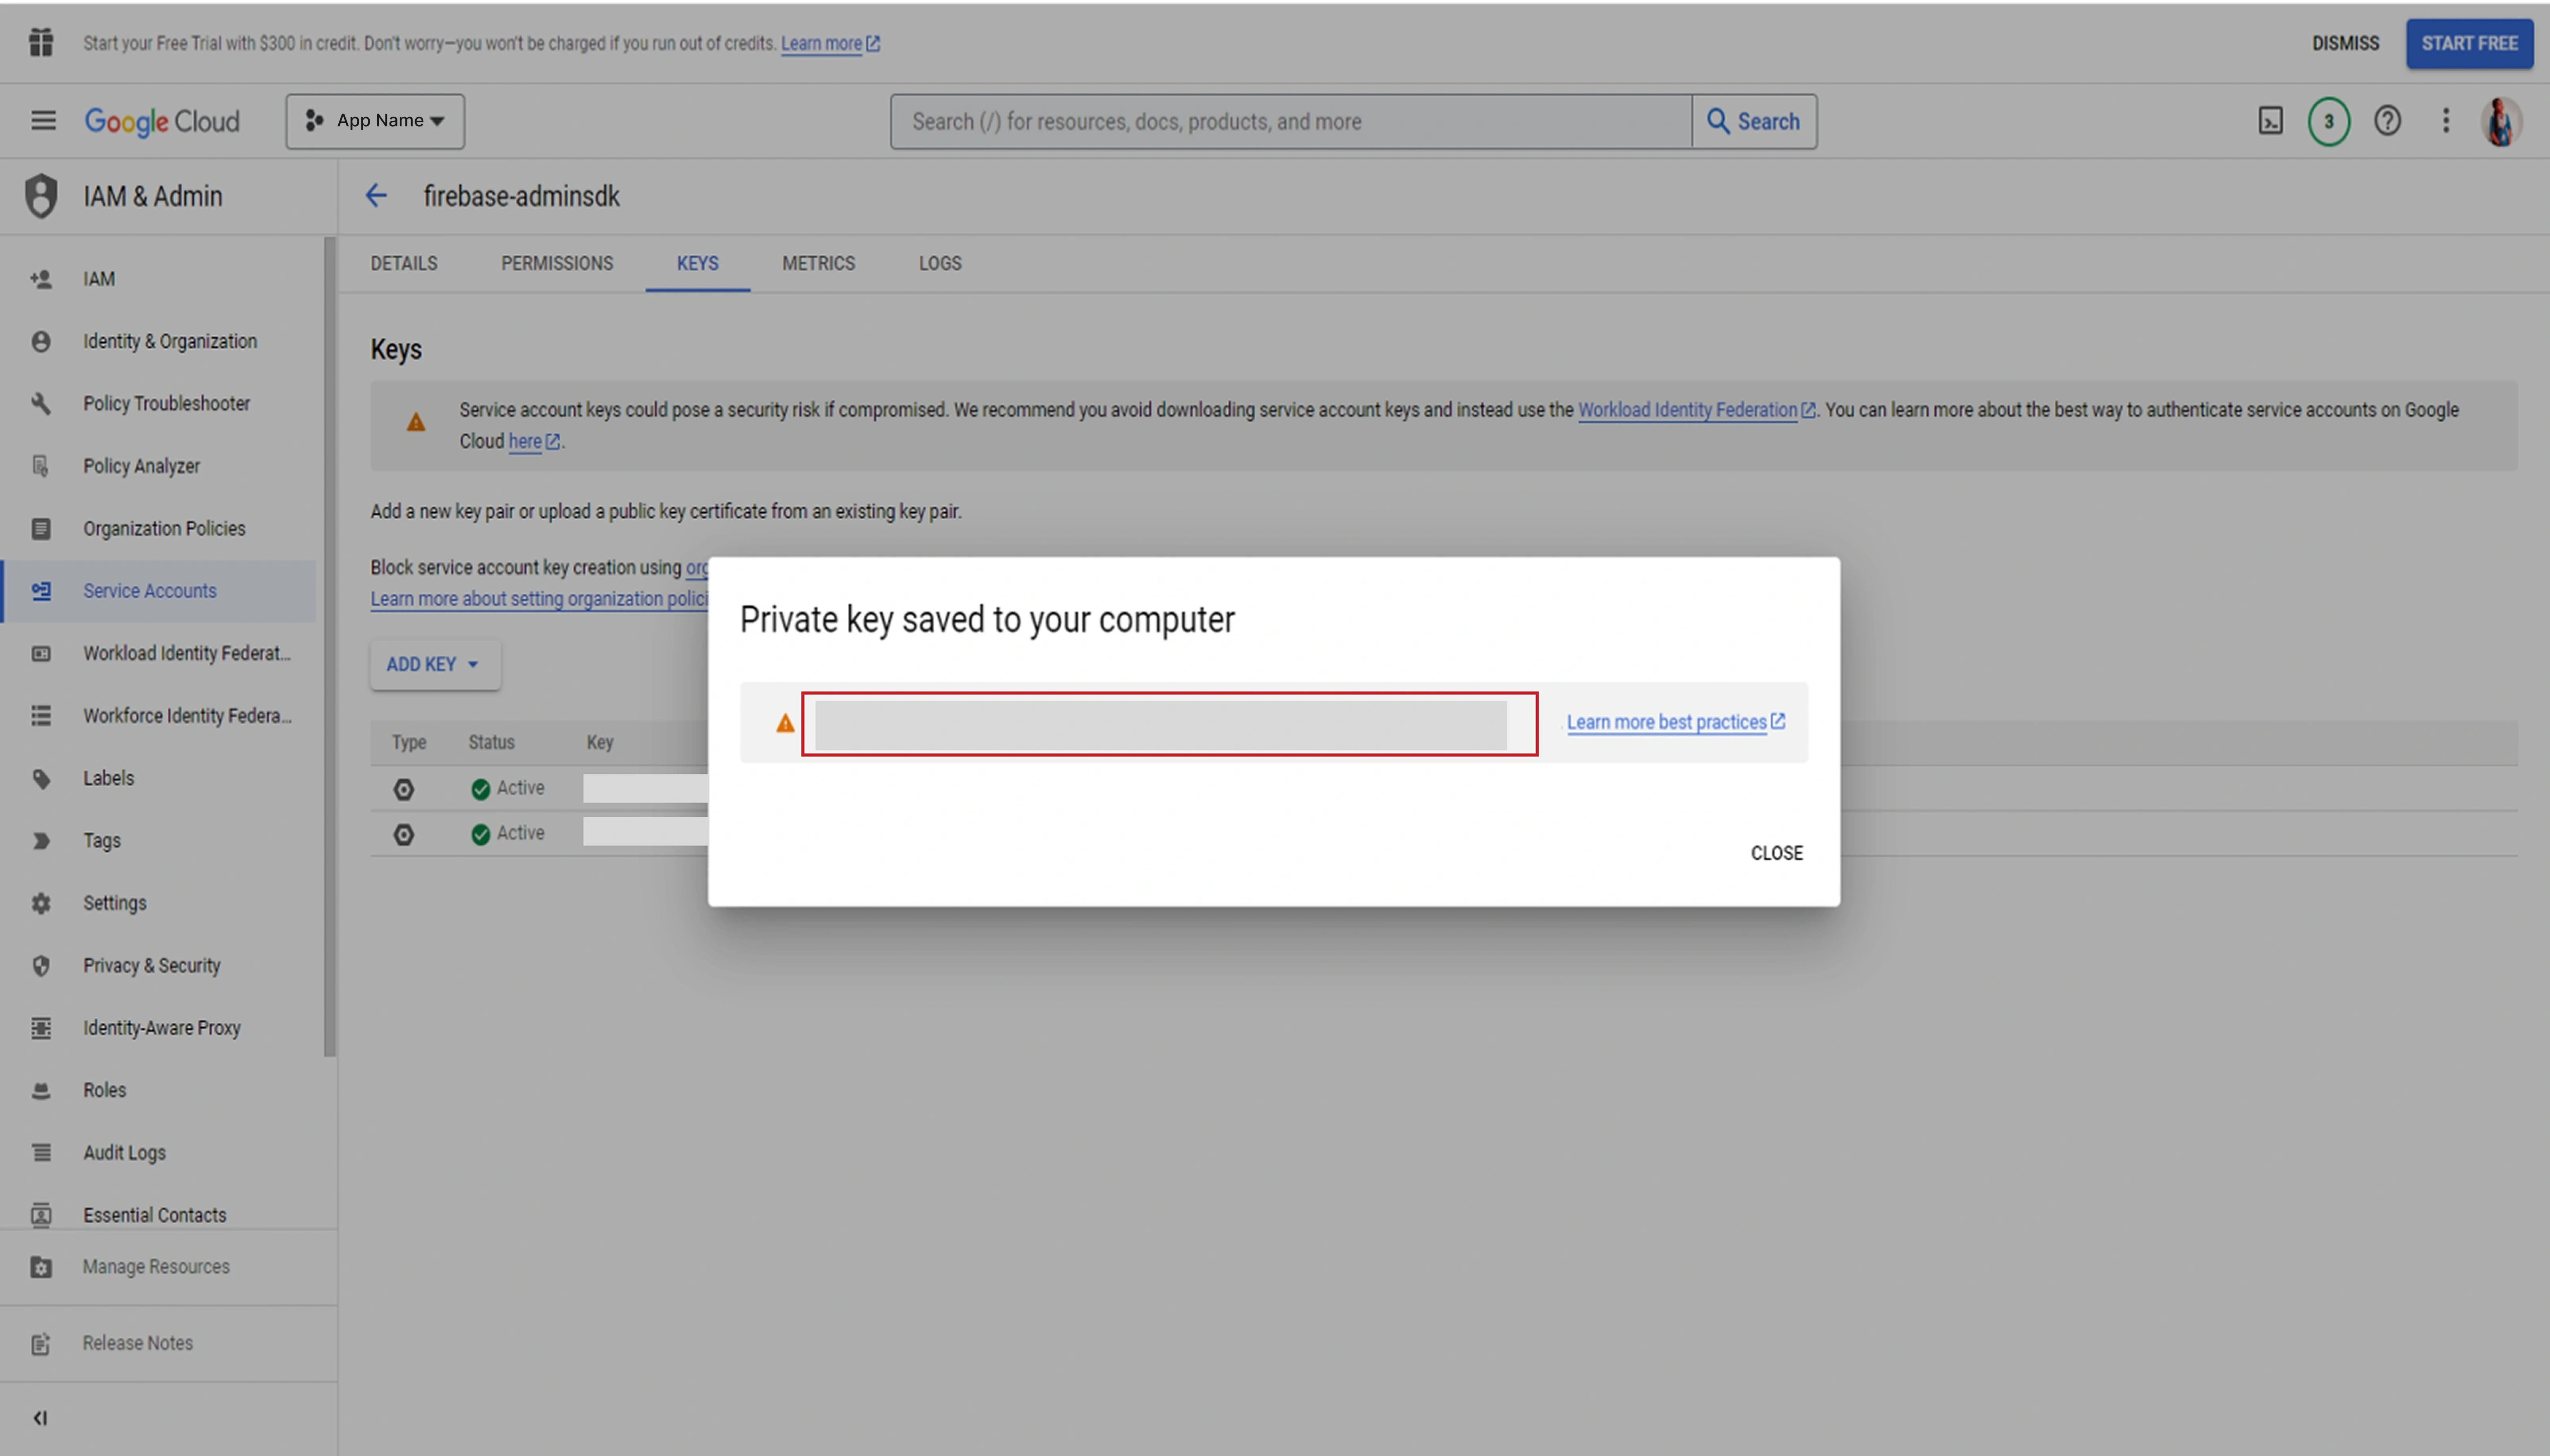
- Select JSON format and click "Create"
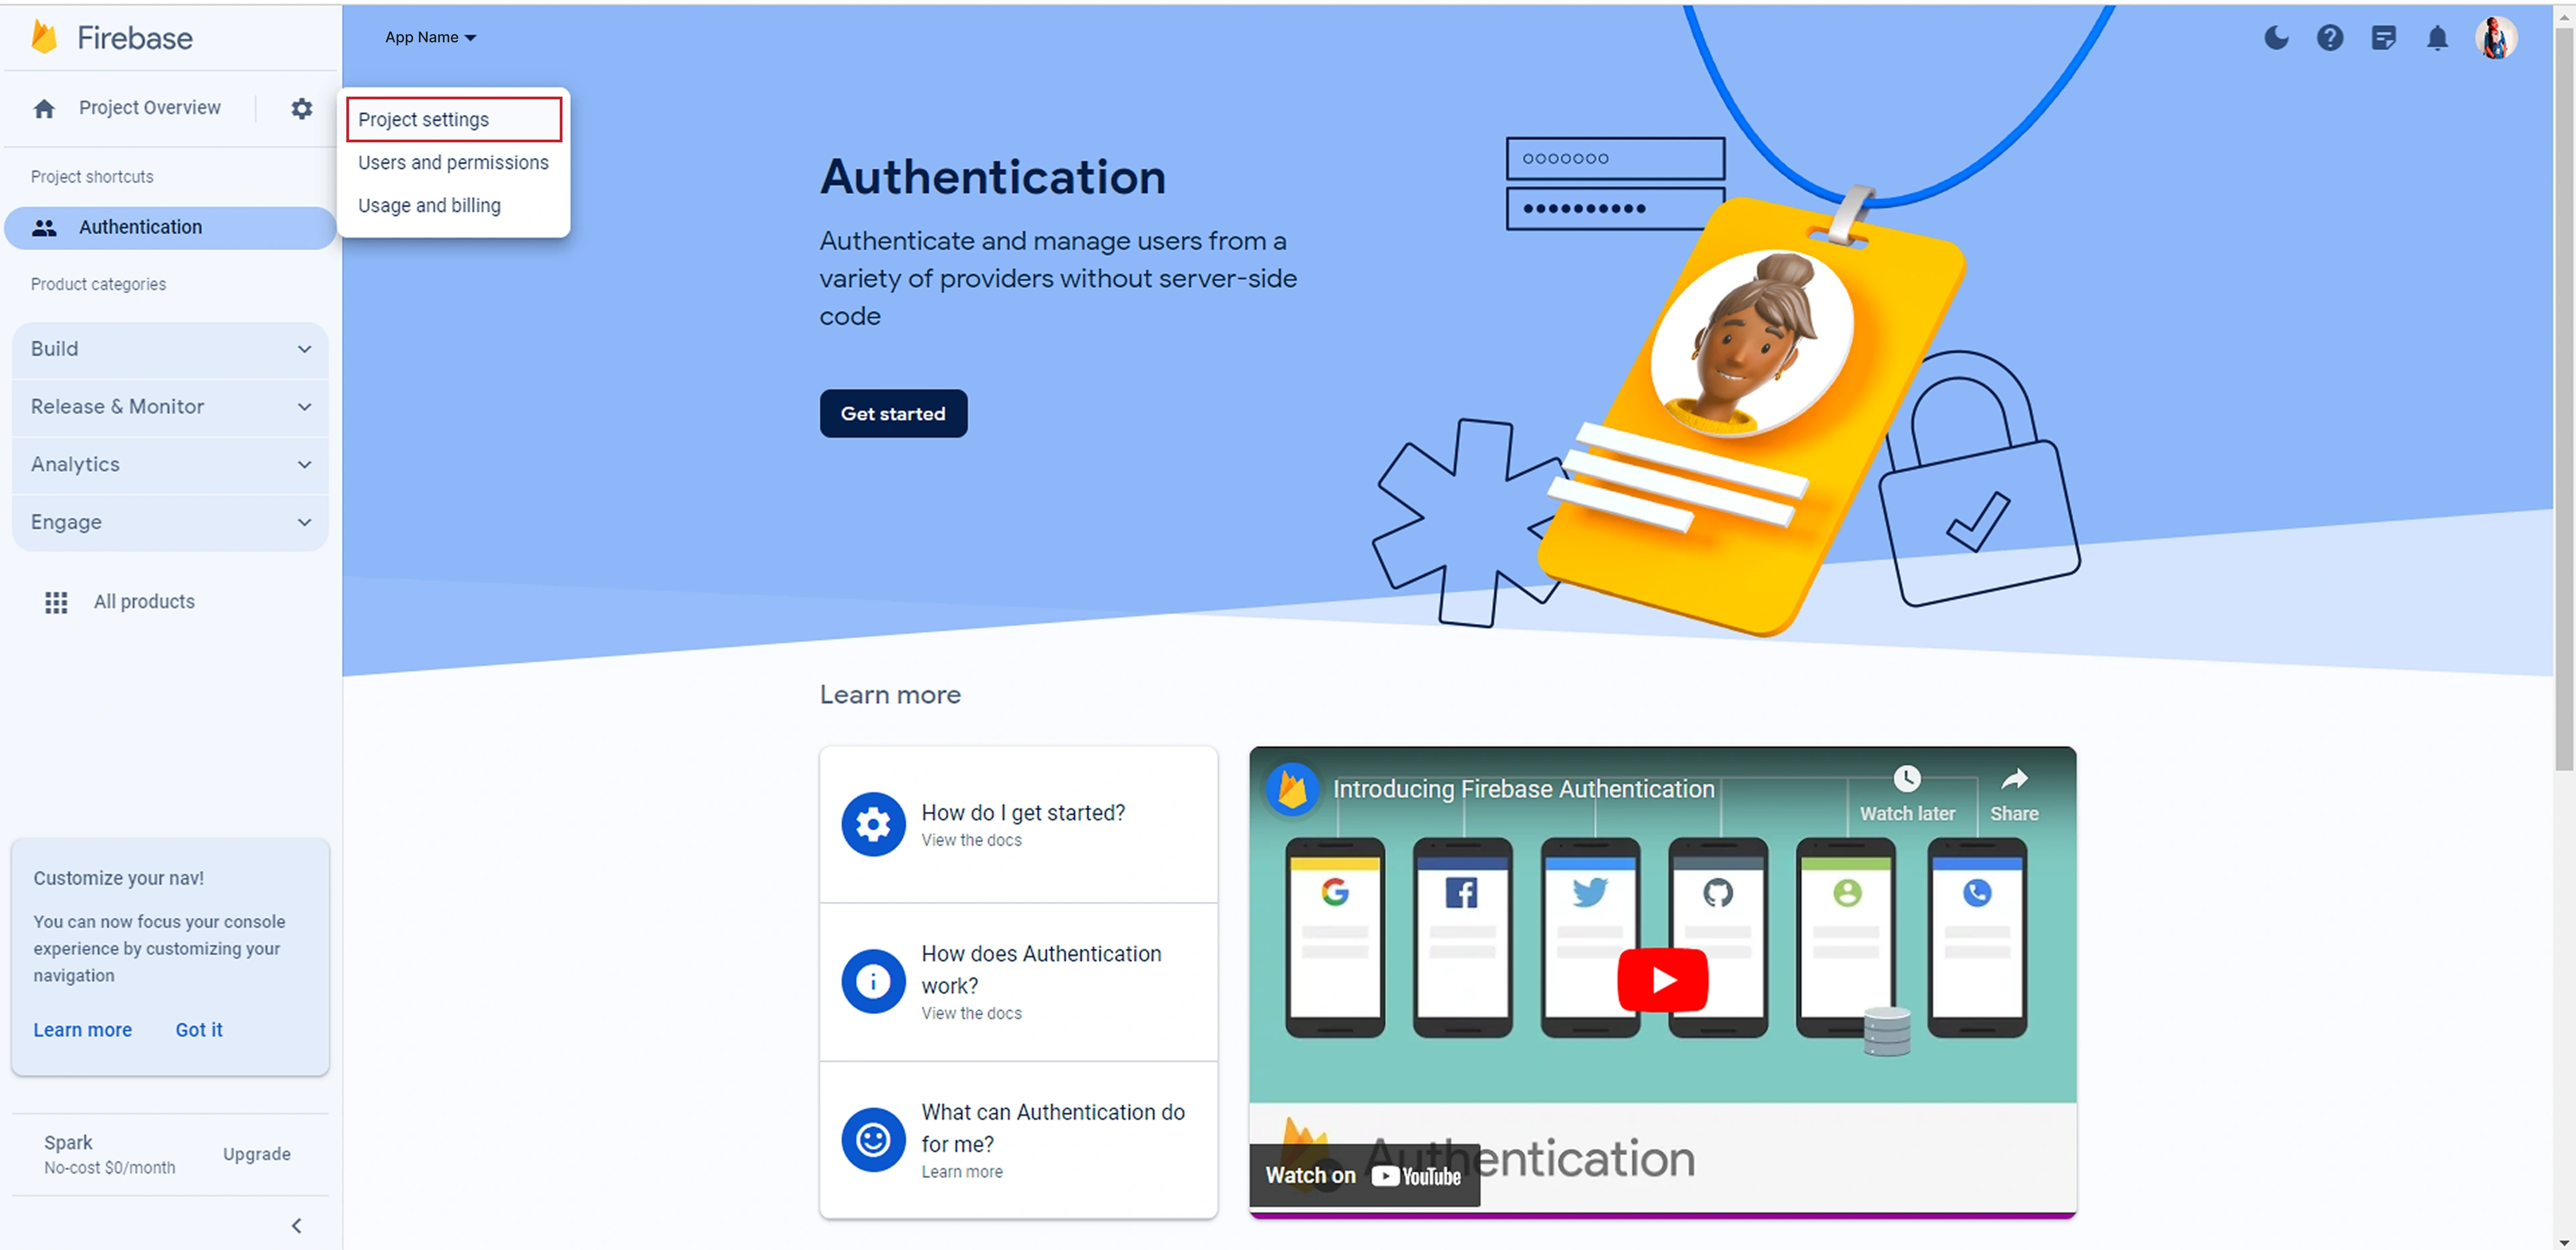
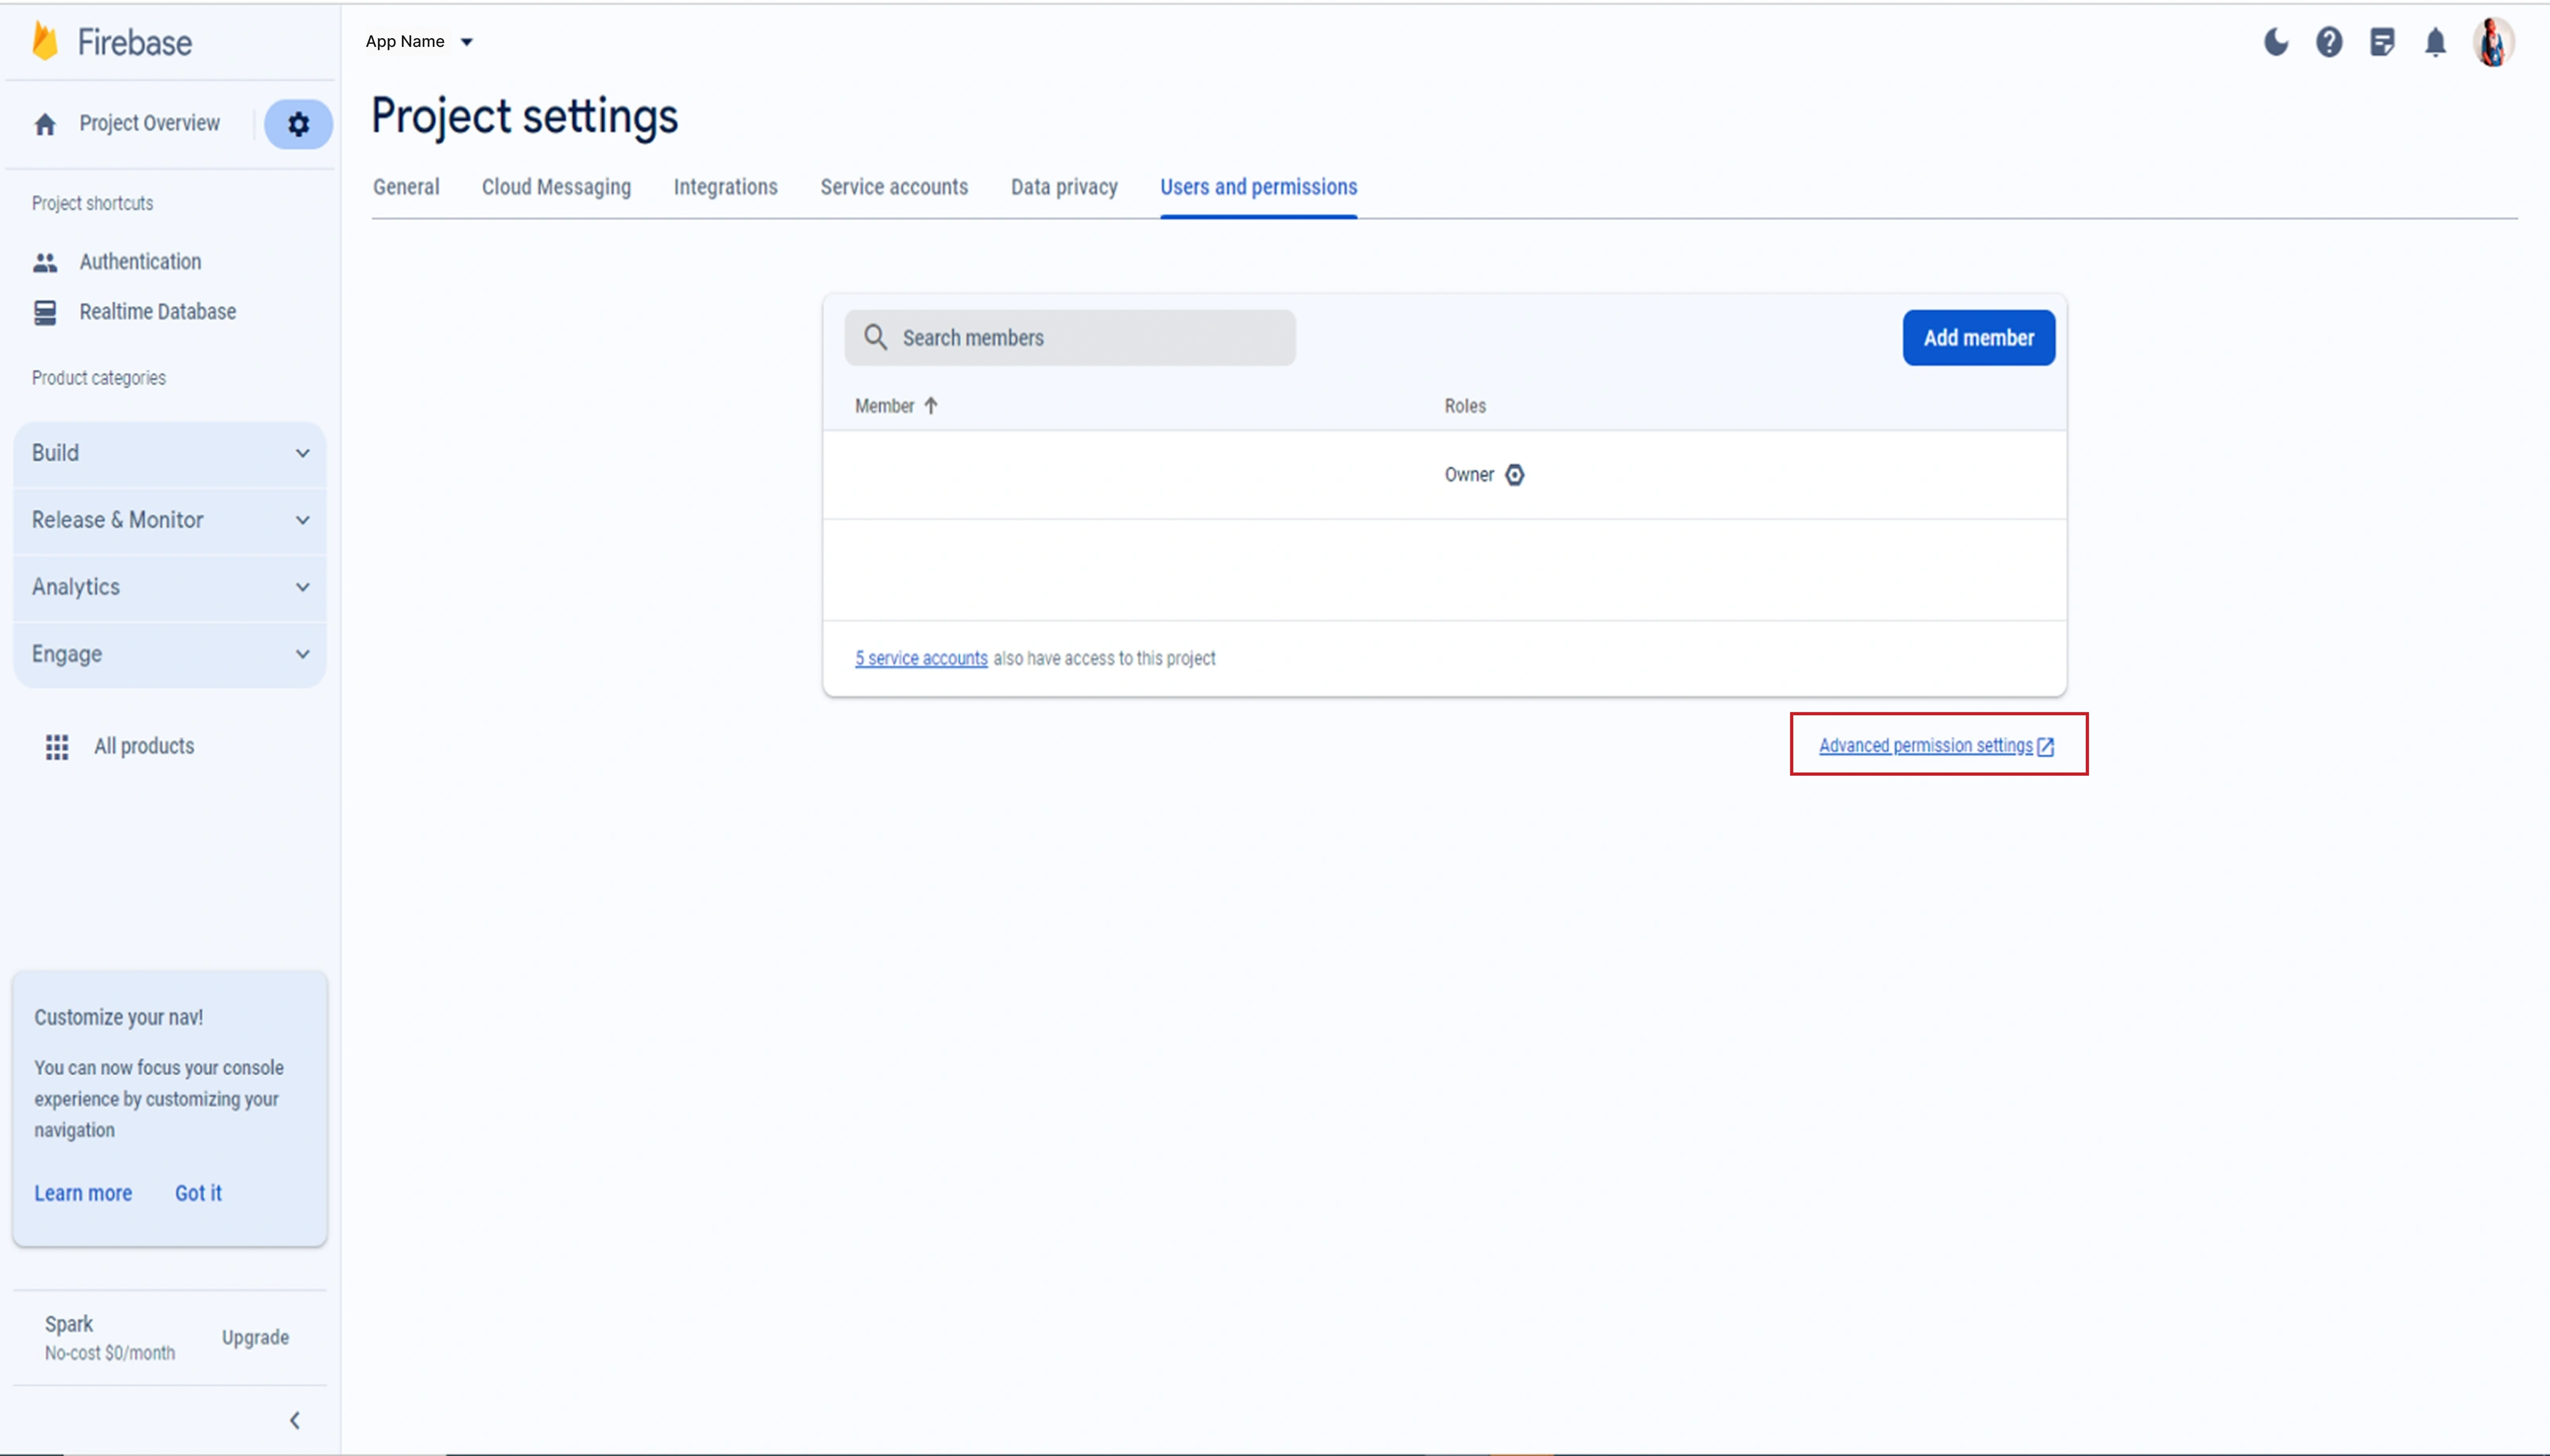
.env Configuration
FIREBASE_CREDENTIALS=firebase.json
FIREBASE_DATABASE_URL=https://your-project-id.firebaseio.com
folder
Place the JSON file in:
/admin/config/firebase.json
Mobile App Configuration
Android Setup
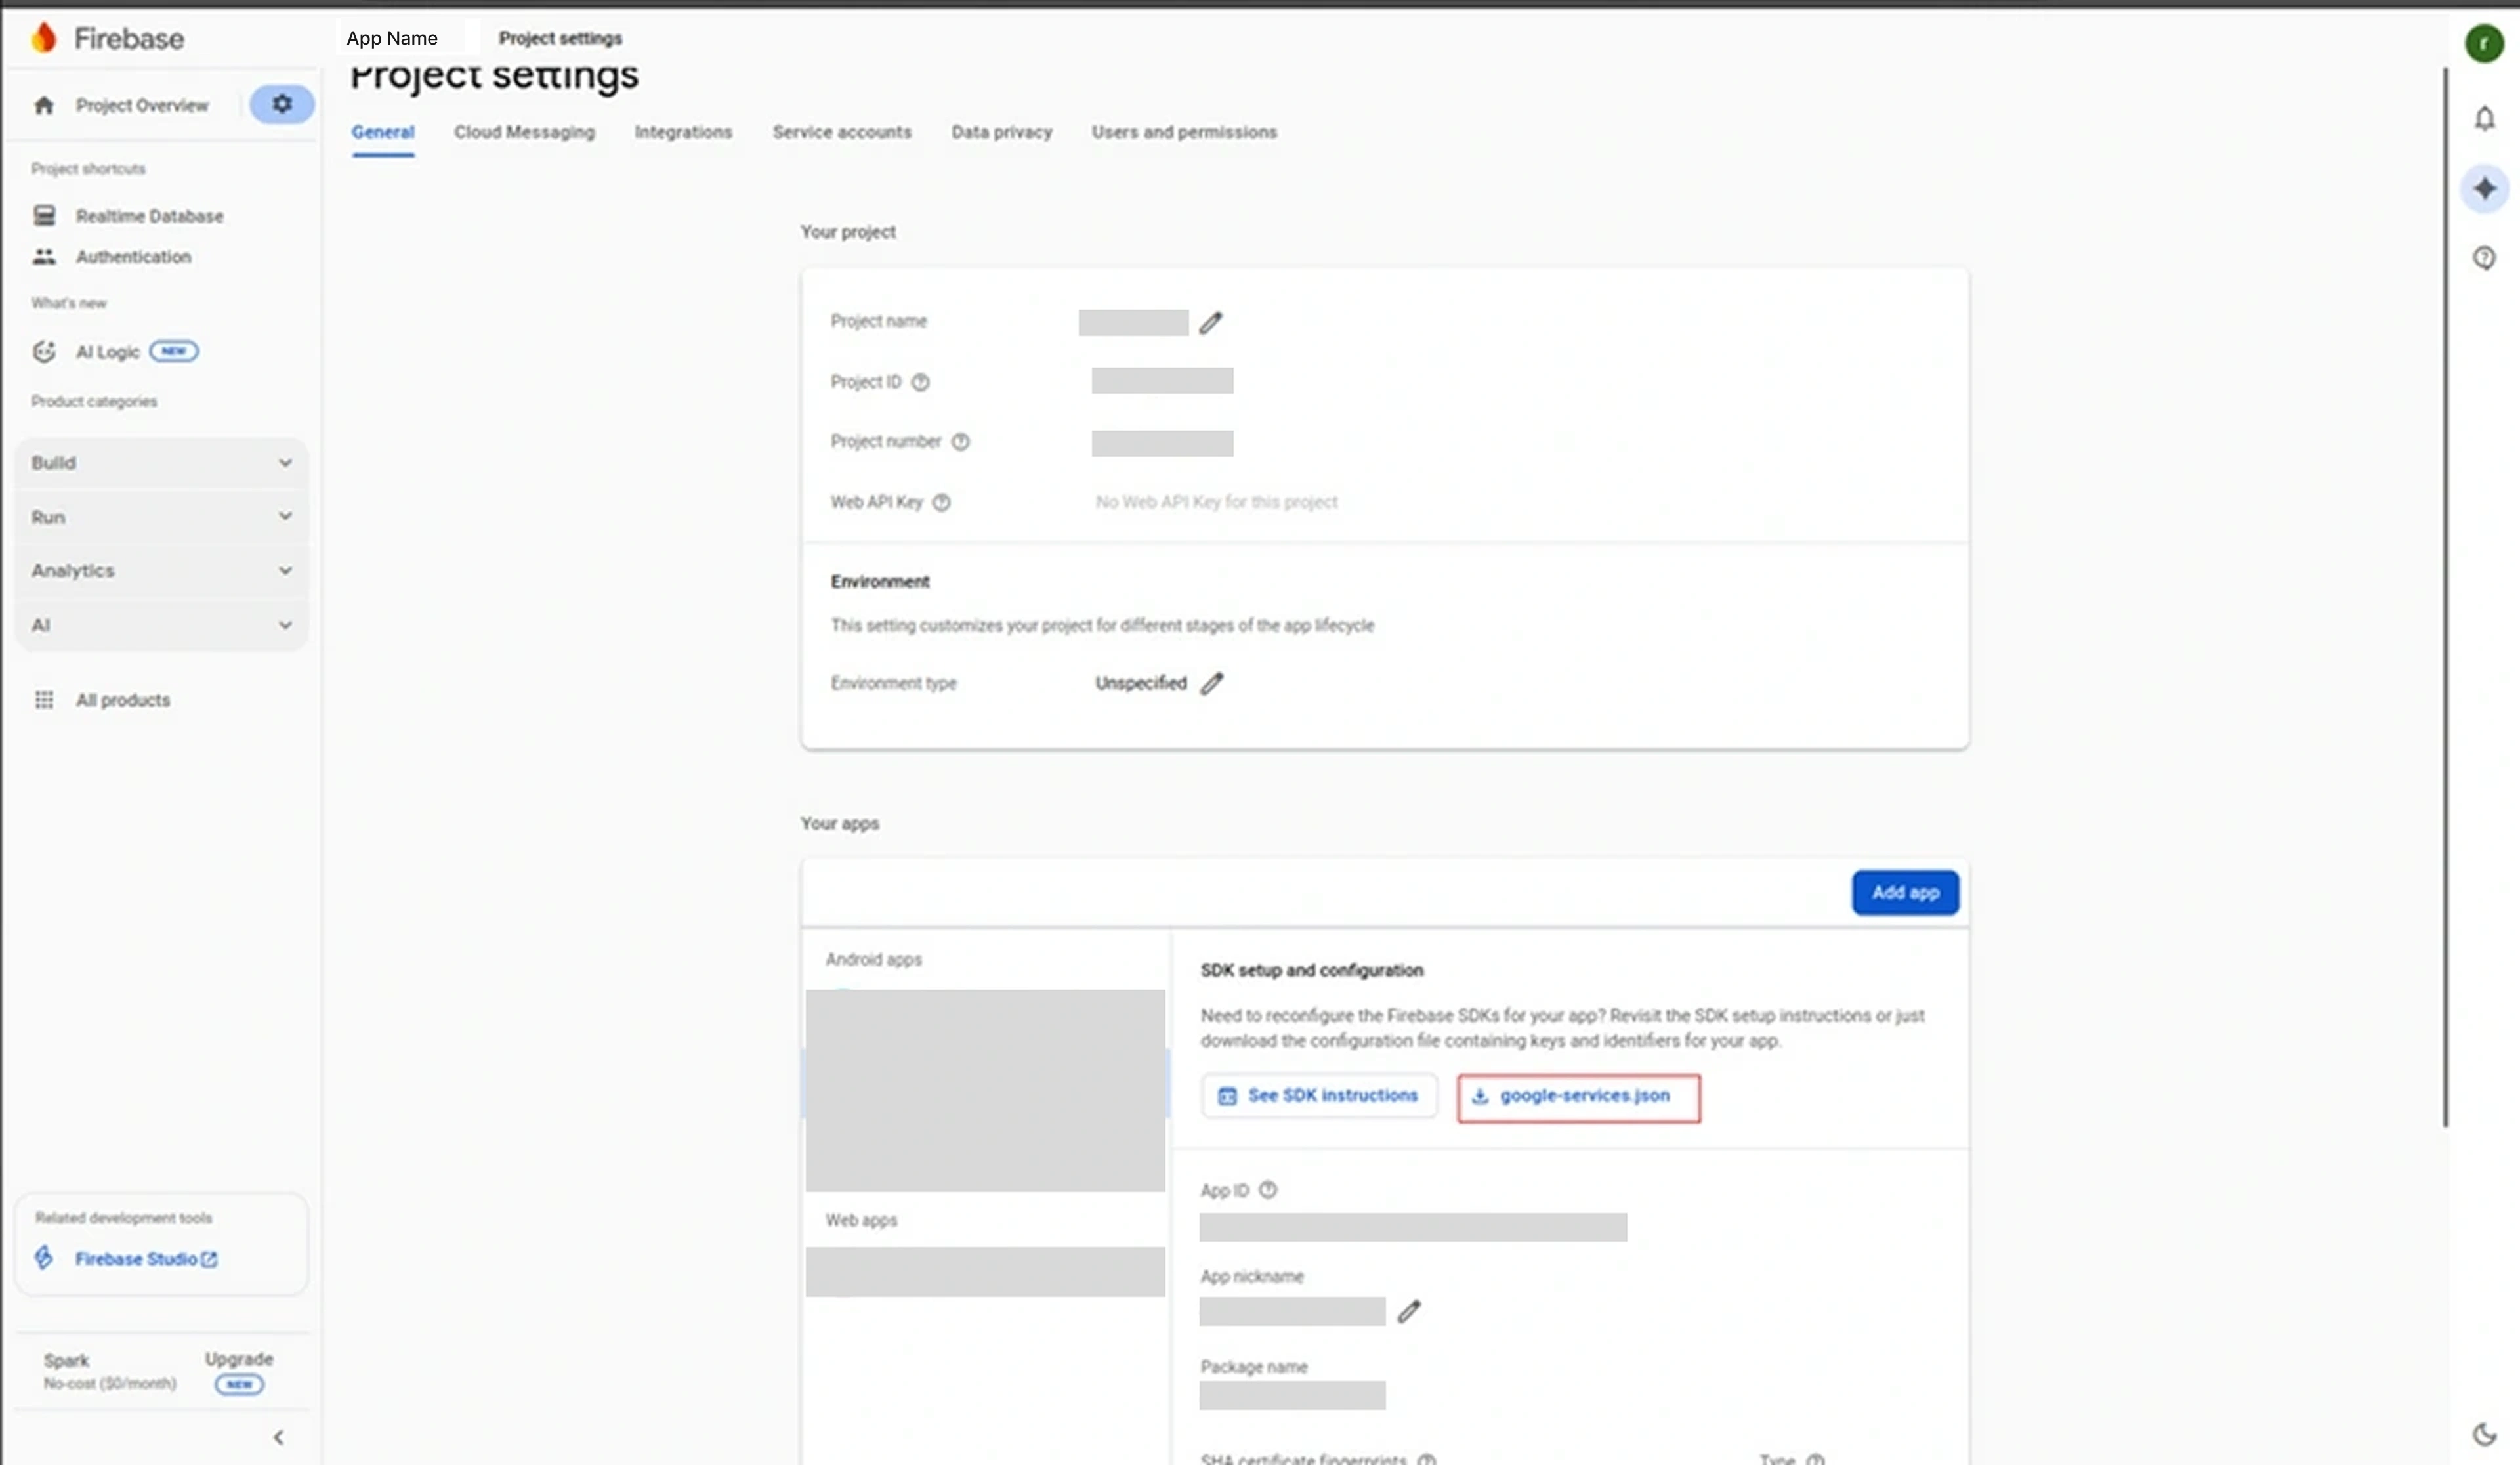
- Select your existing project in Firebase Console
- Click Settings icon → Project settings → Add app → Android
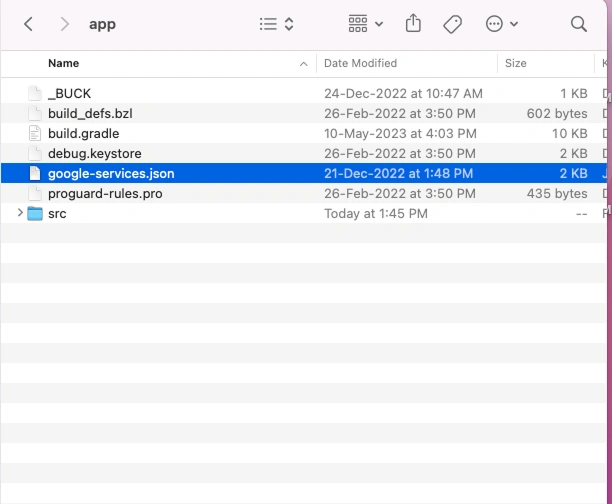
- Download
google-services.jsonfile - Place the file in:
CarFindo_customer/android/app
info
If you haven't created a Firebase project yet, follow the Admin Configuration steps above first.
Required Firebase Services
admin_panel_settings
Authentication
database
Realtime Database
cloud
Cloud Firestore
notifications
Cloud Messaging
analytics
Analytics
location_on
Geo Locations
fingerprint Bundle ID
Clients must update the bundle identifier to match their application package.
Example: com.clientname.CarFindo
Android
Update in:
folder_open android/app/build.gradle
applicationId "com.clientname.CarFindo"
Rename the Java package directory:
folder_open android/app/src/main/java/com/clientname/CarFindo
key Keystore Configuration
Generate a signing keystore:
keytool -genkey -v \
    -keystore CarFindo.keystore \
    -alias CarFindo \
    -keyalg RSA \
    -keysize 2048 \
    -validity 10000
Place the keystore file inside:
folder_open android/app/
Update the signing configuration in:
folder_open android/gradle.properties
MYAPP_UPLOAD_STORE_FILE=CarFindo.keystore
MYAPP_UPLOAD_KEY_ALIAS=CarFindo
MYAPP_UPLOAD_STORE_PASSWORD=yourpassword
MYAPP_UPLOAD_KEY_PASSWORD=yourpassword
rocket_launch Android Release Build
Generate APK
cd android
./gradlew assembleRelease
APK location:
android/app/build/outputs/apk/release/app-release.apk
Generate Play Store Bundle
cd android
./gradlew bundleRelease
Output: android/app/build/outputs/bundle/release/app-release.aab
phone_iphone iOS Configuration
iOS development requires a macOS system with Apple Xcode installed. Xcode provides all necessary tools, simulators, and SDKs required to build and run the application on iOS devices.
Ensure that you have the latest version of Xcode installed from the Mac App Store and have accepted all license agreements before proceeding.
download Install iOS Dependencies
The iOS project uses CocoaPods to manage native dependencies. You must install all required pods before running the application.
Follow the steps below:
cd ios
pod install
cd ..
This command installs all required native libraries and links them with your iOS project.
local_fire_department iOS Firebase Setup
Firebase is used for push notifications and other backend services. You need to download and configure the Firebase iOS configuration file.
Step 1: Download Configuration File
GoogleService-Info.plist
Step 2: Add File to Project
Place the downloaded file inside the following directory:
folder_open ios/CarFindo/GoogleService-Info.plist
Steps in Xcode:
- Open the iOS project in Xcode.
- Drag and drop the
GoogleService-Info.plistfile into the Project Navigator. - Select "Copy items if needed" when prompted.
- Ensure the file is added to the main application target.
This configuration enables Firebase services such as push notifications and analytics.
fingerprint iOS Bundle Identifier
The Bundle Identifier uniquely identifies your application in the Apple ecosystem. It must match the identifier configured in Firebase and Apple Developer account.
Steps:
- Open the project in Xcode:
ios/CarFindo.xcworkspace - Select the main application target.
- Go to the General tab.
- Update the Bundle Identifier field.
Example: com.clientname.taxiapp
Ensure that the Bundle Identifier matches exactly with the one used in the Firebase configuration file, otherwise services may not work correctly.
image iOS App Icons
Application icons are used across the app, App Store, and device home screen. You need to replace the default icons with your branding assets.
App Icon Path:
folder_open ios/CarFindo/Images.xcassets/AppIcon.appiconset
Replace all icon sizes inside this folder with your custom icons while maintaining the required dimensions.
iOS App Logo
Replace the main logo used inside the application UI:
folder_open src/assets/logo.png
Recommended size: 500 × 500 PNG (transparent background preferred)
play_arrow Run iOS Application
Before running the application, make sure the Metro bundler is running.
Step 1: Start Metro Server
npm start
Step 2: Run iOS App
npx react-native run-ios
This command will build the app and launch it in the iOS Simulator. Alternatively, you can open the project in Xcode and run it directly on a simulator or a physical device.
rocket_launch iOS Release Build
To publish your application to the App Store, you must generate a release build using Xcode.
Steps:
- Open the project in Xcode:
ios/CarFindo.xcworkspace - Select Generic iOS Device as the build target.
- From the top menu, select Product → Archive.
- Once the archive is created, open the Organizer window.
- Validate and upload the build to App Store Connect.
After uploading, you can manage your app release from App Store Connect.
api API Configuration
Application API configuration is located in:
folder_open src/config/const.js
Update the following values with client server details:
- BASE_URL
- API_URL
- IMG_URL
- SOCKET_URL (if applicable)
Example:
export const BASE_URL = "https://api.clientdomain.com"
export const API_URL = "https://api.clientdomain.com/v1"
export const IMG_URL = "https://cdn.clientdomain.com"
palette Branding Configuration
Application Logo
Replace the logo file located at:
folder_open src/assets/logo.png
Recommended format: 500 × 500 PNG
Android Launcher Icons
Replace launcher icons in:
folder_open android/app/src/main/res/
Folders:
- mipmap-mdpi
- mipmap-hdpi
- mipmap-xhdpi
- mipmap-xxhdpi
- mipmap-xxxhdpi
iOS App Icons
Replace icons in:
folder_open ios/CarFindo/Images.xcassets/AppIcon.appiconset
map Map Provider
The application uses MapLibre for map rendering and location-based services.
Map Library Used
@maplibre/maplibre-react-native
Capabilities
layers
Vector Tile Rendering using RouteMappy tiles
map
Real-time map display for ride tracking
navigation
Location-based services for navigation and route
visualization
bolt
High-performance map rendering optimized for mobile
devices
These features enable the application to display car locations, listing maps, and search results within the app.
route RouteMappy
Admin Panel Configuration
Step 1: Enter Your RouteMappy API Key
In the place of enter_map_key in your .env
file, add your RouteMappy API key as shown below:
MAP_KEY=enter_map_key
info
RouteMappy maps integration requires a valid API key. Please contact RouteMappy directly for licensing and pricing information:
- Website: https://routemappy.com/
- Email: sales@menpanitech.com
Mobile Application Configuration
Step 1: Add Your API Key
Edit the following file:
folder_open CarFindo/src/config/Constants.js
export const ROUTEMAPPY_API_KEY = 'enter_your_routemappy_key';
info
RouteMappy maps integration requires a valid API key. Please contact RouteMappy directly for licensing and pricing information:
- Website: https://routemappy.com/
- Email: sales@menpanitech.com
payments Payment Integration
Library Used
- react-native-razorpay
- flutterwave-react-native
Features
lock
Secure online payments
directions_car
Ride fare payments
credit_card
Multiple payment methods (Cards, UPI, Net Banking,
Wallets)
Configuration
Payment credentials must be configured on the backend server to enable transaction processing.
Required credentials typically include:
- Payment Gateway API Key
- Secret Key
- Webhook configuration for transaction validation
These credentials are used by the backend API to securely communicate with the payment gateway.
warning
Important Warning
Sensitive credentials such as secret keys must never be stored in the mobile application. All payment validation and transaction verification should be handled securely through the backend server.
notifications FCM Configuration
Modern FCM v1 Setup (OAuth 2.0)
This guide covers the modern Firebase Cloud Messaging v1 API. It uses OAuth 2.0 for secure authentication and provides more features than the deprecated legacy API.
warning
Important
The legacy FCM HTTP API (using Server Keys) is deprecated and will be removed. Always use the Firebase Cloud Messaging HTTP v1 API for all new implementations.
Step 1: Generate Service Account Credentials
-
Access Firebase Console
Go to Firebase Console and select your project.
Navigate to Project Settings (gear icon) → Service accounts tab.
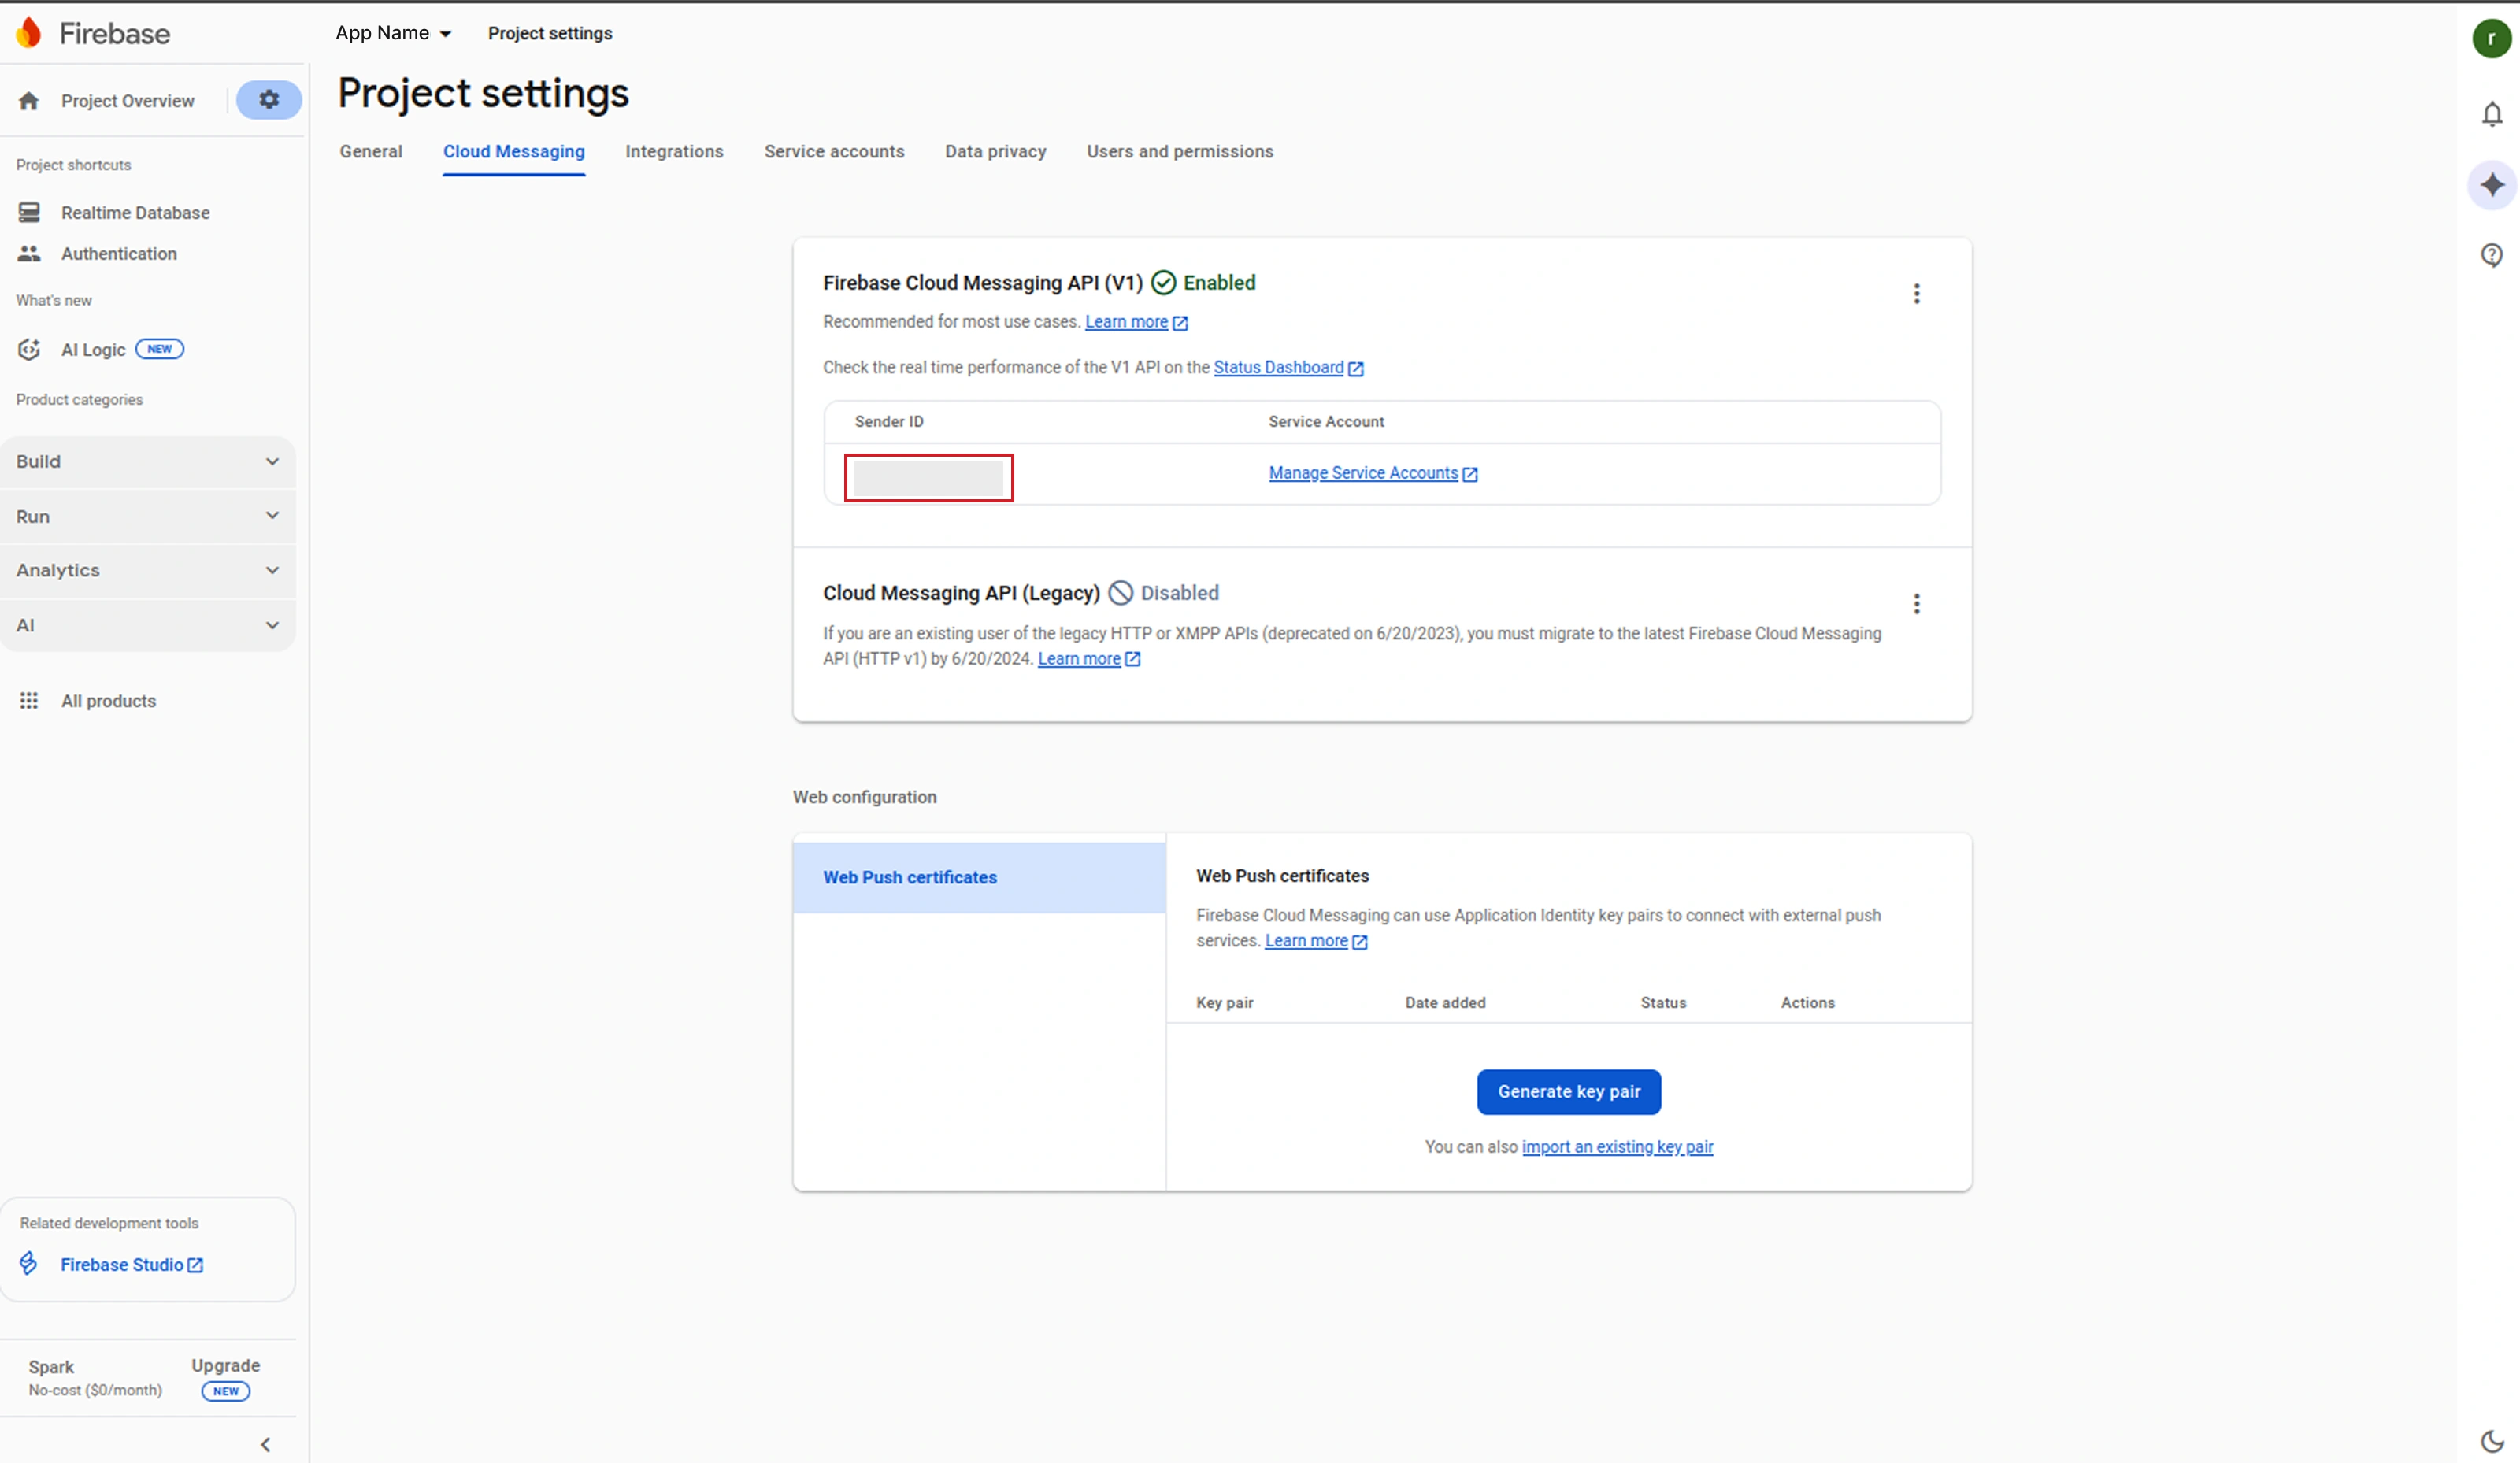
-
Generate a new private key
Click "Generate new private key" in the Firebase Admin SDK section.
Confirm by clicking "Generate key" in the popup.
A JSON file (
your-project-id-firebase-adminsdk.json) will be downloaded automatically. This file contains your service account credentials.shield Security Keep this file secure. It contains sensitive credentials that provide full access to your Firebase services. Never commit this file to a public repository or share it with unauthorized users.
Step 2: Server-Side Configuration
Place the Service Account File
Copy the downloaded JSON file to your project's secure configuration directory:
folder
Recommended Location:
/admin/config/firebase-service-account.json
Configure Environment Variables
Update your backend .env file with the following
configuration:
# Firebase Cloud Messaging v1 Configuration
        FIREBASE_PROJECT_ID=your-project-id
        FCM_DRIVE_PATH=/path/to/firebase-service-account.json
info
Note
The FCM_DRIVE_PATH points to your Firebase Service Account JSON file, and
FIREBASE_PROJECT_ID is your Firebase project identifier, which can be found in the
Firebase Console.
Step 3: Sending Notifications with v1 API
Here's a secure implementation example for sending push notifications using the FCM v1 API with OAuth 2.0 authentication:
// FCM v1 API Notification Sender
        // Uses OAuth 2.0 authentication with service account

        use Google\Cloud\Firestore\FirestoreClient;
        use Google\Cloud\Core\ServiceBuilder;

        // Initialize Firebase with service account
        $firestore = new FirestoreClient([
            'keyFilePath' => env('FCM_DRIVE_PATH'),
            'projectId' => env('FIREBASE_PROJECT_ID')
        ]);

        // Construct the FCM v1 endpoint
        $url = "https://fcm.googleapis.com/v1/projects/" . env('FIREBASE_PROJECT_ID') . "/messages:send";

        // Get OAuth 2.0 access token
        $token = $firestore->getCredentialsFetcher()?->fetchAuthToken();
        $accessToken = $token['access_token'];

        // Construct the notification payload (v1 format)
        $data = [
            "message" => [
                "token" => "device_registration_token_here",
                "notification" => [
                    "title" => "Notification Title",
                    "body" => "Notification Message Body"
                ],
                "data" => [
                    "key1" => "value1",
                    "key2" => "value2"
                ],
                "android" => [
                    "priority" => "high"
                ],
                "apns" => [
                    "headers" => [
                        "apns-priority" => "10"
                    ]
                ]
            ]
        ];

        // Send the notification
        $options = [
            'http' => [
                'header'  => "Authorization: Bearer $accessToken\r\n" .
                              "Content-Type: application/json\r\n",
                'method'  => 'POST',
                'content' => json_encode($data)
            ]
        ];

        $context = stream_context_create($options);
        $result = file_get_contents($url, false, $context);
Troubleshooting
Common Issues:
-
Authentication Failed (401):
Verify the service account JSON file path is correct and the file has proper read permissions. Ensure the project ID matches.
-
Invalid Token (404):
The device registration token may be invalid or expired. Request a new token from the client app.
-
Permission Denied (403):
The service account needs the "Firebase Cloud Messaging Admin" role in IAM settings.
check_circle
Success
The modern FCM HTTP v1 API provides enhanced security, improved reliability, and supports all the latest Firebase Cloud Messaging features.
mail Gmail Configuration
Step-by-Step Configuration
-
Step 1: Access Gmail Account Settings
Log in to your Gmail account and click on your profile picture in the top right corner. Select "Manage your Google Account" from the dropdown menu.
-
Step 2: Enable Security Verification
Navigate to the "Security" tab in the left sidebar.
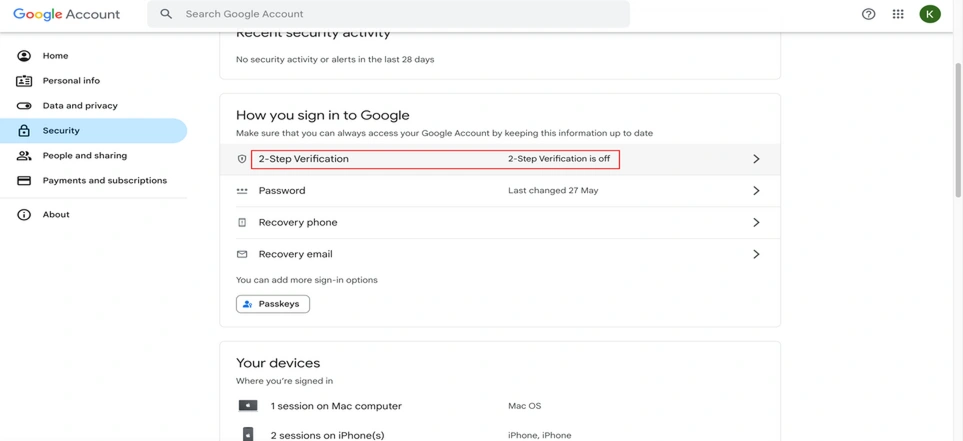
Under "Signing in to Google," enable 2-Step Verification if not already active.
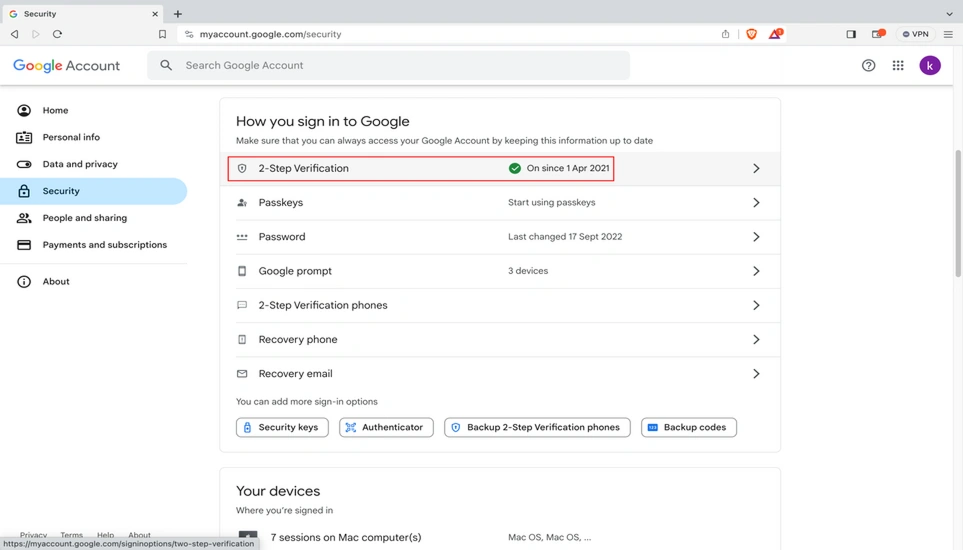 info
infoNote: You must have 2-Step Verification enabled to generate an App Password.
-
Step 3: Generate App Password
While still in the Security section:
-
Find the "App passwords" option (under 2-Step Verification)
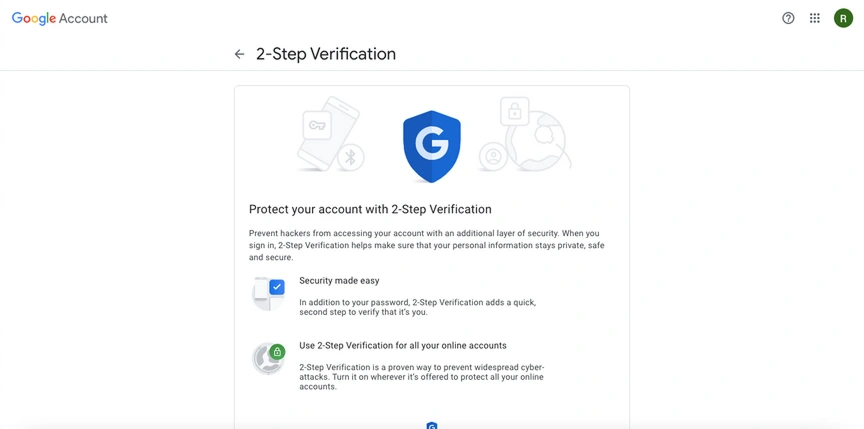
-
Click "create"
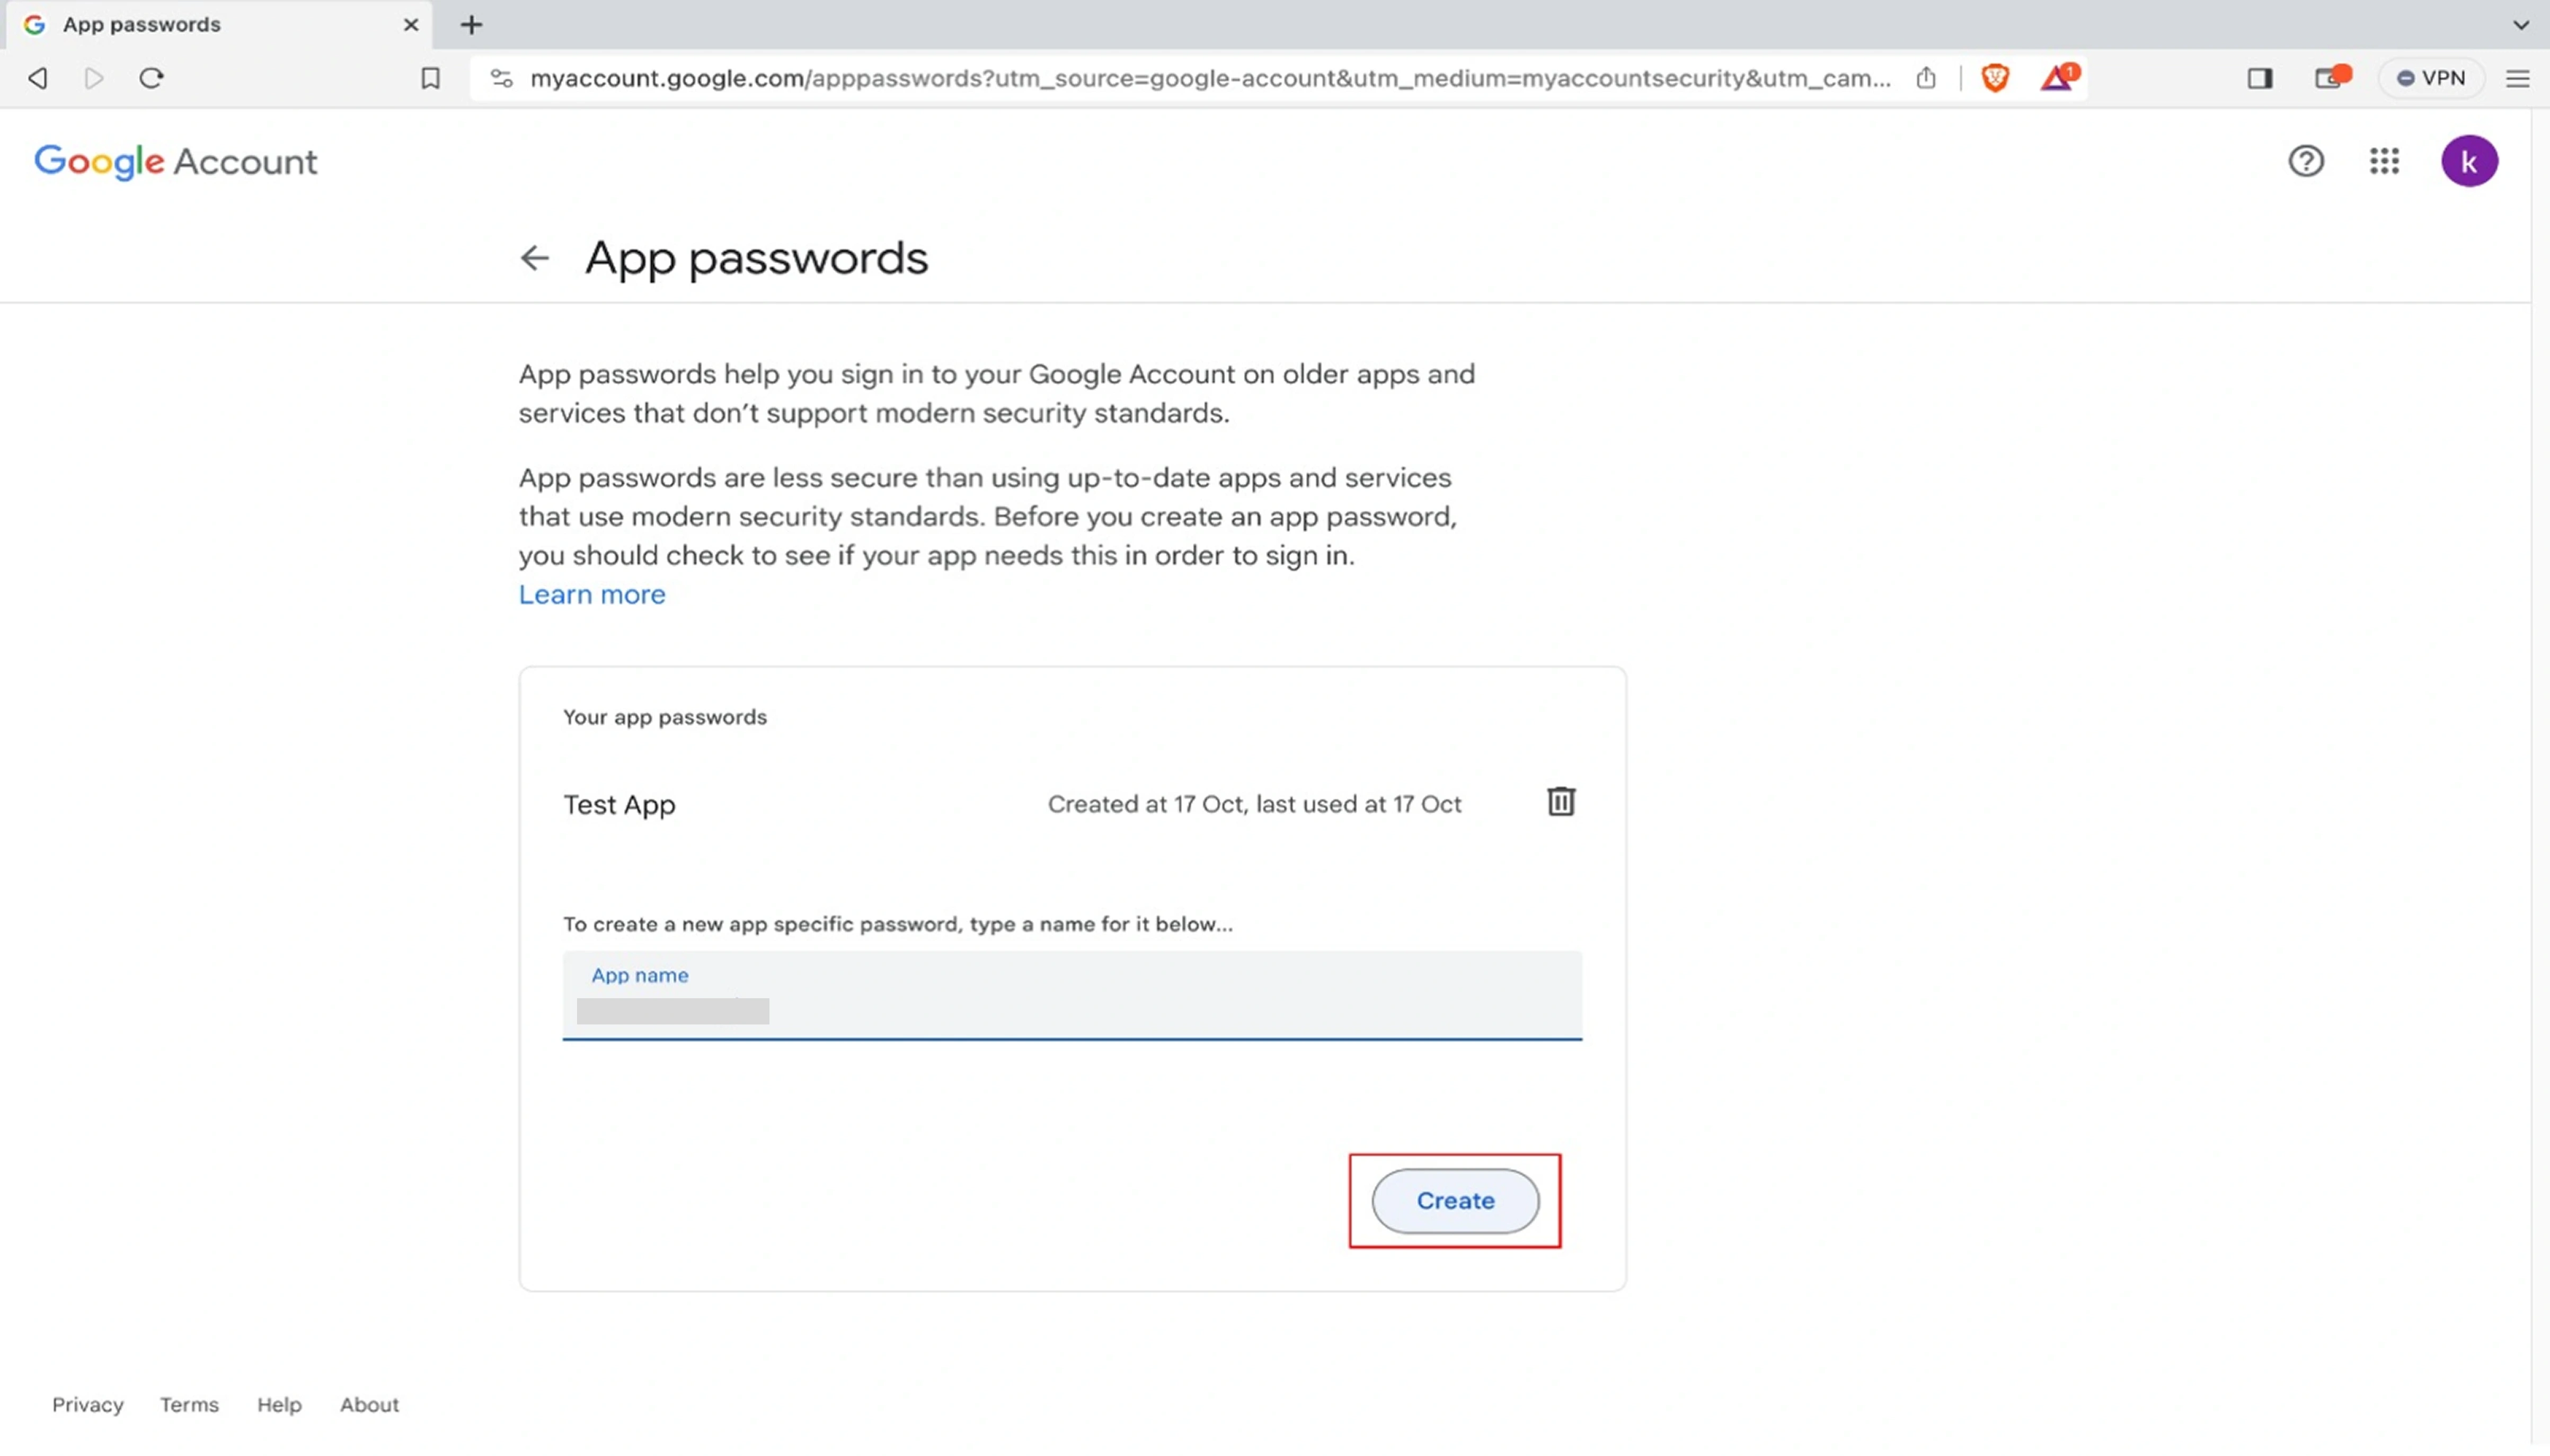
-
Copy the 16-character password shown
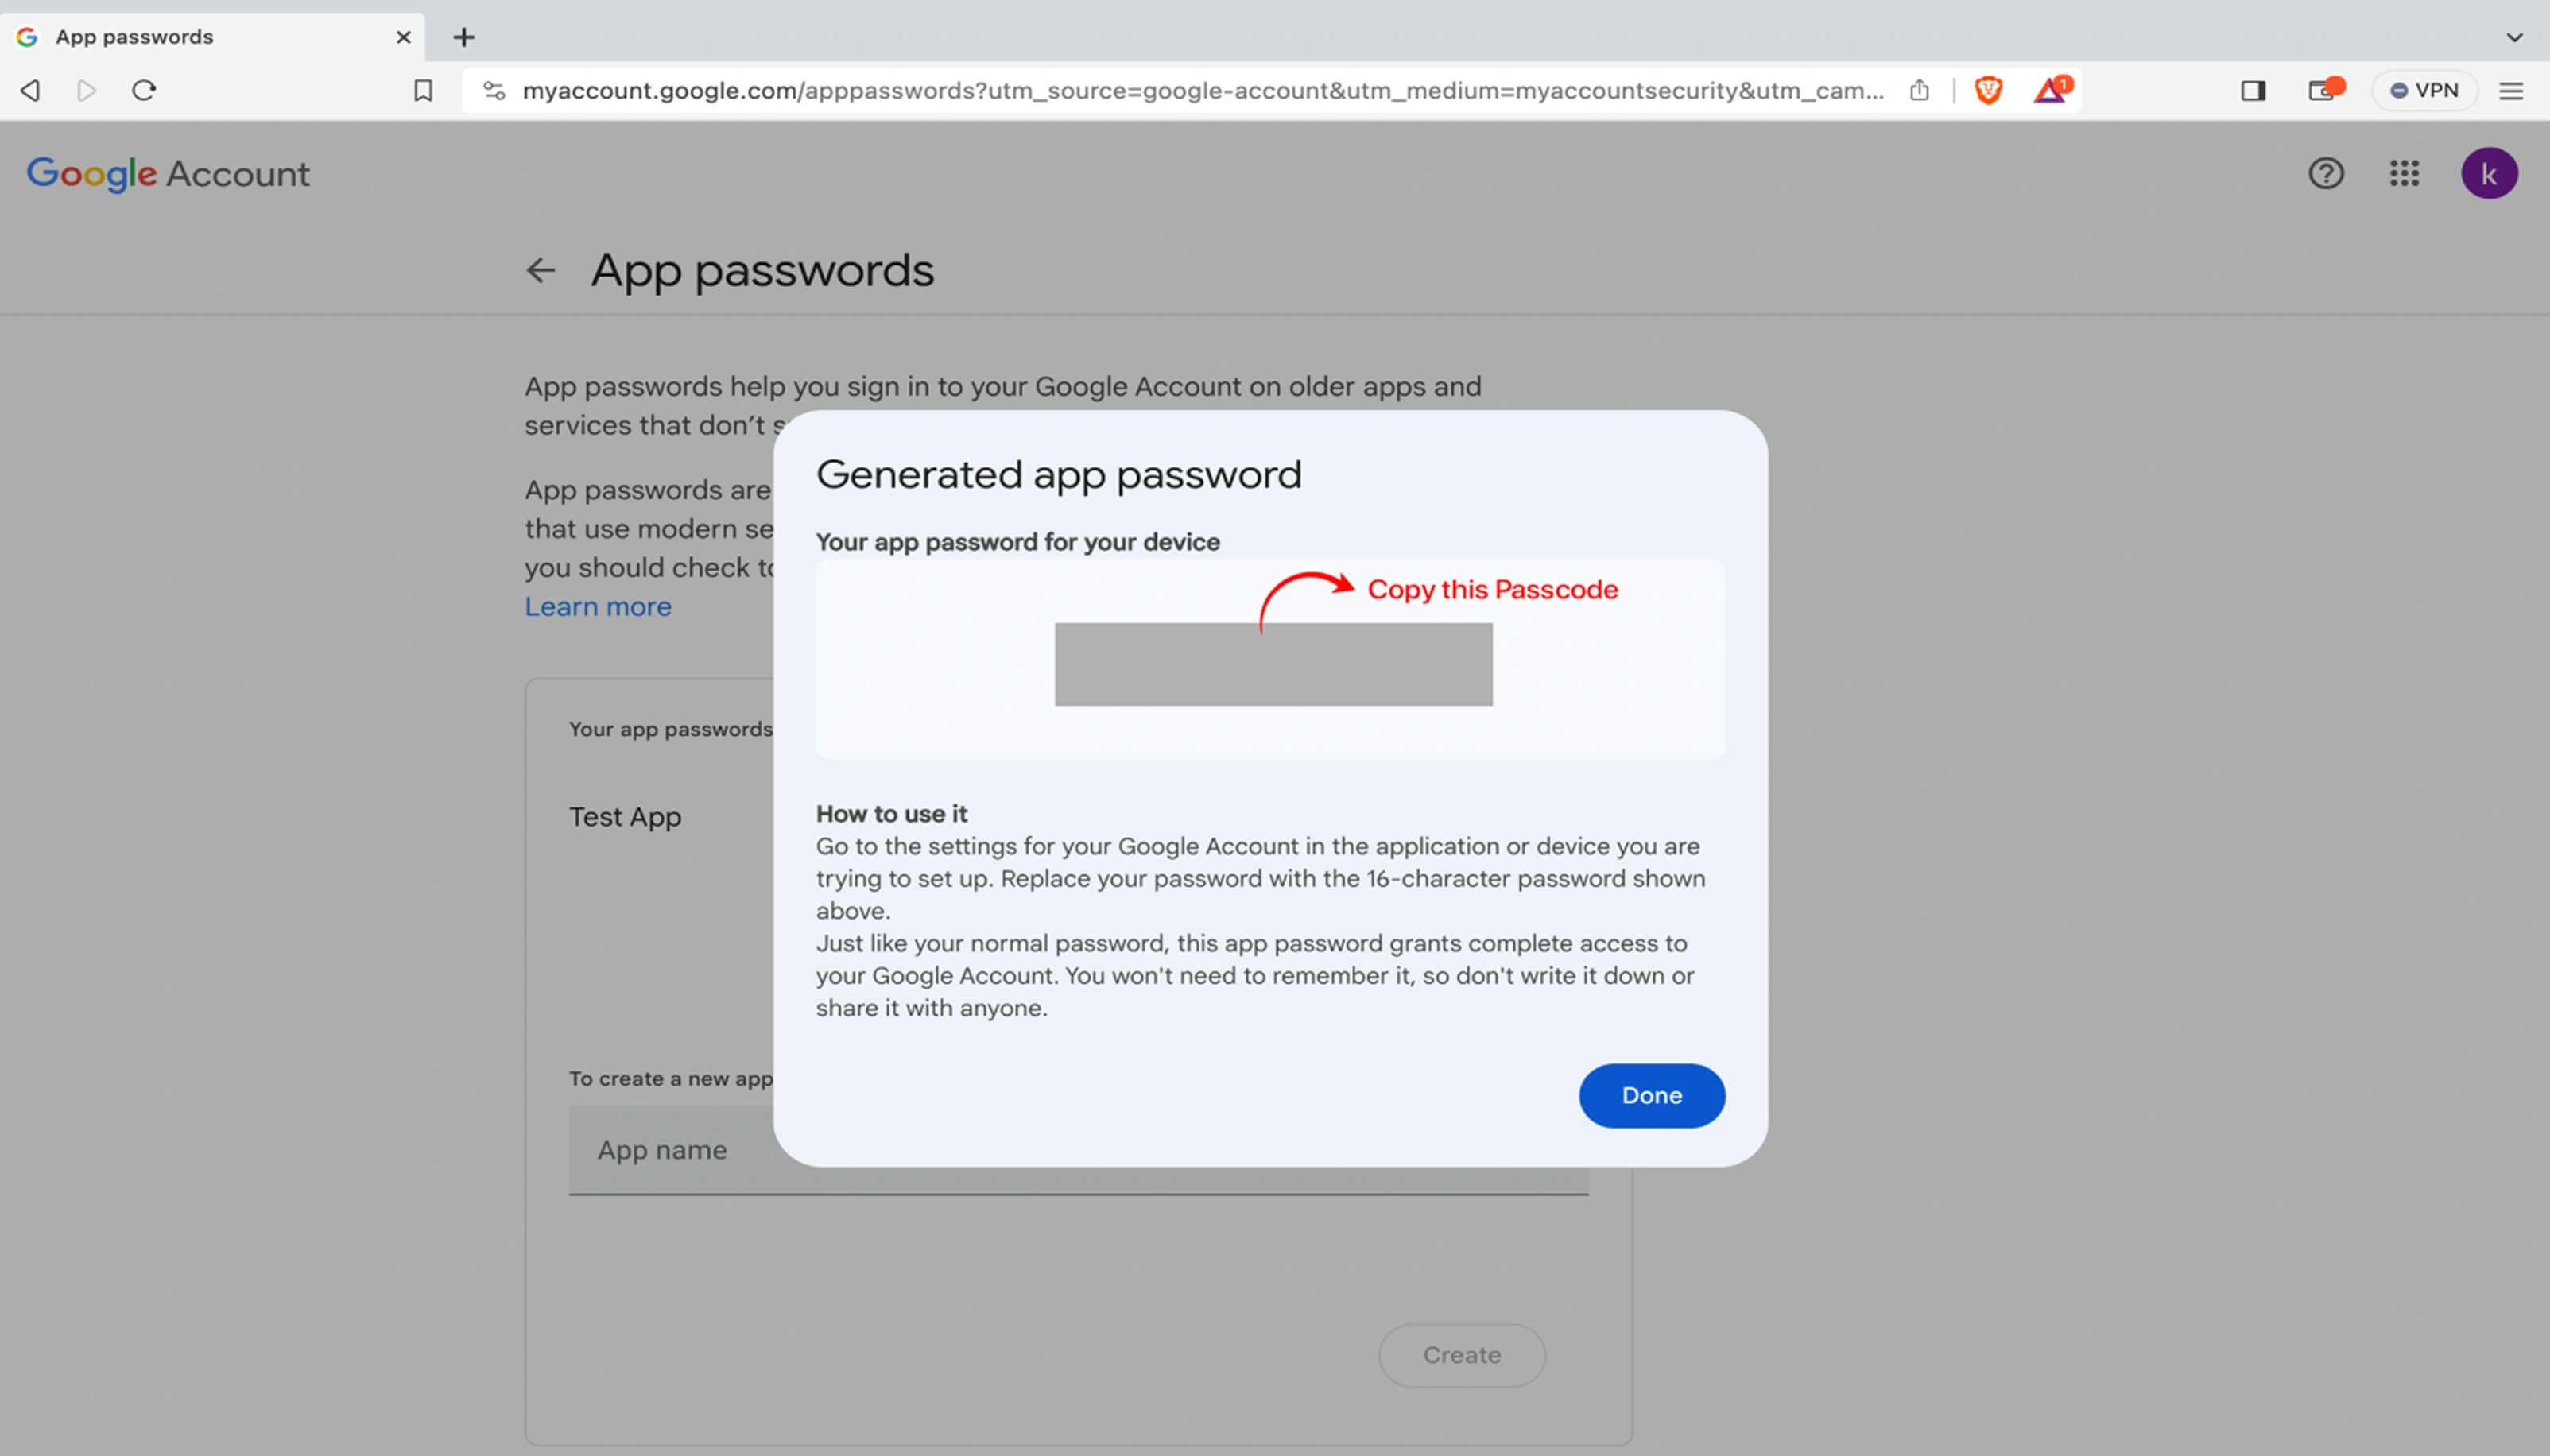
-
.env File Configuration
Add these configurations to your .env file:
MAIL_MAILER=smtp
MAIL_HOST=smtp.gmail.com
MAIL_PORT=587
MAIL_USERNAME=youremail@gmail.com
MAIL_PASSWORD=your_generated_app_password
MAIL_ENCRYPTION=tls
MAIL_FROM_ADDRESS=youremail@gmail.com
MAIL_FROM_NAME="${APP_NAME}"
warning
Important Security Notes:
- Never use your main Gmail password in the .env file
- Always use the generated App Password
- Keep your .env file secure and never commit it to version control
- If compromised, revoke the app password immediately from Google Security settings
Troubleshooting
Common Issues:
-
Authentication Failed:
Verify 2-Step Verification is enabled and you're using an App Password.
-
Connection Timeout:
Check if your server/firewall allows outbound connections on port 587.
-
Daily Limit Exceeded:
Gmail has sending limits (500 emails/day for free accounts).
devices Device Configuration
Application Deployment Guide
info
Advisable: Copy the source files to D: or E: drive rather than C: drive.
Environment Setup
- Connect your device via USB
- Verify connection:
adb devices
Confirm the device appears in the list.
check_circle
Prerequisites
- Android Studio with SDKs installed
- Active emulator/device visible via adb
- Developer options enabled on physical devices
Build & Run Process
- Launch Command Prompt
- Navigate to project directory:
cd D:\CarFindo_customer
- Install project dependencies:
npm install
- Execute the application:
npx react-native run-android
help_outline FAQ & Troubleshooting
Frequently Asked Questions & Troubleshooting
quick_reference Quick Navigation
1. Installation Dependencies
Failed (npm install or composer install)
Cause: Missing or outdated Node.js/PHP version, unstable internet connection, or running commands from the wrong directory.
Solution:
- Ensure Node.js (v20+) and PHP (8.3+) are installed and updated.
- Open terminal inside the project root directory.
- For React website dependencies:
npm install
- For Laravel backend dependencies:
composer install
- If the issue persists:
rm -rf node_modules package-lock.json
npm install
✓ Success
Indicator: After successful installation, you should see a node_modules folder and
vendor folder created.
2. Module Not Found Error (React Website)
Cause: Missing dependencies, incorrect import paths, or incomplete project extraction.
Solution:
- Verify all project files are extracted correctly.
- Check import paths in
resources/js/files. - Reinstall dependencies:
npm install
- Clear Vite cache:
npm run build
3. Firebase Configuration Issues
Cause: Firebase project setup is incomplete or configuration files are missing.
Solution:
- Verify Firebase project settings in Firebase Console.
- For Admin Panel: Place
firebase.jsoninconfig/directory. - For Customer App: Download and configure:
google-services.json(Android)GoogleService-Info.plist(iOS)
- Ensure Firebase Realtime Database is enabled for chat functionality.
- Verify package names and bundle identifiers match Firebase configuration.
💡 Tip: Always download the latest configuration files from Firebase Console. Old files may contain outdated credentials.
4. Environment Variables Not Configured
Cause: Missing or incomplete environment
configuration in .env file.
Solution:
- Copy
.env.exampleto.env. - Configure all required values:
APP_URL=ENTER_YOUR_APP_URL
DB_DATABASE=CarFindo_db
FIREBASE_FILE=ENTER_YOUR_FIREBASE_FILE
MAIL_HOST=ENTER_YOUR_SMTP_HOST
- Run
php artisan optimize:clearafter updating.env. - Restart the Laravel server.
⚠️
Important: Never commit your .env file to version control. It
contains sensitive credentials.
5. Android Device Not Detected
Cause: USB debugging is disabled or device Customers are not installed.
Solution:
- Enable Developer Options on your Android device.
- Enable USB Debugging.
- Connect the device using a supported USB cable.
- Verify detection:
adb devices
- Accept the authorization prompt on the device.
6. Car Listings Not Displaying on Website
Cause: Database connection issues or listing status is incorrect.
Solution:
- Verify database credentials in
.envare correct. - Run
php artisan migrateto ensure tables exist. - Check if listings have Status = Active in Admin Panel → Marketplace → Listings.
- Clear cache:
php artisan optimize:clear. - Check Laravel logs at
storage/logs/laravel.logfor errors.
7. Real-time Chat Not Working
Cause: Firebase Realtime Database configuration issues.
Solution:
- Verify
FIREBASE_DBURL is correct in.env. - Ensure Firebase Realtime Database is enabled in Firebase Console.
- Check database security rules allow read/write.
- Verify the Firebase Service Account has proper permissions.
- For Customer App: Ensure
google-services.json(Android) orGoogleService-Info.plist(iOS) is placed correctly. - Check network connectivity.
8. Payment Gateway Not Working
Cause: Payment credentials are incorrect or payment methods are disabled.
Solution:
- Verify payment gateway credentials in
.env:
RAZORPAY_KEY=ENTER_YOUR_RAZORPAY_KEY
RAZORPAY_SECRET=ENTER_YOUR_RAZORPAY_SECRET
- Confirm gateway status is enabled in Admin Panel → Payment Settings.
- Check configuration under Payments → Payment Types.
- Test using sandbox credentials before going live.
9. Push Notifications Not Working
Cause: Firebase Cloud Messaging (FCM) is not configured properly.
Solution:
- Verify Firebase project configuration.
- Confirm
FIREBASE_FILEandFIREBASE_DBare set in.env. - For Customer App: Ensure
google-services.json(Android) orGoogleService-Info.plist(iOS) is placed correctly. - Ensure notification permissions are granted on the device.
- Test notifications from Admin Panel → Notifications.
- Verify device internet connectivity.
10. OTP Verification Not Received
Cause: SMTP service provider configuration is incomplete or delayed.
Solution:
- Verify SMTP mail settings in
.env:
MAIL_USERNAME=ENTER_YOUR_MAIL_USERNAME
MAIL_PASSWORD=ENTER_YOUR_MAIL_PASSWORD
MAIL_HOST=ENTER_YOUR_SMTP_HOST
- Confirm email address format is correct.
- Check Spam folder.
- Retry OTP after a few minutes.
11. Customer Unable to Login
Cause: Incorrect credentials, inactive account, or account suspension.
Solution:
- Verify registered email address.
- Reset password using the Forgot Password option.
- Ensure account status is active in Admin Panel.
- Verify OTP services are functioning properly.
12. Car Listing Not Appearing After Submission
Cause: Listing status is set to Draft/Pending or admin approval is required.
Solution:
- Login to Admin Panel.
- Navigate to Marketplace → Listings.
- Check if the listing status is Active.
- If status is Pending, approve the listing.
- Verify all required fields are filled correctly.
13. Laravel Admin Panel 500 Error
Cause: PHP version mismatch, missing dependencies, or permission issues.
Solution:
- Verify PHP version is 8.3+.
- Run
composer installto install all dependencies. - Run
php artisan key:generate. - Run
php artisan migrate. - Set proper permissions for
storageandbootstrap/cache. - Check Laravel logs at
storage/logs/laravel.logfor detailed errors.
14. Car Images Not Uploading
Cause: File size exceeds server limits or unsupported file format.
Solution:
- Upload supported image formats (JPG, PNG, WEBP).
- Reduce image size.
- Run
php artisan storage:linkto create symbolic link. - Verify upload permissions on the server.
- Check storage availability.
15. Admin Panel Not Loading After Installation
Cause: Missing configuration, incorrect
.env values, or database connection issues.
Solution:
- Verify
.envconfiguration is complete. - Ensure database credentials are correct.
- Run
php artisan optimize:clear. - Run
php artisan optimize. - Restart the Laravel server:
php artisan serve. - Check Laravel logs for detailed errors.
16. Search Not Returning Results
Cause: Search index issues or database connection problems.
Solution:
- Verify database is connected and populated.
- Check if listings are Active.
- Run
php artisan optimize:clearto clear cache. - Check if search filters are configured correctly.
- Verify brand, model, and category data exists.
17.Seller Verification Request Pending
Cause:Seller account is awaiting administrator approval.
Solution:
- Login to Admin Panel.
- Navigate to Trust & Certification → Verification Requests.
- Review uploaded documents (Business, GST, License).
- Approve or reject the verification request.
- TheSeller will receive a notification after approval.
18. Customer App Not Building on Android/iOS
Cause: Missing dependencies or configuration issues.
Solution:
- Run
npm installto install all dependencies. - For Android: Ensure
google-services.jsonis inandroid/app/. - For iOS: Run
pod installinios/folder. - Clear build cache:
npx react-native-clean-project. - Check if
API_URLinsrc/config/const.jsis correct.
19. Website Customization Changes Not Reflecting
Cause: Cache issues or incorrect settings in Admin Panel.
Solution:
- Clear browser cache or use Incognito/Private mode.
- Clear Laravel cache:
php artisan optimize:clear. - Verify the setting was saved in Admin Panel.
- For theme color: Ensure you're using a valid Hex color code (e.g.,
#4032ae). - For images: Ensure uploaded images are in supported formats (JPG, PNG, WEBP).
- Run
php artisan storage:linkif images are not displaying. - Check if
APP_URLin.envmatches your domain.
💡 Tip: After
making changes in the Admin Panel, use php artisan optimize:clear and
php artisan optimize to ensure all caches are cleared.
20. Newsletter Subscribers Not Receiving Emails
Cause: SMTP configuration issues or queued jobs not running.
Solution:
- Verify SMTP settings in
.envare correct. - Check if subscribers are Active in Admin Panel → Marketing → Newsletter Subscribers.
- Ensure queue worker is running:
php artisan queue:work. - Check campaign status in Admin Panel → Marketing → Newsletter Campaigns.
- Verify email content and subject are not empty.
21. Social Media Links in Footer Not Working
Cause: Invalid URLs or missing social media links in Website Settings.
Solution:
- Go to Admin Panel → Dashboard → Website Settings.
- Verify the social media URLs are correct (e.g.,
https://facebook.com/yourpage). - Ensure the URLs are full URLs including
https://. - Clear cache after updating:
php artisan optimize:clear. - Check if the social media platforms are enabled and active.
22. Vehicle History or Inspection Report Not Showing
Cause: Data not added or status is not verified.
Solution:
- Login to Admin Panel.
- Navigate to Trust & Certification → Vehicle History or Inspection Reports.
- Add or verify the report for the specific listing.
- Ensure the report status is Verified.
- Check if the listing is Active.
23. Blog Posts Not Appearing on Website
Cause: Blog post status is Draft or unpublished.
Solution:
- Login to Admin Panel.
- Navigate to Content → Blog Posts.
- Check if the post status is Published.
- Verify Publish Date is not in the future.
- Clear cache:
php artisan optimize:clear.
support_agent Need Additional Help?
If you encounter any issues that are not covered in this documentation, please contact our support team.
Support Email:
Support Hours:
Monday – Friday
Response Time: Within 24–48 Business Hours
Please include the following information when
contacting support:
- Purchase Code
- Application Version
- Server Information (PHP version, OS, etc.)
- Error Screenshot (if available)
- Detailed Issue Description
This will help us provide faster and more accurate assistance.
support_agent Contact Us
support_agent
Need Help?
If you encounter an error that is not listed above, please feel free to contact our support team for further assistance. We’re here to help.
Custom Development Services
If you need any custom work, additional features, or modifications to this application, our team is ready to help you build and scale your project efficiently.
What We Can Help With
code
Custom feature development based on your business needs
palette
UI/UX design improvements and branding customization
integration_instructions
Third-party API integrations (payment, SMS, maps, etc.)
speed
Performance optimization and scalability improvements
cloud_upload
Full project setup and deployment assistance
rocket_launch
Building large-scale applications from scratch
Hire Us
You can hire our development team for complete project development, from idea to deployment, including frontend, backend, and server setup.
call
Phone Number
+91 9150 441 443
language
Website
https://menpanitech.com/
mail
Email
sales@menpanitech.com
info
Important Note
Custom development services may involve additional cost and timeline depending on the scope and complexity of the project.
We’re happy to collaborate and bring your ideas to life